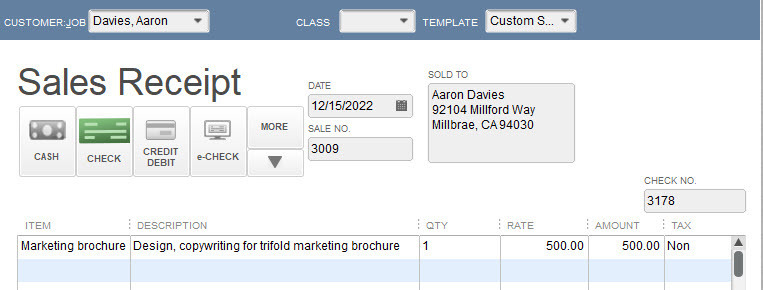
Now, more than ever, you need QuickBooks to track what needs to be done.
COVID-19 has transformed the entire U.S. small business landscape in just a few short months. Companies are struggling to stay afloat. We all just want to get back to “normal,” but it’s unclear when that will happen.
We’d like to help you as much as possible during these uncertain times. One of the ways we can do that is by supporting you as you keep a close watch on your income and expenses. QuickBooks is our go-to tool for that purpose, and we hope you’re making the best possible use of the software right now.
There are steps you can take to ensure that QuickBooks is working quickly and well for you, and that you’re attending to the work you must do every day. The software’s Reminders and Calendar can help you stay current with your accounting.
Setting Up Reminders
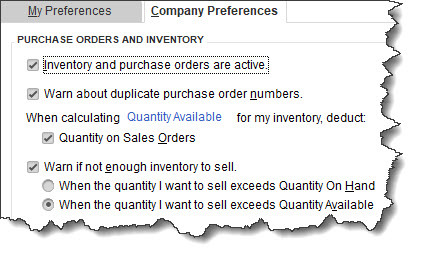
You don’t want to let anything slip through the cracks right now. It’s nearly impossible to keep up with your QuickBooks tasks without using the software’s Reminders feature. Before you start using this, you’ll have to set up its structure. Open the Edit menu and select Preferences | Reminders. This window will open:

You can tell QuickBooks which situations should trigger Reminders.
This window should open to the My Preferences screen. Click the box in front of Show Reminders List when opening a Company file to create a checkmark. Then click Company Preferences. You’ll see a list of QuickBooks “events,” like Checks to Print. You can tell QuickBooks how many days in advance you’d like to be warned about this pending activity by entering a number in the box in front of days before check date. You can also request that this appear in either Summary or List form. If you don’t want to be notified about any of them, click the button below Don’t Remind Me. When you’re done here, click OK.
The next time you open QuickBooks, your reminders will appear in a window on top of your home page. When you double-click on one, the transaction or other item will open. Two icons in the upper right of the Reminders screen open your Preferences and a blank To Do form. Here, you can schedule a call, task, appointment, etc. and associate it with a customer, vendor, or employee if desired. This item will then appear in your Reminders list.

The Reminders window appears when you open the related Company file; you can add To Do’s manually.
A Graphical View
QuickBooks’ Reminders are not the only way you can ensure that you’re meeting your accounting obligations. You can use the Calendar to see what you’ve scheduled and accomplished every day.
As you did with Reminders, though, you should visit this tool’s Preferences page (Edit | Preferences | Calendar). Here, you’ll only need to work with the options under the My Preferences tab. You can choose from among a Daily, Weekly, or Monthly view, or just have QuickBooks Remember last view. Your calendar can display your choice of a Weekly view: a Fixed view of 5 or 7 days or a Variable view of 5/7 days. And, you can show All Transactions, To Do, Transactions Due, or choose one type of transaction (Invoice, Sales Receipt, Bill, etc.).

How would you like your Calendar displayed? QuickBooks lets you choose from among options.
You can also define Upcoming and Past Due Settings. You can Hide or Show these, Show only if data exists, or remember the last settings. QuickBooks allows you to choose the number of days’ worth of data that will be displayed for both Upcoming data and Past due data.
You can open the Calendar itself from the Company menu and by clicking a link in the Toolbar or on the Home Page. You’ll see a graphical calendar in the View you selected. Every day where there’s been—or is scheduled to be—activity will say either Due or Entered, with the corresponding number of transactions in parentheses. Below that is a list of Transactions Entered; you can double-click on any of them to see the actual transaction form.
A list of upcoming and past due transactions appears in the right vertical pane. Fields and buttons at the top of the screen allow you to change the View and limit the list to a specified type of transaction. You can also add To Do’s from this page.
We hope these tools are helpful for you as you navigate through today’s choppy financial waters. Please do let us know if we can assist you in managing your company’s critical accounting tasks. We want you to keep your business going as best you can until we get to the other side of the ongoing crisis.