Businessperson using laptop with QuickBooks Online dashboard, showing graphs and financial data for small business optimization

7 Essential QuickBooks Online Tips for Small Businesses in 2024

Are you a small business owner who recently switched to QuickBooks Online? You’re in the right place! This guide will walk you through 7 game-changing QuickBooks Online tips to supercharge your accounting in 2024. Whether you’re new to cloud accounting or looking to optimize your QuickBooks experience, these strategies will help you save time, reduce errors, and gain deeper insights into your business finances.

1. Customize Your QuickBooks Online Dashboard for Efficiency

Your QuickBooks Online dashboard is more than just a pretty interface – it’s your financial command center. Here’s how to make it work harder for you:

  • Select key performance indicators (KPIs) that matter most to your business
  • Arrange dashboard elements for quick access to frequently used features
  • Set up custom alerts for critical financial tasks

Pro Tip: Review and adjust your dashboard quarterly to ensure it always reflects your current business priorities.

2. Automate Your Bookkeeping with Bank Feeds and Rules

Say goodbye to manual data entry! QuickBooks Online’s bank feed feature is a time-saving powerhouse:

  • Connect your business bank accounts and credit cards directly to QuickBooks Online
  • Create smart rules to automatically categorize recurring transactions
  • Schedule weekly reconciliations to keep your books accurate and up-to-date

Did You Know? Businesses using automated bank feeds report up to 70% time savings on bookkeeping tasks.

3. Harness the Power of QuickBooks Online Mobile App

In today’s fast-paced business world, managing your finances on-the-go is crucial. The QuickBooks Online mobile app puts your business financials at your fingertips:

  • Capture and categorize receipts instantly with your smartphone camera
  • Create and send professional invoices from anywhere, anytime
  • Access real-time financial reports between client meetings

Mobile Tip: Enable push notifications to stay alerted about important financial updates, even when you’re away from your desk.

4. Expand Functionality with QuickBooks Online App Integrations

QuickBooks Online isn’t just accounting software – it’s a robust ecosystem of business tools:

  • Explore the QuickBooks App Store for industry-specific solutions
  • Popular integrations include TSheets for time tracking and Bill.com for accounts payable
  • Always prioritize data security when connecting third-party apps

Integration Insight: On average, businesses using integrated apps with QuickBooks Online report a 18% increase in productivity.

5. Master Advanced Reporting for Data-Driven Decisions

Unlock the full potential of your financial data with QuickBooks Online’s advanced reporting features:

  • Create custom reports tailored to your specific business needs
  • Schedule automated report delivery to key stakeholders
  • Utilize class and location tracking for granular financial analysis

Reporting Recommendation: Start with the “Company Snapshot” report for a quick overview of your business’s financial health.

6. Streamline Project Management and Billing

For service-based businesses, QuickBooks Online’s Projects feature is a game-changer:

  • Track time, expenses, and profitability for each client project
  • Generate project-specific financial reports with a few clicks
  • Create accurate invoices directly from project dashboards

Project Pro Tip: Use project tags to easily filter and analyze data across multiple projects.

7. Implement a QuickBooks Online Maintenance Routine

Keep your QuickBooks Online running smoothly with these best practices:

  • Conduct a monthly review and cleanup of your chart of accounts
  • Regularly update and categorize transactions
  • Perform quarterly data backups for peace of mind

Maintenance Mantra: “A stitch in time saves nine” – regular maintenance prevents major headaches down the road.

Conclusion: Elevate Your Business with QuickBooks Online

Mastering these 7 QuickBooks Online tips will transform your financial management in 2024. From automating tedious tasks to gaining deeper business insights, QuickBooks Online is more than just accounting software – it’s a powerful tool for business growth.

Ready to take your QuickBooks Online skills to the next level? Emerald Consulting Inc. offers personalized QuickBooks Online training and support. Contact us today to schedule a consultation and unlock the full potential of your business finances!

Financial advisor analyzing data on a tablet with QuickBooks Online charts, in a well-organized office setting.

7 Key Practices for Maximizing QuickBooks

Emerald Consulting is thrilled to share a comprehensive guide on the “7 Key Practices for Maximizing QuickBooks Online” with our valued clients and readers. As a leading accounting solution, QuickBooks Online brings a wealth of features to enhance your financial management. Our guide explores how to leverage QuickBooks Online for optimal efficiency and insight.

1. Customize for Clarity and Insight

QuickBooks Online offers advanced customization for invoices, reports, and sales receipts. By tailoring these to your business needs, you can improve clarity and gain valuable insights. Remember, integrating your logo and branding is key to professionalism and consistency.

2. Ensure Accuracy with Regular Reconciliation

Monthly reconciliation of bank and credit card accounts is crucial. This practice ensures your records are accurate, helping prevent fraud and discrepancies. Indeed, keeping your financials current is foundational for trustworthy management.

3. Embrace Cloud-Based Flexibility

With cloud storage, access your financial data anywhere, anytime. This flexibility is invaluable for remote work and staying informed about your financial status. It’s a core advantage for businesses aiming to maximize QuickBooks Online.

4. Streamline Through Automation

Automate recurring invoices and bill payments to save time and avoid missed payments. Automation supports steady cash flow and strong vendor relationships, essential for operational continuity.

5. Utilize Comprehensive Reporting

QuickBooks Online’s reporting tools allow for in-depth financial analysis. Regularly reviewing profit and loss statements and balance sheets is vital for data-driven decision-making. This practice is key to understanding your financial health.

6. Boost Efficiency with App Integration

Integrating with business apps can streamline operations. Identify apps that fit your business model, like CRM systems, to enhance financial and customer relationship management. This strategic approach can amplify QuickBooks Online’s benefits.

7. Commit to Comprehensive Training

Invest in training for you and your team. A deep understanding of QuickBooks Online’s features enables effective utilization. Tailored training meets your unique business needs, driving success.

Conclusion

Adopting these 7 practices can transform your financial management and operational efficiency. Emerald Consulting is committed to providing our clients with the tools and insights for financial mastery. With QuickBooks Online, you have a powerful ally in achieving your business goals.

The Benefits of Using QuickBooks for Freelancers and Independent Contractors

Being a freelancer or an independent contractor can be both rewarding and challenging. You have the freedom to work on your terms, but managing finances and keeping track of income and expenses can be a real headache. That’s where QuickBooks comes to the rescue! In this blog, we’ll explore the benefits of using QuickBooks for freelancers and independent contractors in simple terms.

  1. Easy Expense Tracking: QuickBooks simplifies tracking your business expenses. You can easily snap pictures of receipts and categorize expenses. This makes tax time a breeze, helping you save money on taxes by ensuring you don’t miss any deductions.
  2. Invoice Management: With QuickBooks, creating and sending professional invoices is a cinch. You can set up recurring invoices for regular clients, saving you time and ensuring you get paid promptly.
  3. Income Management: Keep tabs on your earnings effortlessly. QuickBooks automatically records your income, making it easy to see your cash flow and plan for the future.
  4. Tax Time Made Simple: Freelancers dread tax season, but QuickBooks can turn it into a stress-free experience. It tracks your income and expenses throughout the year, making it easy to generate accurate tax reports and even estimate your quarterly tax payments.
  5. Financial Insights: QuickBooks provides insightful reports that help you understand your financial health. You can see your profit and loss, track expenses over time, and identify areas where you can save money.
  6. Time Savings: Instead of spending hours on manual bookkeeping, QuickBooks automates many tasks. This means more time for you to focus on your work or enjoy your free time.
  7. Accessibility: QuickBooks can be accessed from anywhere with an internet connection. Whether you’re on a computer or a mobile device, you can check your financial information on the go.
  8. Simplified Collaboration: If you have an accountant or need to collaborate with others, QuickBooks allows for seamless collaboration. You can share access to your books without sharing sensitive information.
  9. Budgeting and Planning: QuickBooks helps you set budgets and track your progress. This can be incredibly useful for freelancers looking to manage their finances more effectively.
  10. Customer Support: QuickBooks offers customer support to assist you with any questions or issues. You’re not alone in managing your finances.

In conclusion, QuickBooks is a game-changer for freelancers and independent contractors. It simplifies financial management, saves time, and provides valuable insights into your business’s financial health. Plus, it can make tax season a lot less daunting. So, if you’re looking for an easy and efficient way to manage your finances, give QuickBooks a try – you won’t be disappointed!

Advanced QuickBooks® Features Every Business Should Know

QuickBooks has become one of the most popular accounting software options for small to mid-sized businesses. While most users are familiar with its basic features like invoicing, tracking sales, and managing expenses, there are several advanced features that can provide businesses with even more insights and efficiencies. Here’s a look at some of these advanced capabilities:

1. Advanced Reporting

QuickBooks Advanced Reporting feature allows users to access and customize reports to fit specific needs, ensuring you have the right data to make informed decisions. You can also pull from QuickBooks’ rich database to create intricate, tailored reports.

2.Batch Transactions

Need to enter multiple invoices, bills, or checks? Rather than doing them one by one, use the Batch Enter Transactions tool. This feature can save a lot of time, especially for businesses with voluminous transactions.

3. Inventory Tracking

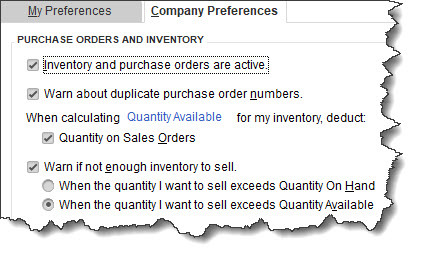
QuickBooks can track products, cost of goods, and receive notifications when inventory is low. The Advanced Inventory feature (available in QuickBooks Desktop Enterprise) allows for barcode scanning, FIFO costing, and multiple location tracking.

4. Custom User Permissions

Businesses can customize the level of access for different users. This ensures that employees only access features or data relevant to their role, enhancing data security.

5.Online Banking Integration

QuickBooks can automatically download and categorize bank and credit card transactions, cutting down manual entry and ensuring accurate, up-to-date records.

6.Recurring Transactions

If you have regular bills or invoices, set them up as recurring transactions. This feature ensures timely billing and can automate certain financial tasks.

7. Job Costing

This feature allows businesses to track project profitability. By allocating expenses to specific jobs or projects, companies can get a clear picture of where they are making or losing money.

8. Class and Location Tracking

Companies with multiple departments or locations can track income and expenses for each segment, providing more granular financial insights.

9.Delayed Charges and Billing

You can enter charges to be billed to a client at a later date. This ensures you don’t forget to invoice for any item or service provided.

10.Income Tracker

 Get an instant view of your income-related transactions in one place. This includes overdue invoices and those that are due soon.

11.Document Attachment

Attach contracts, receipts, and other documents directly to invoices, bills, or other transactions. This makes record-keeping streamlined and ensures important documents are always at hand.

12. Lead Center

Manage potential customers separately from your regular clientele. Once they become paying customers, easily convert leads to customers in the system.

13. Automated Online Data Backup

Data loss can be devastating. QuickBooks provides automated data backup, ensuring that all your crucial financial data is safe and retrievable.

Conclusion

While QuickBooks is known for its user-friendly interface and basic accounting capabilities, diving deeper into its advanced features can unveil a treasure of tools that can help businesses streamline operations, gain better financial insights, and grow more efficiently. Embracing these advanced features can be a game-changer for many businesses. Whether you’re new to QuickBooks or a seasoned user, consider exploring these functionalities to make the most out of your accounting software.

How QuickBooks© Online Helps You Track Mileage

With gas prices so high, you need to track your travel costs as closely as possible. Consider getting a tax deduction for your business mileage.

If you drive even a little for business, it’s easy to let mileage costs slide. After all, it’s a pain to keep track of your tax-deductible mileage in a little notebook and do all the calculations required. If you do rack up a lot of business miles, you probably forget to track some trips and end up losing money.

QuickBooks Online offers a much better way. Its Mileage tools include simple fill-in-the-blank records that allow you to document individual trips. You can either enter the starting point and destination and let the site calculate your mileage and deduction or enter the number of miles yourself.

If you use QuickBooks Online’s mobile app, it can track your miles automatically as you drive (as long as you have the correct settings turned on). Here’s a look at how all of this works.

Setting Up 

To get started, click the Mileage link in QuickBooks Online’s toolbar. The screen that opens will eventually display a table that contains information about your trips, but you need to do a little setup first. Click the down arrow next to Add Trip in the upper right corner and select Manage vehicles. A panel will slide out from the right. Click Add vehicle.

A picture containing text

Description automatically generated

You’ll need to supply information about your vehicles before you can start entering trips.

You’ll need to supply the vehicle’s year, make, and model. Do you own or lease it, and on what date was the vehicle purchased or leased and put into service? Do you want to have your annual mileage calculated by entering odometer readings or have QuickBooks Online track your business miles driven automatically? When you’re done making your selections and entering data, click Save.

Entering Trip Data

You can download trips as CSV files or import them from Mile IQ, but you’re probably more likely to enter them manually. Click Add Trip in the upper right corner. In the pane that opens, you’ll enter the date of the trip and either the total miles or start and end point. You’ll select the business purpose and vehicle and indicate whether it was a round trip. When you’re done, click Save. The trip will appear in the table on the opening screen, and your current possible total deduction will be in the upper left corner, along with your total business miles and total miles.

If you want to designate a trip as personal, click the box in front of the trip in that table. In the black horizontal box that appears, click the icon that looks like a little person, then click Apply. Now, the trip will appear in the Personal column and will not count toward your business tax-deductible mileage. 

Graphical user interface, text, application

Description automatically generated

When you select a trip in the Mileage table, you can mark it as personal so it’s not included in your business tax-deductible miles.

Personal Trips Can Count, Too

If you use your vehicle(s) for personal as well as business purposes, tracking some of those miles can also mean a tax deduction. For tax year 2022, you can deduct 18 cents per mile for your travel to and from medical appointments. Note: Medical mileage is only deductible if medical exceeds a certain percent of AGI. Be sure to check with the IRS yearly tax code, as they update the mileage amounts annually.

And if you do volunteer work for a qualified charitable organization, the miles you drive in service of it can be deducted at the rate of 14 cents per mile. You can also claim the cost of parking and tolls, as long as you weren’t reimbursed for any of these expenses. Obviously, the IRS wants you to keep careful records of your charitable mileage, and QuickBooks Online can provide them.

QuickBooks Online doesn’t track these deductions, but you’ll at least have a record of the miles driven.

Auto-Track Your Miles

The easiest way to track your mileage in QuickBooks Online is by using its mobile app. You can launch this and have it record your mileage automatically as you’re driving. Versions are available for both Android and iOS, and they’re different from each other. They also have more features than the browser-based version of QuickBooks Online, like maps, rules, and easier designation of trips as business or personal.

Graphical user interface, application

Description automatically generated

The iOS version of Mileage in the QuickBooks Online app

In both versions, you’ll need to click the menu in the lower right corner after you’ve opened the QuickBooks Online app and select Mileage. Make sure Auto-Tracking is turned on. Your phone’s location services tool must be turned on, too. There are other settings that vary between the two operating systems. You can search the help system of either app to make sure you get your settings correct if the onscreen instructions aren’t clear enough.

Of course, you won’t see the fruits of your mileage deductions until you file your 2022 taxes. But you can factor these savings in as you’re doing your tax planning during the year. Please let us help if you’re having any trouble with QuickBooks Online’s Mileage tools, or if you have questions with other elements of the site.

With gas prices so high, you need to track your travel costs as closely as possible. Consider getting a tax deduction for your business mileage.

Hiring An Independent Contractor? How QuickBooks Online Can Help

Are you taking on a worker who’s not an employee? QuickBooks Online includes tools for tracking and paying independent contractors.

The COVID-19 pandemic created millions of self-employed individuals and small businesses. Whether they chose to, or circumstances forced them to, these new entrepreneurs had to learn new ways to get paid and to prepare their income taxes.

If you’re thinking about taking on a contract worker, you, too, will have to educate yourself on the paperwork and processes required to comply with the IRS’ rules for his or her compensation. It’s much easier than hiring a full-time employee, but it still takes some knowledge of how QuickBooks Online handles these individuals.

You’ll also need to make certain that the person you’re hiring is indeed an independent contractor and not an employee. The IRS takes this distinction very seriously. If you’re at all unsure of your new hire’s employment status, we can help you sort it out.

Creating Records for Contractors

Once new contractors have accepted your offer, you’ll need to have then fill out an IRS Form W-9. You can download a copy here. Employees complete the more detailed Form W-4 so that the employer can withhold income taxes correctly, but you won’t have to withhold taxes for your contract workers. They will be responsible for calculating and paying quarterly estimated taxes and filing an IRS Form 1040 every year. 

You, though, will be responsible for sending them an IRS Form 1099-NEC (Non-Employee Compensation) every January if you paid them more than $600 during the previous year. You do not need to send a 1099-NEC to a corporation or to an LLC that is treated as a C Corp or an S Corp. 

Graphical user interface, text, application

Description automatically generated

You can complete the Vendor Information window for each independent contractor, checking the box in front of Track payments for 1099.

Using the information the contractors provide, you can create records for them in QuickBooks Online. If you don’t have a QuickBooks Payroll subscription, you can set them up as 1099 vendors. Click the Expenses tab in the toolbar and then on the Vendors tab. Click New vendor in the upper right to open the Vendor Information window. Complete the fields for the worker and be sure to check the box in front of Track payments for 1099, as shown in the partial image above.

The vendor records you create will appear in QuickBooks Online’s Vendors list (again, Expenses | Vendors). Click on one to open it. You can toggle between two tabs here. The first, Transaction List, will eventually display all your financial dealings with that contractor. Vendor Details opens the record you just created, which you can edit from this screen.

Paying Contractors

When independent contractors send you invoices, you’ll return to this same screen. There are three ways you can pay them. Click the down arrow next to New Transaction in the upper right corner to see your options (or look down at the end of the row while you’re in list view). You can record the debt as a Bill if you want to pay it later (or if that’s the way you structure your recordkeeping). If you’re paying it right away, you can create an Expense or write a Check

Graphical user interface, text, application, chat or text message

Description automatically generated

You can choose an option from this vendor action menu to pay your independent contractors.

When you click one of these, QuickBooks Online opens a form with many of the contractors’ details already filled in. You’ll need to complete any additional fields at the top of the screen, and then either record the payment or debt under Category details or Item details, depending on how you do your bookkeeping. Either way, you’ll be able to enter the quantity and rate and/or amount and mark it billable (with a markup percentage, if you’d like) to a customer or project.

You’re probably going to want our help here, since there’s more than one way to pay independent contractors. If you subscribe to QuickBooks Payroll, you can use the service’s contractor features, which include the ability to invite your contractors to fill out their own records in QuickBooks Online. You may also want to add an account to your Chart of Accounts, and we’d want to offer guidance there. And you need to ensure that you’re classifying payments correctly, so they’ll appear in 1099 reports and 1099s themselves.

Creating records for independent contractors and paying these individuals seem like they should be simple operations. But anytime you’re dealing with payroll issues, you’re dealing with peoples’ livelihoods – and the IRS. We strongly encourage you to let us help you get this right. Contact us, and we’ll make sure you’re handling your worker payments with absolute accuracy.

New to QuickBooks® ? Try These 5 Activities

QuickBooks can be overwhelming when you first start using it. Here are five ways to familiarize yourself with some of its features to get you up and running in no time.

Tackling any new piece of software can be daunting. Add a complex process like accounting to the mix, like QuickBooks does, and you may feel apprehensive about your ability to learn how to use it. 

But QuickBooks was designed for small businesspeople, not for accountants nor technical wizards. It uses familiar language and forms, and it works like other Windows programs. That doesn’t mean, though, that you’ll be able to just jump in and start completing your accounting tasks. 

Here are five steps you can take to start familiarizing yourself with QuickBooks that will get you up and running in no time. We’ll assume that you’ve already created your company file. If you need help with this critical first step, let us know.

Open a sample file.

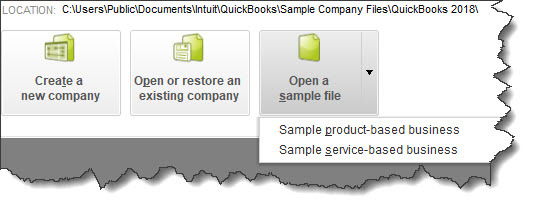
While you’re exploring QuickBooks, it’s a good idea to work with a sample file. That way, you can look around and practice without risking compromising your company file. You’ll be able to see how completed records and transactions should look and try your hand at entering sample data of your own.

QuickBooks comes with sample files that allow you to practice entering data without harming your own company file.

Before you open a sample file, you’ll need to close your current company. Click on File in the upper left to open that menu, then select Close Company. A window will open that should have your company file in its list. Below that, you’ll see three boxes containing different options. Click on the down arrow next to Open a sample file, as pictured above (this may look slightly different in your version). Choose the one you want to open and click on it. QuickBooks will load again with that file open. When you’re done looking at the sample file, go to File | Close Company again. The No Company Open window should appear again. Click on your company file name and then on Open to return to your own file.

Learn where your lists are.

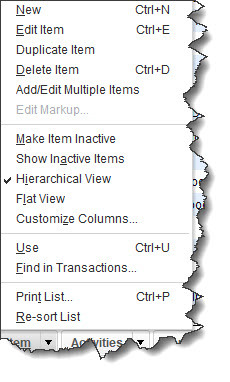
You’ll be storing a great deal of information in lists. QuickBooks maintains these automatically sometimes when you enter information in a record or transaction. For example, when you create a record for a product or service you sell, it goes into a master list that you can access by opening the Lists menu at the top of the screen and clicking on Item List. You’ll also open the Lists menu when you want to add options to an existing type of list, like Class List (QuickBooks allows you to assign Classes to transactions so you can group related information, like New Construction or Remodel if you’re a contractor).

You’ll sometimes select from lists of commands in QuickBooks. This is the menu for the Item List.

Try a Transaction.

There are two transactions you’ll probably be using the most: invoices and sales receipts. QuickBooks comes with templates that resemble these sales forms’ paper counterparts. You simply fill in the blanks by entering data and selecting options from drop-down lists. Open the Customers menu and select Create Invoices. Click the back arrow above Find in the upper left corner to see sample invoices. Then click the right arrow to get back to a blank form and create an invoice by clicking the down arrows in blank fields to see your sample lists.

Explore Snapshots.

Once you start entering records and transactions, you’ll want to be able to access that information in ways that provide insight on how your company is doing. You’ll eventually start running reports in QuickBooks, but the software also accomplishes this through its Snapshots. There are three of them, and they all provide these overviews by using data tables and charts. Open the Company menu and click on Company Snapshot, then click the tabs to move between Company, Payments, and Customer. You’ll learn how QuickBooks provides real-time information about your finances.

Look at the Income Tracker.

It’s easy to see the status of your invoices (and estimates) in QuickBooks. Open the Customers menu and select Income Tracker. Colored bars at the top of the screen show you what’s outstanding and what’s been paid. A list of the related transactions appears below these bars.

This partial view of the Income Tracker tells you how much money is tied up in unbilled Time & Expenses and unpaid Invoices.

As we said earlier, QuickBooks can be overwhelming when you first start to use it. We can ease that transition by providing training and helping you move your existing accounting information over to the software. If you’ve started using QuickBooks on your own and you have questions, we can always step in to offer answers.

Stay healthy, and best wishes for a more prosperous 2021.

Using QuickBooks’ Reminders and Calendar

Now, more than ever, you need QuickBooks to track what needs to be done.

COVID-19 has transformed the entire U.S. small business landscape in just a few short months. Companies are struggling to stay afloat. We all just want to get back to “normal,” but it’s unclear when that will happen.

We’d like to help you as much as possible during these uncertain times. One of the ways we can do that is by supporting you as you keep a close watch on your income and expenses. QuickBooks is our go-to tool for that purpose, and we hope you’re making the best possible use of the software right now.

There are steps you can take to ensure that QuickBooks is working quickly and well for you, and that you’re attending to the work you must do every day. The software’s Reminders and Calendar can help you stay current with your accounting.

Setting Up Reminders

You don’t want to let anything slip through the cracks right now. It’s nearly impossible to keep up with your QuickBooks tasks without using the software’s Reminders feature. Before you start using this, you’ll have to set up its structure. Open the Edit menu and select Preferences | Reminders. This window will open:

A screenshot of a cell phone

Description automatically generated

You can tell QuickBooks which situations should trigger Reminders.

This window should open to the My Preferences screen. Click the box in front of Show Reminders List when opening a Company file to create a checkmark. Then click Company Preferences. You’ll see a list of QuickBooks “events,” like Checks to Print. You can tell QuickBooks how many days in advance you’d like to be warned about this pending activity by entering a number in the box in front of days before check date. You can also request that this appear in either Summary or List form. If you don’t want to be notified about any of them, click the button below Don’t Remind Me.  When you’re done here, click OK.

The next time you open QuickBooks, your reminders will appear in a window on top of your home page. When you double-click on one, the transaction or other item will open. Two icons in the upper right of the Reminders screen open your Preferences and a blank To Do form. Here, you can schedule a call, task, appointment, etc. and associate it with a customer, vendor, or employee if desired. This item will then appear in your Reminders list. 

A screenshot of a social media post

Description automatically generated

The Reminders window appears when you open the related Company file; you can add To Do’s manually.

A Graphical View

QuickBooks’ Reminders are not the only way you can ensure that you’re meeting your accounting obligations. You can use the Calendar to see what you’ve scheduled and accomplished every day.

As you did with Reminders, though, you should visit this tool’s Preferences page (Edit | Preferences | Calendar). Here, you’ll only need to work with the options under the My Preferences tab. You can choose from among a Daily, Weekly, or Monthly view, or just have QuickBooks Remember last view. Your calendar can display your choice of a Weekly view: a Fixed view of 5 or 7 days or a Variable view of 5/7 days. And, you can show All Transactions, To Do, Transactions Due, or choose one type of transaction (Invoice, Sales Receipt, Bill, etc.).

A screenshot of a cell phone

Description automatically generated

How would you like your Calendar displayed? QuickBooks lets you choose from among options.

You can also define Upcoming and Past Due Settings. You can Hide or Show these, Show only if data exists, or remember the last settings. QuickBooks allows you to choose the number of days’ worth of data that will be displayed for both Upcoming data and Past due data.

You can open the Calendar itself from the Company menu and by clicking a link in the Toolbar or on the Home Page. You’ll see a graphical calendar in the View you selected. Every day where there’s been—or is scheduled to be—activity will say either Due or Entered, with the corresponding number of transactions in parentheses. Below that is a list of Transactions Entered; you can double-click on any of them to see the actual transaction form. 

A list of upcoming and past due transactions appears in the right vertical pane. Fields and buttons at the top of the screen allow you to change the View and limit the list to a specified type of transaction. You can also add To Do’s from this page.

We hope these tools are helpful for you as you navigate through today’s choppy financial waters. Please do let us know if we can assist you in managing your company’s critical accounting tasks. We want you to keep your business going as best you can until we get to the other side of the ongoing crisis.

5 Things You Should Know About the Chart of Accounts in QuickBooks Online

QuickBooks Online doesn’t require deep knowledge of accounting principles. Still, there are concepts you should understand.

You probably didn’t expect you’d have to become an accounting expert when you started your business. You knew you’d have to deal with recording income and expenses – maybe track your inventory and process a payroll. But you may not have understood just how complex financial bookkeeping could be.

That’s why you decided to use QuickBooks Online, or are at least considering it. The service is an expert on accounting, and it simplifies the process. It knows exactly how you have to document transactions to stay compliant with the rules that accountants and other businesses follow. This is good practice, and it’s absolutely necessary if, for example, you ever have to apply for financing.

One of the features of accounting systems you should understand is the Chart of Accounts. You won’t have to alter it in any way—in fact, we strongly advise against it—but you’ll encounter it when you work with transactions. Here are five things you should know about it.

What is it?

These three columns from QuickBooks Online’s Chart of Accounts display account Names, Types, and Detail Types.

QuickBooks Online’s Chart of Accounts is a list of financial categories that are used to classify your company’s transactions when you record them. If you were doing your accounting manually, you would have to create your own Chart of Accounts. But QuickBooks Online builds one for you based on the company type and industry you choose when you’re setting up the site.

Why is the Chart of Accounts important?

Some people refer to the Chart of Accounts as the “backbone” of your company file. All transactions flow to it. Its primary importance can be summed up in one word: reports. Your reports will not be accurate if your Chart of Accounts is poorly constructed or if you categorize transactions incorrectly. This becomes as issue when you want to:

  • Prepare taxes. Your income tax return will not reflect your reportable income and deductible expenses if transactions are not assigned to the right classifications.
  • Apply for financing, take on an investor, sell your company, etc.
  • Monitor your finances. You won’t get a true picture of your income and expenses, which makes it difficult to analyze your company’s fiscal health and plan for the future.

What’s in the Chart of Accounts?

There are two types of accounts. One contains information that’s used in the Balance Sheet report. These accounts will have a number in the QuickBooks Balance column that’s based on all transactions up to the current date. They include Assets (bank accounts, accounts receivable, inventory, etc.), Liabilities (unpaid bills, credit cards, payroll and sales taxes, loans, etc.), and Equity.

The remainder of the accounts are used in the Profit and Loss report, otherwise known as the Income Statement. They’re divided into Income (sales, discounts given, etc.), Cost of Goods Sold (labor, shipping, materials and supplies, etc.), Expenses (advertising, insurance, payroll, etc.), Other Income, and Other Expense. You won’t see a number in the QuickBooks Balance column for these accounts because the Profit and Loss report changes based on the date range selected.

Should I ever make any modifications to my Chart of Accounts?

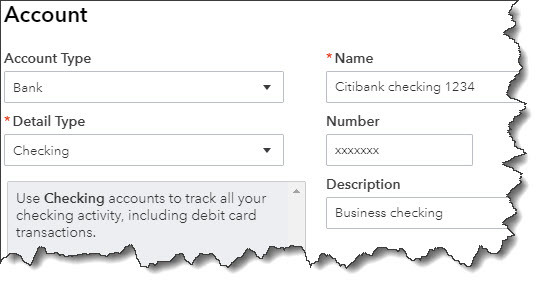
You can set up bank and credit card accounts in QuickBooks Online’s Chart of Accounts.

As we stated earlier, we strongly recommend that you never modify your Chart of Accounts without consulting us. However, there are two exceptions to this. You’ll want to create entries for your bank and credit card accounts. To do this, first open the Chart of Accounts by clicking the gear icon in the upper right and selecting Chart of Accounts under Your Company. When it opens, click New in the upper right corner. Choose Bank or Credit Card and fill in the blanks.

Do I need to use account numbers in the Chart of Accounts?

Generally, the smaller the business, the less need there is for this. If your business is big enough that you have dedicated A/P and A/R individuals, you may want to post transactions to account numbers.

Understanding Reports

QuickBooks Online makes it possible for you to view the Chart of Accounts and those two critical reports, Balance Sheet and Profit & Loss. Customizing and analyzing them, though, is something you should do under professional supervision. We’re happy to help here and in other advanced areas of the site. Contact us for a consultation.

4 Things You Should Know About Advanced Settings in QuickBooks® Online

Do you know about all of QuickBooks Online’s settings? What you’re missing may be important.

Looking through all the settings available in QuickBooks Online is something like reading the owner’s manual when you get a new car. You know you should do it, but you find yourself consulting it only when you encounter a problem.

Whether you’re new to QuickBooks Online, or you’ve been using it for a while, we recommend that you familiarize yourself with these important preferences.  Settings do more than turn features off and on: they can teach you about tools you might not have known were available.

Let’s explore some that you may have missed.

Closing the Books

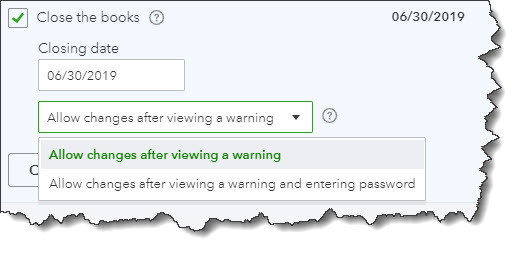
You’ve probably heard this phrase before but do you know what it actually means in QuickBooks Online? When you set a closing date, you’re indicating that no transactions entered prior to that date should be changed.

Click the gear icon in the upper right, then select Your Company | Account and Settings. Scroll down to the Advanced section in the left vertical toolbar. Under the first heading, Accounting, check the box in front of Close the books. Enter a date and choose one of the two options for exceptions, as pictured in the image below:

You can close the books as of a specific date in QuickBooks Online so users can’t change transactions entered before then.

Warning: Talk to us before you make this decision. We can discuss the pros and cons.

Categories

QuickBooks Online offers a couple ways to categorize transactions so you can see related data in searches and reports. Scroll down to Categories and click on the Off button to the right of Track classes to turn this feature on. QuickBooks Online will then add a Class field to forms like invoices, along with a drop-down list that you can build with your own options. For example, you could create categories like departments, customer types, and product lines.  You can choose to assign classes to entire transactions or to individual rows in them, and you can ask to be warned if you try to save a form without selecting a Class.

Track locations works similarly. You can assign a location (territory, store, department, etc.) to each transaction if you’d like.

Automation

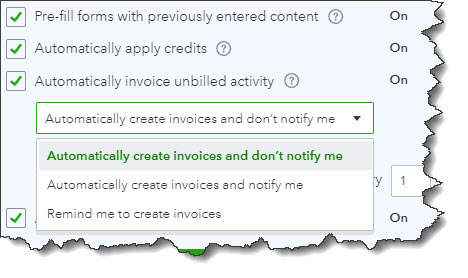
By using QuickBooks Online for your daily accounting tasks, you’re already saving time. But the site offers a way to save even more with its Automation tools. Here’s what you can do:

  • Pre-fill forms with previously entered content. Once you’ve saved a transaction for a customer, vendor, or employee, you can choose to have QuickBooks Online complete some fields in the next form you create for them.
  • Automatically apply credits. Do you want QuickBooks Online to apply credits to the next invoice you create for a given customer? Most businesses do, but a specific example of a time you wouldn’t check the box would be if you’re a property manager who requires security deposits.

QuickBooks Online offers several automation options.

  • Automatically invoice unbilled activity. Be careful with this one. When you have customers with unbilled activity, QuickBooks Online can automatically create invoices for them on a schedule you designate. You have a few options here. You can simply ask for a reminder as the date approaches, or you can allow the site to automatically create invoices – with or without notifying you.
  • Automatically apply bill payments. When you record bill payments, QuickBooks Online can automatically apply them to the oldest recorded bill.

Time Tracking

Does your company sell services that are billed by the hour? If so, there are a couple of options you can turn on here. When you create timesheets or individual timed activities, you can add a Service field to the tracking form. You can also include a checkbox to indicate that a block of timed work is billable to customers. If you do the latter, you can opt in or out of letting users see the actual rate you’re charging customers.

Checking Your Work

QuickBooks Online refers to these as Advanced Settings for a reason. Making the wrong choices on any of them could lead to unhappy or confused customers and/or inaccuracies in your accounting file. We think you should know about these options, but we also hope you’ll schedule a consultation with us before attempting to set them up. It’s always much easier to spot problems in the making than to correct mistakes already made.