How to Create and Use Vendor Records in QuickBooks® Online

Keeping your supplies coming in may be difficult right now. Be sure you know your vendors and track their records carefully.

Your company counts on its supply chains to keep operations running smoothly. When it falters, you can have trouble creating and shipping products. Problems may even crop up that have a negative effect on your internal business needs.

We don’t have to tell you that COVID-19 has interrupted supply chains. The pandemic has been catastrophic for many small businesses because of this, and because income has been suddenly and sharply reduced. Some financial help is available, and we hope you’re able to take advantage of it during these extraordinarily difficult times.

It’s perhaps more important than ever to carefully track your income and expenses, and we hope you’re using QuickBooks to do so. Among the software’s financial management tools is the ability to maintain thorough records of those vendors that make up your supply chain. Let’s take a look at how this works.

Creating Vendor Records

We’ll go through the steps for creating vendor records, though you may have at least started on these already. Hover your mouse over Expenses in the toolbar and select Vendors. If you’ve already added some, you’ll see them in a list. To create a new one, click New Vendor in the upper right. Most of the form is easy to complete; it’s primarily contact information.

There are a few fields, though, that need special attention. These are:

  • Cost rate/hr and Billing rate/hr. These help you track time costs for your projects. Don’t enter anything here if you pay vendors via bills or expenses.
  • Terms. Due on receipt? 15 days? 30 days? 
  • Account no. and Business ID No. You should have these on file.
  • Track payments for 1099. Put a check in this box for any 1099 contractors.

When you’re done, click Save. This vendor will now appear in your list.

Taking Action

A screenshot of a cell phone

Description automatically generated

You can take a number of actions from QuickBooks’ Vendors screen.

You can do a lot of your work directly from QuickBooks’ Vendors page. This screen displays a list of all of your vendors, along with columns for their Phone, Email, and Open Balance. At the end of each row is an Action column. The link there reads either Create bill or Make payment, depending on whether there is an outstanding balance. 

Click on the down arrow in that column to open a list of additional options. If there is a zero balance, you can Create expense, Write check, Create purchase order, or Make inactive. If money is due, your options are to Create bill or Create expense. Icons in the upper right allow you to print the list, export it to Excel, or change the column settings.

Collecting Your Billables

Before we look at vendor records in QuickBooks, we’d like you to check a couple of settings to make sure you’re billing your customers for every expense they incur with you. Click the gear icon in the upper right corner and select Your Company | Account and Settings, then click on Expense. Among others, you’ll see these options:

A close up of a map

Description automatically generated

If you incur expenses on behalf of customers, be sure you will be reimbursed for them by adding a Billable column on expense and purchase forms.

To add a Customer column to expense and purchase forms, click in the first box pictured in the image above. To Make expenses and items billable, click in the second box and add a default markup rate if you want. Do you want to Track billable expenses and items as income? If you’re not sure, ask us. And if you’ve set up sales tax in QuickBooks and want to add that to billable items, check that box, too. When you’ve finished with these and the other questions under Bills and expenses, click Save.

Now is the time to focus on the importance of cash flow and vendor relationships by maintaining good vendor payable records. You want to keep your relationships with your suppliers in good status. If you’re having trouble tracking cash flow or dealing with any other element of your accounting (or QuickBooks itself), please do contact us. We want to support you through this difficult period as much as we can.

How to Use Rules in QuickBooks® Online Transactions

Maintaining your transaction registers conscientiously leads to a clearer understanding of your finances.

Last month, we talked about the types of best practices that can lead to more effective use of QuickBooks Online and, ultimately, more thorough knowledge of your finances. The first one was this: Go through your new transactions every day. Categorizing and otherwise expanding on the data brought in by your financial institutions really pays off when it comes to customer billing, reports, and taxes.

Granted, this habit will add time to your daily accounting chores. But there’s a tool on the site that can greatly accelerate this process: Rules. This feature must be used with care to avoid mischaracterizing or, worse, losing track of critical transactions. Here’s how it works.

Creating Rules

There are two ways to create Rules. The easiest is to start with an existing transaction. Hover over Banking in the left vertical pane and select Banking to open your transaction list. Be sure that you’re looking at transactions that are still For review, as these are the only ones that can be assigned to Rules.

Click on a transaction to open its expanded view. At the bottom of the small window that just opened, click on Create rule from this transaction. A screen like this will open:

A screenshot of a cell phone

Description automatically generated

QuickBooks Online’s Rules feature allows you to automatically document transactions that meet certain conditions.

Let’s say you own a lawn and garden maintenance company. You always order supplies from the same vendor, so there are numerous transactions every month. You want QuickBooks Online to automatically categorize and clear transactions under $250; above that, and you’d want to see them individually. 

You’d start by naming the rule, designating it as Money out or Money in, and choosing an account (or leaving this option set at All bank accounts). Next, tell QuickBooks Online whether the conditions you’re about to establish should apply to all or any. That is, if you’re setting multiple conditions, is it all right if just one meets the criteria, or must they all?

Below that, you’d specify the actual conditions that must be present for QuickBooks Online to handle similar transactions in the same way. In our example pictured above:

  • The transaction [Description] [is exactly] Lawn and Garden Supply LLC, and, 
  • The [Amount] [is less than] $250.

So, any transaction that comes into QuickBooks Online from your bank that has Lawn and Garden Supply LLC in the Description field and which is for less than $250 will be treated similarly.  There are other options for the first two fields; you’ll find them by clicking the down arrow.

Now you have to tell QuickBooks Online what to do with the transactions that meet those criteria. Farther down on this screen, you’ll see these options:

A picture containing screenshot, knife

Description automatically generated

QuickBooks Online will handle the transactions that meet the conditions you set by completing these fields.

Using the drop-down lists of options, you’ll select the Transaction Type, Payee, Category, and Class (if you use them). Every time a transaction comes in that meets the conditions you defined above, QuickBooks Online will apply these options.

Finally, you’ll have to choose from two different ways of processing these matching transactions. You can have QuickBooks Online Auto-categorize and auto-add, in which case the transactions will be automatically processed and moved out of the For review queue. In our example, we chose this so we didn’t have to work with transactions of less than $250; we only wanted to see more expensive purchases. If we had wanted QuickBooks Online to fill in those fields but still show us the transactions, we would have clicked in front of Auto-categorize and manually review. Clicking Save would move this Rule into a list that could be accessed by clicking Banking | Rules, where you can Edit or Delete them.

Complicated Stuff

To recap, because of the Rule that was created here, any transaction in which the Description reads Lawn and Garden Supply LLC and which is for less than $250 will now be auto-completed and moved out of For Review. Any transaction for over that amount will remain in the queue for approval.

QuickBooks Online’s Rules can save time if you have a large volume of similar transactions. But if they’re not created with absolute accuracy, you risk mischaracterizing or missing transactions you should have reviewed before adding them to the Reviewed queue. We’d be happy to help here to ensure that that doesn’t happen, so that you can take full advantage of the helpful Rules feature.

Are You Following Best Practices in QuickBooks® Online?

“Best practices” are recommendations for the most effective way to get things done. Are you following standard procedures in QuickBooks Online?

Habits can be good things when you’re talking about getting through the workday successfully. You might have developed a habit of responding to emails quickly and preparing checklists before you go into meetings. Maybe you schedule your most challenging work for high-energy times of the day and leave less-demanding tasks for those times when you’re not as chipper.

It’s easy to fall into habits with QuickBooks Online, too. You might follow the same workflow pattern every day simply because that’s the way you’ve always done things. There’s nothing wrong with that – as long as you’re incorporating as many of the site’s best practices as you can. That is, you’ve made a habit of taking actions that will lead to the most effective use of QuickBooks Online.

Here are four habits we think you should consider developing if you haven’t already.

Go through your new transactions every day:

One of the five best things about QuickBooks Online is its ability to connect to your financial accounts and import transactions regularly. But this feature is only useful if you review your recently-downloaded transactions every day. Wait too much longer than that, and it will become too overwhelming.

A screenshot of a cell phone

Description automatically generated

We recommend you review your account transactions every day and complete any of the fields necessary.

To view an account register, you’d click Banking in the left vertical pane, and then click on the desired account at the top of the screen. When you select a transaction, a small window like the (partial) one pictured above drops down and displays your options. If you have not worked with defining and clearing downloaded transactions before, we can provide guidance here. It’s complicated.

Always assign categories to expenses:

You’ll get out of QuickBooks Online what you put into it. That is, the more conscientious you are about completing records and transactions thoroughly, the more helpful your reports will be. It’s especially important that you assign categories to expenses and mark them as billable or not. Those categorized expenses will be very important as you’re preparing your company’s income taxes. And you want to be sure that customers are billed for expenses you incur on their behalf.

Run aging reports once or twice a week:

QuickBooks Online can help you keep up with money owed to you and money you owe, but you have to take the time to stay current with that information. The site’s Dashboard provides the dollar total for unpaid invoices and links to a list, but it doesn’t tell you what bills of your own may be coming due – or are late.

We recommend you run at least two reports at the beginning and end of the week: Accounts Receivable Aging Summary and Accounts Payable Aging Summary. You can modify these reports by clicking the Customize button, but they should be good as is. You don’t want to see any numbers in any columns except the first one (Current). If you see any beyond that, it means that either incoming or outgoing payments are overdue.  Click on any number to see the transactions behind it.

Set reorder points on inventory items.

A close up of a map

Description automatically generated

Inventory-tracking in QuickBooks Online is complicated. We can help you understand it.

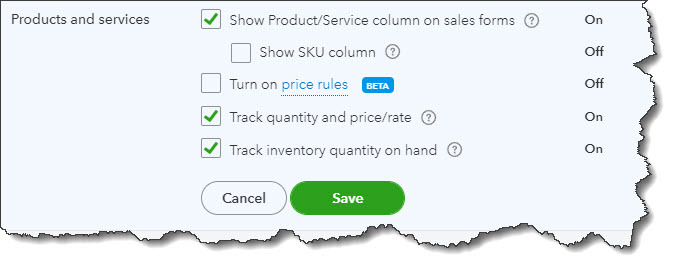
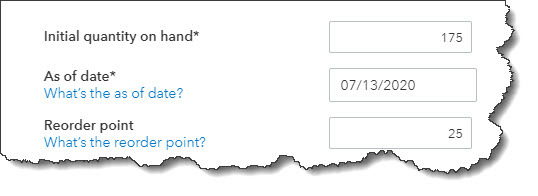
Keep an eagle eye on your product inventory levels. When you create an item record (Sales | Products and Services | New), be sure to enter a Reorder point. The Products and Services page tells you how many items have Low Stock or are Out of Stock. You can also see the Qty on Hand and Reorder Point in the table below those numbers.

Warning: Inventory-tracking is an advanced feature of QuickBooks Online. If you need these tools, contact us about scheduling some time to go over them thoroughly.

More to Implement

There are many other best practices that we’d recommend for your use of QuickBooks Online. Several of them have to do with reports, one of the site’s capabilities that is particularly robust but which many businesses don’t fully engage in because some of them are difficult to analyze. These include standard financial reports like Balance Sheet and Statement of Cash Flows

You’ll need these reports if you apply for financing or want to share information about your company’s financial health with a third party. The insight they provide can also be useful to you in making business decisions.  We’d be happy to create and analyze these for you on a regular basis, or to consult with you on any other aspect of QuickBooks Online that is perplexing.

Have You Explored QuickBooks Online’s New 2019 Features?

Intuit keeps innovating. Here are some of the changes the company introduced for QuickBooks Online in 2019.

Whether you can see them now or not, Intuit added and enhanced a ton of new features in 2019. Some of you may not see all of them until 2020, since the company typically rolls them out slowly.

So, if you’re not in one of the first waves of users, we want you to know what’s coming. It may also be that your version of QuickBooks Online has incorporated the changes, but you just haven’t noticed them. Here’s a rundown of what’s in store for everyone on the horizon.

A new location for the Create button

Previously, you clicked on the +(plus) sign in the upper right corner to open the Create window (invoice, sales receipt, bill, single time activity, etc.). Now, you’ll see a button marked +New in the upper left corner.

Instant Deposits

If you use QuickBooks Online Payments, you’ll be able to have available credit card and bank transfer payments from customers deposited in your bank account within 30 minutes for a 1 percent fee. The funds will be directed to your U.S.-issued Visa or MasterCard debit card.

Mileage Tracker

This is a tool previously found only in QuickBooks Self-Employed, but QuickBooks Online users will now have access to it. It does just what it sounds like: allows you to track business-related mileage so you’ll have a numerical total to enter when you come to that deduction on your income tax return. You can record trips manually by entering starting and ending addresses (or the total miles). Or, if you’re using the QuickBooks Mobile app, you’ll be able to turn on GPS and let your smartphone record the mileage automatically.

A picture containing text, map

Description automatically generated

QuickBooks Online’s Mileage Tracker allows you to record business miles driven manually or automatically and calculates your tax deduction.

New navigation tools in QuickBooks Mobile app

You’ve probably gotten used to navigating from a list of features in the QuickBooks Mobile app. You should soon see an entirely different look for navigation that uses icons representing common tasks (Transactions, Expenses, Mileage, etc.). These will appear when you click on the Shortcuts tab. You’ll find the remaining tools under the All tab.

Health benefit management

QuickBooks Online now allows you to compare, buy, and manage employee health, dental, and vision coverage.

Receipt Capture

Receipts can be the bane of a business owner’s existence. Many still use the “shoebox” method, tossing receipts in a box and entering them when tax time rolls around. Not a particularly elegant solution. Now, you can snap photos of receipts and move them into QuickBooks Online in one of three ways, by:

  • Scanning through the mobile app.
  • Uploading, then dragging and dropping.
  • Forwarding through email.

Receipts are automatically categorized and matched to transactions; if there’s no match, you can create a new transaction. Your receipts appear in the Receipts dashboard under the Banking tab.

Multilingual invoicing

Do you have international customers? If so, you may be able to send them invoices in their native languages. Besides English, QuickBooks Online now supports French, Spanish, Italian, Portuguese (Brazil), and Chinese (traditional).

A close up of a map

Description automatically generated

You can now send invoices to customers in any of six languages.

One-step contractor payments

You can now select trackable details like class, project, and location by making selections from drop-down lists in the contractor payments window.

Next-day deposits

If you’re a QuickBooks Online Payments subscriber, you’ll be able to get next-day access to payments customers have made to you via credit card or ACH. You’ll have to sign up for this service, and fees apply to ACH payments (1 percent of the total deposit, up to $10).

Auto-calculated sales tax

QuickBooks Online has streamlined the process of adding sales tax to sales forms – even if you’re a cash-basis business. After you’ve done some initial setup work, QuickBooks Sales Tax will do the necessary calculations and add sales tax automatically.

Hello, 2020

We hope that 2019 has been a good year for your business, and we wish you the best in 2020. If you’re still struggling to use QuickBooks Online to maximize productivity and make better business decisions, remember that we’re here to help. We can also advise you on any of the new features Intuit has introduced. Contact us anytime to set up a consultation.

5 Things You Should Know About the Chart of Accounts in QuickBooks Online

QuickBooks Online doesn’t require deep knowledge of accounting principles. Still, there are concepts you should understand.

You probably didn’t expect you’d have to become an accounting expert when you started your business. You knew you’d have to deal with recording income and expenses – maybe track your inventory and process a payroll. But you may not have understood just how complex financial bookkeeping could be.

That’s why you decided to use QuickBooks Online, or are at least considering it. The service is an expert on accounting, and it simplifies the process. It knows exactly how you have to document transactions to stay compliant with the rules that accountants and other businesses follow. This is good practice, and it’s absolutely necessary if, for example, you ever have to apply for financing.

One of the features of accounting systems you should understand is the Chart of Accounts. You won’t have to alter it in any way—in fact, we strongly advise against it—but you’ll encounter it when you work with transactions. Here are five things you should know about it.

What is it?

These three columns from QuickBooks Online’s Chart of Accounts display account Names, Types, and Detail Types.

QuickBooks Online’s Chart of Accounts is a list of financial categories that are used to classify your company’s transactions when you record them. If you were doing your accounting manually, you would have to create your own Chart of Accounts. But QuickBooks Online builds one for you based on the company type and industry you choose when you’re setting up the site.

Why is the Chart of Accounts important?

Some people refer to the Chart of Accounts as the “backbone” of your company file. All transactions flow to it. Its primary importance can be summed up in one word: reports. Your reports will not be accurate if your Chart of Accounts is poorly constructed or if you categorize transactions incorrectly. This becomes as issue when you want to:

  • Prepare taxes. Your income tax return will not reflect your reportable income and deductible expenses if transactions are not assigned to the right classifications.
  • Apply for financing, take on an investor, sell your company, etc.
  • Monitor your finances. You won’t get a true picture of your income and expenses, which makes it difficult to analyze your company’s fiscal health and plan for the future.

What’s in the Chart of Accounts?

There are two types of accounts. One contains information that’s used in the Balance Sheet report. These accounts will have a number in the QuickBooks Balance column that’s based on all transactions up to the current date. They include Assets (bank accounts, accounts receivable, inventory, etc.), Liabilities (unpaid bills, credit cards, payroll and sales taxes, loans, etc.), and Equity.

The remainder of the accounts are used in the Profit and Loss report, otherwise known as the Income Statement. They’re divided into Income (sales, discounts given, etc.), Cost of Goods Sold (labor, shipping, materials and supplies, etc.), Expenses (advertising, insurance, payroll, etc.), Other Income, and Other Expense. You won’t see a number in the QuickBooks Balance column for these accounts because the Profit and Loss report changes based on the date range selected.

Should I ever make any modifications to my Chart of Accounts?

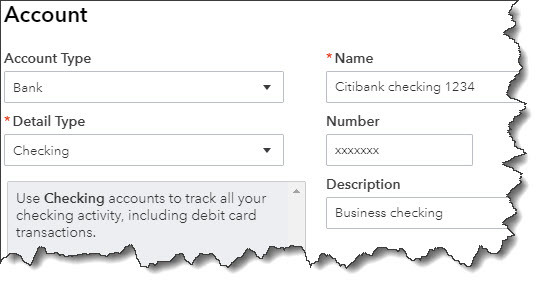
You can set up bank and credit card accounts in QuickBooks Online’s Chart of Accounts.

As we stated earlier, we strongly recommend that you never modify your Chart of Accounts without consulting us. However, there are two exceptions to this. You’ll want to create entries for your bank and credit card accounts. To do this, first open the Chart of Accounts by clicking the gear icon in the upper right and selecting Chart of Accounts under Your Company. When it opens, click New in the upper right corner. Choose Bank or Credit Card and fill in the blanks.

Do I need to use account numbers in the Chart of Accounts?

Generally, the smaller the business, the less need there is for this. If your business is big enough that you have dedicated A/P and A/R individuals, you may want to post transactions to account numbers.

Understanding Reports

QuickBooks Online makes it possible for you to view the Chart of Accounts and those two critical reports, Balance Sheet and Profit & Loss. Customizing and analyzing them, though, is something you should do under professional supervision. We’re happy to help here and in other advanced areas of the site. Contact us for a consultation.

4 Things You Should Know About Advanced Settings in QuickBooks® Online

Do you know about all of QuickBooks Online’s settings? What you’re missing may be important.

Looking through all the settings available in QuickBooks Online is something like reading the owner’s manual when you get a new car. You know you should do it, but you find yourself consulting it only when you encounter a problem.

Whether you’re new to QuickBooks Online, or you’ve been using it for a while, we recommend that you familiarize yourself with these important preferences.  Settings do more than turn features off and on: they can teach you about tools you might not have known were available.

Let’s explore some that you may have missed.

Closing the Books

You’ve probably heard this phrase before but do you know what it actually means in QuickBooks Online? When you set a closing date, you’re indicating that no transactions entered prior to that date should be changed.

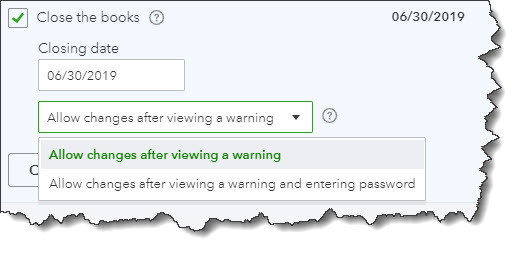
Click the gear icon in the upper right, then select Your Company | Account and Settings. Scroll down to the Advanced section in the left vertical toolbar. Under the first heading, Accounting, check the box in front of Close the books. Enter a date and choose one of the two options for exceptions, as pictured in the image below:

You can close the books as of a specific date in QuickBooks Online so users can’t change transactions entered before then.

Warning: Talk to us before you make this decision. We can discuss the pros and cons.

Categories

QuickBooks Online offers a couple ways to categorize transactions so you can see related data in searches and reports. Scroll down to Categories and click on the Off button to the right of Track classes to turn this feature on. QuickBooks Online will then add a Class field to forms like invoices, along with a drop-down list that you can build with your own options. For example, you could create categories like departments, customer types, and product lines.  You can choose to assign classes to entire transactions or to individual rows in them, and you can ask to be warned if you try to save a form without selecting a Class.

Track locations works similarly. You can assign a location (territory, store, department, etc.) to each transaction if you’d like.

Automation

By using QuickBooks Online for your daily accounting tasks, you’re already saving time. But the site offers a way to save even more with its Automation tools. Here’s what you can do:

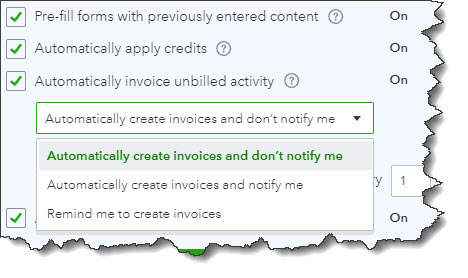
  • Pre-fill forms with previously entered content. Once you’ve saved a transaction for a customer, vendor, or employee, you can choose to have QuickBooks Online complete some fields in the next form you create for them.
  • Automatically apply credits. Do you want QuickBooks Online to apply credits to the next invoice you create for a given customer? Most businesses do, but a specific example of a time you wouldn’t check the box would be if you’re a property manager who requires security deposits.

QuickBooks Online offers several automation options.

  • Automatically invoice unbilled activity. Be careful with this one. When you have customers with unbilled activity, QuickBooks Online can automatically create invoices for them on a schedule you designate. You have a few options here. You can simply ask for a reminder as the date approaches, or you can allow the site to automatically create invoices – with or without notifying you.
  • Automatically apply bill payments. When you record bill payments, QuickBooks Online can automatically apply them to the oldest recorded bill.

Time Tracking

Does your company sell services that are billed by the hour? If so, there are a couple of options you can turn on here. When you create timesheets or individual timed activities, you can add a Service field to the tracking form. You can also include a checkbox to indicate that a block of timed work is billable to customers. If you do the latter, you can opt in or out of letting users see the actual rate you’re charging customers.

Checking Your Work

QuickBooks Online refers to these as Advanced Settings for a reason. Making the wrong choices on any of them could lead to unhappy or confused customers and/or inaccuracies in your accounting file. We think you should know about these options, but we also hope you’ll schedule a consultation with us before attempting to set them up. It’s always much easier to spot problems in the making than to correct mistakes already made.