If you have a nagging feeling this month that you’re not caught up with your accounting tasks, it’s time to clean up your unfinished 2019 work.
It would be great if you could have closed out 2019 knowing that you were all caught up with your accounting work. You sent all your invoices, paid all your bills, and wrapped everything up with a series of reports and a proverbial bow.
Unfortunately, December rarely goes that way. You’re making last-minute adjustments for your taxes. Dealing with the holiday rush if you’re a retailer. Handling end-of-year employee issues, trying to make your monthly sales quotas, and doing something special to make your customers feel appreciated at this time of year.
On top of your daily accounting work, you’re feeling pressure in December to get a clear picture of your finances for the entire year. Then the holidays hit, and suddenly you’re ringing in the New Year without having had time for that.
Here are five things you can do clean up 2019 and make way for 2020.
1. Create two critical A/R reports: Accounts Receivable Aging Summary and Open Invoices.
This may make you feel both better and worse. On the bright side, you’ll know where you stand in terms of who owes you what and how big the problem is. On the other hand, you may find it disheartening to see how many payments are past due. These reports are easy to find. Click Reports in the left vertical pane and scroll down to Who owes you.

The Open Invoices report can show you quickly who’s past due.
Now would be an excellent time, too, to develop some strategies to be proactive and keep your accounts receivable more up to date in 2020. We’d be happy to sit down with you and help you with this difficult task.
2. Create two critical A/P reports: Accounts Payable Aging Summary and Unpaid Bills.
Add “Stay Current with Bills” to your list of 2020 goals. But first, you have to see where you stand right now. Click Reports again and scroll down to What you owe.
Who is responsible for paying bills? If it’s you, maybe it’s time to hand over that task to someone without your managerial responsibilities who can make it a priority.
3. Create statements for all customers who are past due.
Things slip for your customers toward the end of the year, too. Give them a chance to catch up. Their invoices might have gotten lost in the year-end confusion, but you need to get current with your accounts receivable. So, send statements to those in arrears.
Click +New at the top of the left vertical pane, then go to Other | Statement.
4. Clean up your customer and vendor lists.
Customers and vendors come and go, but their QuickBooks records are forever unless you do something about them. You can easily make them inactive – after confirming they have no open activity. Click Sales | Customers in the left vertical pane. Click the box in front of customers you want to make inactive and then click Batch actions | Make inactive.
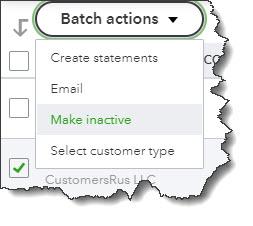
Cleaning up your customer and vendor lists will save you time in the future.
5. Always look carefully at your dashboard when you log in.
The block in the upper left corner is the most important here. You can see at a glance how much money you have tied up in unpaid invoices and how much money needs to be deposited. This will help you keep QuickBooks Online cleaned up.
More to Do
There are certainly other things you can do to clean up QuickBooks. For example, if you carry inventory, January is a good time to run the Physical Inventory Worksheet report and make some decisions about where your purchasing emphasis should be in 2020. Need help interpreting your product movement and sales priorities? We can help with that.
Finally, sometime this month—certainly in the first quarter of 2020—let us create the critical standard financial reports (under For my accountant in Reports) that you could actually generate in QuickBooks Online, but which would be difficult for you to analyze. These are the reports you would need if you were going to apply for a loan, for example, or request a business valuation. But the insight they provide can give you a sophisticated overview of your finances.