Setting Up Sales Taxes in QuickBooks, Part 1

If your business is required to collect and pay sales taxes, you can use QuickBooks’ tools to help you meet those obligations.

Next to payroll, state sales taxes represent probably the most complex element of your accounting tasks. QuickBooks can help with the mechanics, but there’s a lot you need to learn before you can start charging and paying them. For example:

  • Is your company located in a destination-based or origin-based state where taxes are concerned (do you charge sales tax based on where your customers are or where you are)?
  • Certain types of items and services are exempt from sales tax. Are yours?
  • What local taxes (city, county, etc.) must you collect, if any?
  • How often must you submit what you owe, and to what agency?

If you don’t know your state’s rules, search for your Department of Revenue (sometimes called the Department of Taxation) on Google. Or talk to us about this whole complicated process. You can’t begin to work with sales taxes in QuickBooks until you know the answers to many questions.

First Steps

Once you know what your state’s rules are, you can start setting up the sales taxes you’re required to collect and pay. Open the Edit menu and select Preferences. Click on Sales Tax, then Company Preferences. Make sure the Yes button is highlighted next to Do you charge sales tax?, then click on Add sales tax item. You’ll see this window:
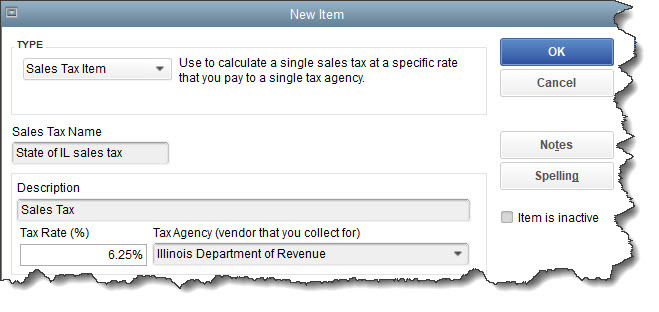
In states where it’s required, you may have to at least set up a state sales tax item in QuickBooks. You may also be responsible for local (city, county, etc.) taxes.

TYPE should already be set to Sales Tax Item. Enter a name for your tax in the Sales Tax Name field; the Description should automatically appear as Sales Tax. Type in the Tax Rate (%) and the name of the Tax Agency that will collect it (select <Add New> if it’s not there already). Click OK to return to Company Preferences and continue to define additional tax rates. If there is a sales tax item you use frequently, you can select it from the Your most common sales tax item field.

Tip: Each sales tax rate is considered an Item in QuickBooks. When you have to edit or delete one, open the Lists menu and select Item List. Type sales tax in the Look for box, then Search. Right-click on your target and select your desired action from the local menu that appears.

Sales Tax Groups

When you want to combine multiple sales taxes as one item (state, county, etc.), click Add sales tax item again in Company Preferences and choose Sales Tax Group. Enter a Group Name/Number and Description. In the table below, click the down arrow in the field in the TAX ITEM column. Keep selecting individual tax rates until you’re finished, then click OK. When you use one of these groups in a transaction, the customer will only see the total tax, but reports will break them down into their individual parts.

Completing Your Preferences

The bottom half of the Company Preferences screen needs more information.
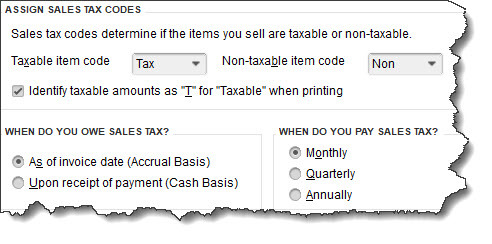
It’s important that all the entries at the bottom of the Company Preferences screen are correct before you start working with sales taxes in QuickBooks.

The first two items here are simply field labels that will appear in transactions to indicate whether or not a line item should be taxed. You should leave them as is; they’re automatically created by QuickBooks. If you want to Identify taxable amounts as “T” for Taxable when printing, click in that box to make a checkmark.

Is your QuickBooks company file set up on a cash or accrual basis? Click on the button in front of the correct choice. WHEN DO YOU PAY SALES TAX is a question that will be answered as you’re learning about your state’s sales tax requirements. When you’ve completed this section, click OK.

Assigning Tax Codes

As you create item and service records in QuickBooks, you’ll be asked to indicate whether or not they’re taxable. The Tax Code field appears at the bottom of the window, like in the image below.

You’ll need to designate every item or service you sell as taxable or non-taxable.

There’s much more you need to know about collecting and submitting sales taxes, like how to work with transactions and reports. We’ll cover those topics next month. In the meantime, let us know if we can help you set up your QuickBooks company file for this complex task.

Creating Statement Charges in QuickBooks®

There’s more than one way to bill customers for your products and services. A statement charge is one of them.

Depending on what kind of business you have, you probably have a preferred way of billing customers. If they walk into your shop and present a credit card or cash, you create sales receipts. If they order off your website, they might receive an electronic receipt. Or your arrangement may be such that you send invoices.

There’s another way that’s especially useful if your customers are responsible for paying recurring charges, like an ongoing service contract that’s billed monthly. You can enter those financial obligations directly as statement charges.

As you know, QuickBooks can create statements, summaries of a customer’s activity. These are generated automatically from the invoices, receipts, payments, and other transactions you’ve recorded over a given period of time. But did you know you can manually add charges to statements? Here’s how it works.

Creating a Statement Charge

Click the Statement Charges icon on the home page or open the Customers menu and select Enter Statement Charges. Your Accounts Receivable register appears. Open the list in the field next to Customer:Job by clicking on the down arrow and select the correct Customer:Job.

Warning: If the item will be attached to a specific job, not just a customer, be sure you choose the correct job. QuickBooks maintains a separate register for each.

Consider creating a statement charge instead of an invoice for recurring transactions that will not be billed immediately.

Change the date if necessary and open the Item list (or click <Add New> if you haven’t created an item record yet). Select the one you want and enter a quantity (Qty). QuickBooks should fill in the rate and description. The TYPE column will automatically contain STMTCH (statement charge). Click Record when you’re done. The next time you create a statement for that Customer:Job, you’ll see the transaction you just entered.

Statement Charge Limitations

Before you decide to use statement charges, keep in mind that:

  • You can’t include some information that would appear on an invoice, like sales tax and discounts.
  • Even if your charge relates to hours you worked for the customer, QuickBooks will not open a reminder window containing that information the next time you create an invoice for the customer. You’d have to Enter Time by creating a single activity or entering the hours on a timesheet.
  • You still have to bill the customers.

Billing the Customer

There are two ways to bill customers for statement charges. You can, of course, just generate statements that include the date(s) of the charge(s). The next time you create a statement for customers who have manually-entered statement charges, it will contain them, along with any other activity like invoices and payments.

We’ve covered statements before, but we’d be happy to go over this QuickBooks feature with you. This means you’ll have to enter a statement charge every month if it’s to be a recurring one. Instead, you can treat them as memorized transactions, so they’re automatically entered in the register. If you’re billing multiple customers for the same service every month, for example, this would work well.

First, you’ll need to create a Group that contains all of those customers. Open the Lists menu and select Memorized Transaction List. Right-click anywhere on that screen and click on New Group. This box will open.

If you regularly bill customers for the same service, like a monthly subscription, you can create a Group and memorize the transactions.

Give your Group a Name and click the button in front of Automate Transaction Entry. Open the list in the field next to How Often and select the billing interval. Choose the Next Date to indicate when this group billing should begin. If the charges should be entered on a limited basis, enter the Number Remaining. And be sure to fill in the Days In Advance To Enter if that’s applicable. Click OK.

Next, you’ll assign the customers who should be billed monthly to your Group. Click Statement Charges on the home page again to open your A/R register. Select each customer one at a time and right-click on the statement charge that you want to recur monthly, then select Memorize Stmt Charge. In the window that opens, give the transaction a new Name if you’d like (this will not affect the transaction, only how it’s listed). Click on the button in front of Add to Group and select the Group name from the drop-down list. Repeat for each customer you want to include.

Keeping Track

If periodic statements are your primary customer billing method, this system should work fine. But if you also send invoices and/or collect payment at the time of the sale, you’ll need to remember that your statement charges must be billed on a regular basis, too. We can go over your customer billing procedures with you to determine whether you’re using QuickBooks’ tools wisely – or whether some changes could improve your collection of payments.

Receive Payments the Right Way in QuickBooks®: Your Options

How you record a customer payment in QuickBooks depends on why and how you received it.

One of the reasons we like QuickBooks is because it uses language and processes that are familiar to small businesspeople. Instead of using the term “accounts receivable,” it has a menu label that says Customers and menu items that use phrases like Create Invoices and Receive Payments. You would have to go into the Chart of Accounts to find standard accounting terminology – and we never recommend that you do that without consulting with us first.

Yet when you’re doing customer-related tasks, you’re following a traditional accounts receivable workflow, a series of steps that completes a sales cycle, like Estimate | Invoice | Payment | Deposit. QuickBooks keeps it simple for you and doesn’t often force you into unfamiliar territory.

One of the more pleasant elements of accounts receivable is the process of receiving customer payments. There’s more than one way to do this, and it’s very important that you use the correct way in each situation.

Payment Methods

Before you record your first payment, you’ll need to make sure that QuickBooks is set up to accommodate its Payment Method. QuickBooks comes with some standard types, but you can add, edit, and delete your own options (though not those that are built in to the software).

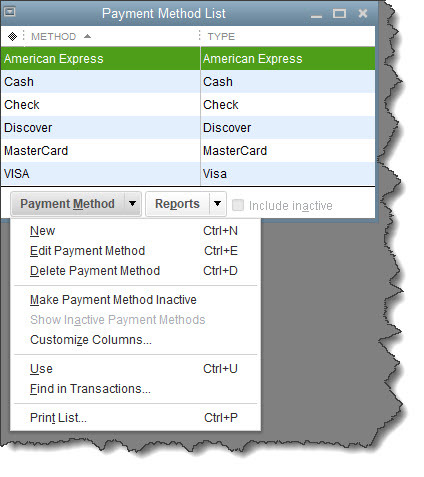
Open the Lists menu and click Customer & Vendor Profile Lists, then Payment Method List. This window will open:

You can work with Payment Method options in this window.

To use any of the commands in the Payment Method drop-down list, you’d highlight the method by clicking on it and opening the options list by clicking the down arrow in that field.

Note: When you add or change an existing entry, the window that opens contains fields for both Payment Method and Payment Type. They should be identical or at least very similar.

Settling an Invoice

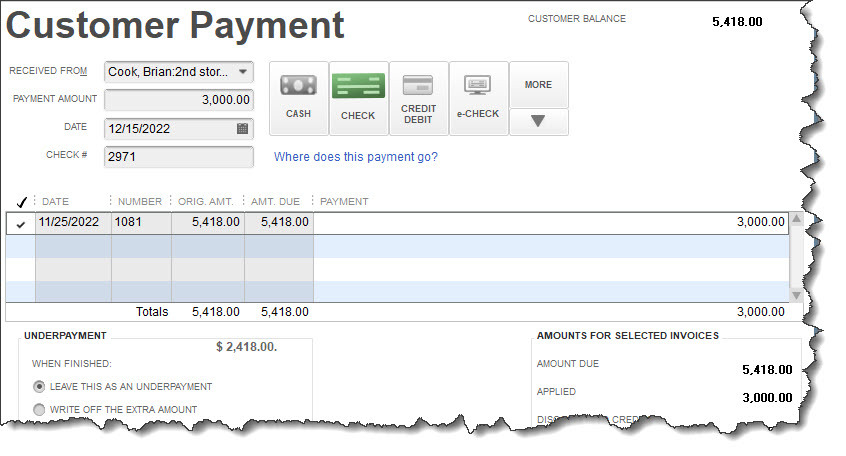
If your company sends invoices, you’ll need to record their matching payments in the Customer Payment window. Click Customer | Receive Payments or the Receive Payments icon on the home page. There’s also a button for this in the toolbar in an open invoice. However you get there, here’s what it looks like:

You’ll record payments that customers send in response to invoices in this window.

Select a customer in the RECEIVED FROM field, and any outstanding invoices will appear in the table below. The CUSTOMER BALANCE appears in the upper right corner. Enter the PAYMENT AMOUNT and verify the date.

Click in the box for the correct payment method to the right. If it’s a check, enter the number in the CHECK # field. If you choose CREDIT DEBIT, you can enter the card details in the small window that opens. If you provided this information in the customer’s record and chose that as the PREFERRED PAYMENT METHOD, it should fill it in automatically.

Note: To set a PREFERRED PAYMENT METHOD, which will save time, open the customer record and click the small pencil icon in the upper right. Click Payment Settings and complete the fields in that window.

If the customer has paid less than the balance due, you can either LEAVE THIS AS AN UNDERPAYMENT or WRITE OFF THE EXTRA AMOUNT. Select one of those two options in the lower left and save your work when you’re done.

Instant Payments

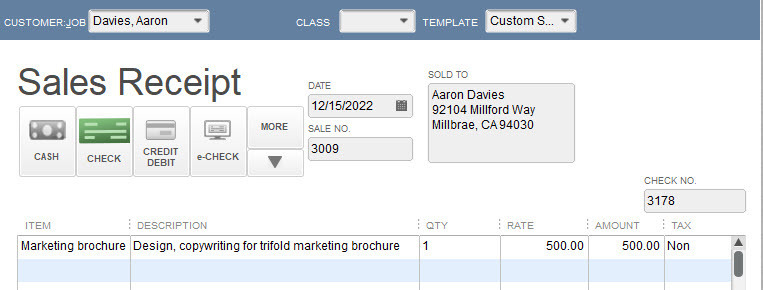
You’ll use a different form when a customer gives you a payment in exchange for the goods or services you provided, without receiving an invoice. Click Customers | Enter Sales Receipts to open a window like this:

If a customer gives you a payment without receiving an invoice, you’ll provide them with a Sales Receipt.

You’ll complete this form much like you did the CUSTOMER PAYMENT window, except you won’t be applying the payment to an existing invoice.

Tip: If you have a merchant account or are willing to get one, you can record payments and email sales receipts at remote locations on your mobile device. We can walk you through the setup.

Receiving payments from customers is one of the easier tasks you’ll do as a QuickBooks user, but if you don’t use the software’s tools correctly, your books will be difficult to untangle. We can help ensure that you’re doing this element of your work right from the start; just contact us to schedule a consultation.

How Do You Track Jobs in QuickBooks? Part 2

In this second of a two-part series, we’ll explore how you use the job-related records you’ve created.

Last month, we showed you how to start building a foundation for tracking jobs in QuickBooks. We explained that you can use the software’s jobs tools to track income and expenses for any related group of items and/or services (you can think of them as projects, if you prefer).

We covered three elements of preparing to use “jobs”:

  • Creating job records that you can use in transactions (example: develop promotional materials)
  • Creating item records that can be assigned to jobs (example: website development)
  • Determining whether you’ll need to create a new account in your Chart of Accounts for your job income and expenses. You should consult with us anytime you think it might be necessary to modify the Chart of Accounts.  

Using Your Job-Related Records

Now that you’ve recorded the items and jobs themselves, you can start using them in transactions, and eventually track your progress by generating reports.

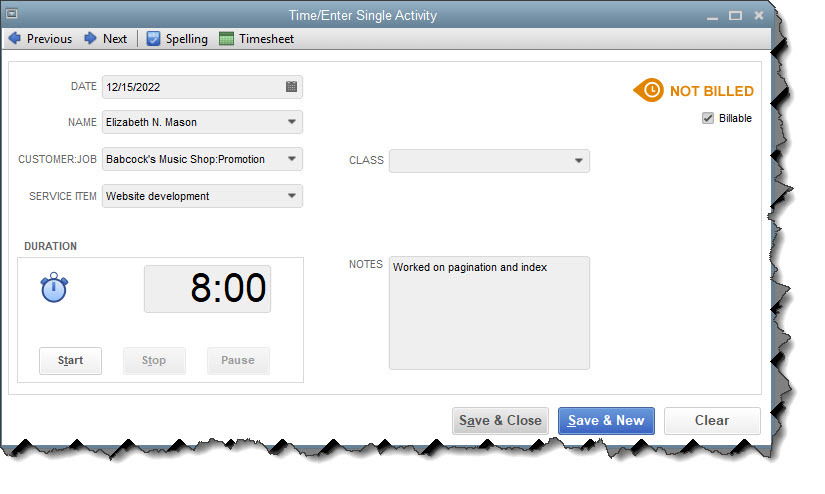
Let’s say you worked eight hours on website development for your promotion job. You’d open the Employees menu and select Enter Time | Time/Enter Single Activity to open this window:

You can enter individual, billable activities and assign them to jobs.

In the example above, you’re limited to recording one day’s work on a specific SERVICE ITEM. You’d verify the date and select from the drop-down lists to complete the fields for employee NAME, CUSTOMER:JOB, and SERVICE ITEM. You can either use the timer to time the job or enter the number of hours manually in the DURATION box. Click in the Billable box to create a checkmark and add NOTES if you’d like. The CLASS field is optional; talk to us if you’re not familiar with this feature.

 If you worked on two separate service items on the same day for that CUSTOMER:JOB, you would create two individual records. You can also enter billable activities directly on a timesheet by clicking Employees | Enter Time | Use Weekly Timesheet. Once you select the employee NAME at the top, any single activity(ies) you created that week will appear as individual records, and vice versa.

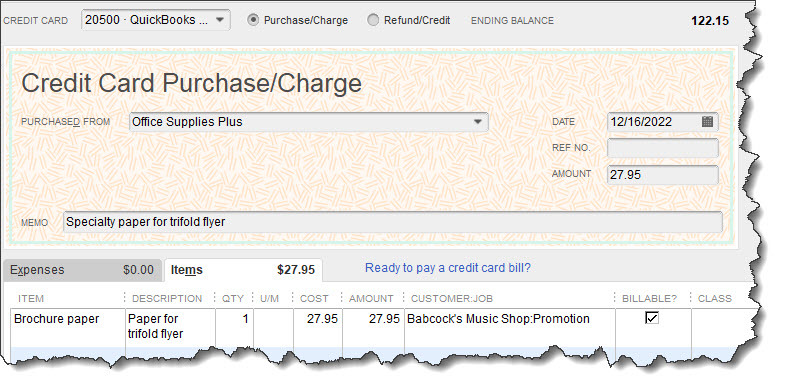
Writing a check or using a credit card for a job-related purchase that should be billed to the customer? You’d fill out these forms in QuickBooks like you usually do, making sure that you document the items or services by highlighting the Items tab, select the correct CUSTOMER:JOB, and make a checkmark in the BILLABLE? column.

If you write a check or charge your credit card for purchases that can be billed to a CUSTOMER:JOB, be sure to record it in QuickBooks.

If you’ll be doing some billable driving for your job, you should also be tracking your mileage in QuickBooks. Open the Company menu and select Enter Vehicle Mileage. If you haven’t created a VEHICLE record in QuickBooks, click <Add New> and easily do so. Complete the rest of the fields and save.

Tip: Do you want to see some of your overhead expenses on job costing reports? Create a CUSTOMER:JOB named “Overhead” and assign related costs to it.

Billing the Billables
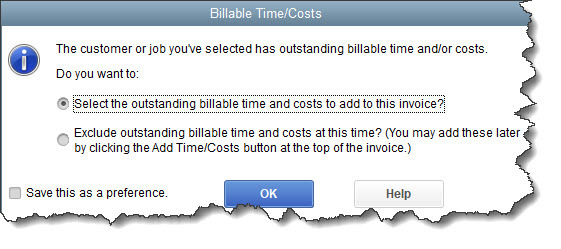
When the time comes to invoice your customers (Customers | Create Invoices), you’ll see how your careful work in QuickBooks simplifies that task. Open an invoice form and select a CUSTOMER:JOB. If you’ve entered billable items for him or her, this small window will open:

When you create an invoice for a CUSTOMER:JOB who has billable time, mileage, or other expenses, QuickBooks can automatically add them.

If you leave the first option checked and click OK, another window will open that lists all of the expenses you’ve marked as billable to the customer, arranged by type. Click in the first column of each expense you want to include and click OK. Your invoice containing those entries will open. Do any editing necessary, and then save it.

Note: You’ll probably notice two fields in the Choose Billable Time and Costs window that refer to Markup. This is an advanced concept that we can explore with you, should you want to charge customers more for expenses you’ve incurred on their behalf.

Related Reports

QuickBooks contains a wide variety of reports related to your work billing customers for jobs. Click Reports in the navigation pane or Windows menu, then Jobs, Time & Mileage to see what’s available. Choose a date range and click Run to see them appear with your own data.

If you’ve never worked with jobs in QuickBooks, we strongly recommend that you let us help you here. There are a lot of moving parts, and you don’t want to miss out on any of your efforts or expenses that are billable.