Should You Charge Late Fees? QuickBooks Can Help

Do you have a lot of aging receivables? Assessing finance charges can speed up customer payments.

Have your customers been submitting payments later than usual these last several months? It wouldn’t be surprising. Many businesses are struggling to pay bills these days. Still, you need to get paid – and on time. Tardy receivables have a negative impact on your own cash flow.

We’ve discussed ways to encourage prompt payment in past columns. For example, you can start accepting credit/debit cards and direct bank transfers, make sure invoices go out immediately after a sale, or offer a premium like a small one-time discount for paying on time 12 months in a row to name a few.

You can also assess finance charges on remittances that come in after the due date. QuickBooks provides the tools to allow this.

Setting It Up

Before you start charging extra for late payments, you’ll need to do some setup work in QuickBooks. Open the Edit menu and select Preferences, then Finance Charge. Click the Company Preferences tab. You’ll see a window like this:

Graphical user interface, text, application

Description automatically generated

You can set your own preferences for assessing finance charges in QuickBooks.

You’ll have to answer these questions and enter your responses in the window:

What will your Annual Interest Rate (%) be?

What will you set as a Minimum Finance Charge?

Will you allow a Grace Period? This is the number of days given to your customers to make their payments after the due date before finance charges kick in. This is typically from 15-21 days.

Where should captured finance charges go? In this example, the Finance Charge Account has been assigned to Other Income

Do you want to Assess finance charges on overdue finance charges? Some jurisdictions don’t allow you to charge interest on overdue interest charges. If you want to do this, check on your local lending laws – specifically state usury laws which may limit the amounts that can be charged.

When will you start to Calculate charges? In this example, the due date is selected. So, QuickBooks will start to add finance charges 21 days after the stated due date. If you choose invoice/billed date, you’ll want to make your grace period longer. This can be rather a confusing concept. Contact us if you want a deeper explanation.

Assessing Finance Charges

There’s one more issue on the Preferences screen that you’ll need to resolve. QuickBooks offers two ways to notify customers about finance charges. You can’t include them on invoices, like you may be used to seeing on credit card bills. Rather, you have to print separate invoices that only contain the finance charges. 

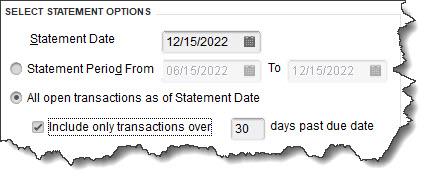
If you put a check in the box in front of Mark finance charge invoices “To be printed,” you can print them out separately. If you leave the box blank, the finance charges will appear on the customer’s next statement. Click OK when you’re done with this window.

Graphical user interface, table

Description automatically generated

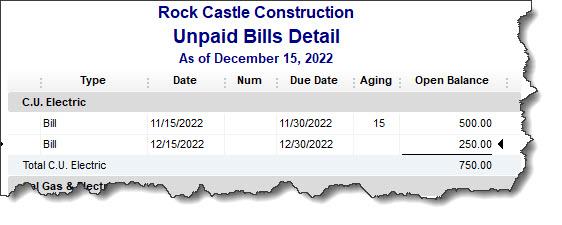
QuickBooks can find the overdue invoices that need to have finance charges applied and display them in a window like this one.

Open the Customers menu and select Assess Finance Charges. A window like the one in the image above will open. Make sure that the Assessment Date is the actual date you want to assess charges, which may not be the current date. Click in the Assess column to create a checkmark for every customer you want to charge. When you’re done, click Assess Charges.

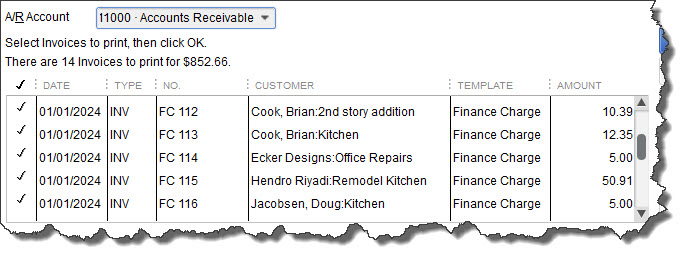
When you’re ready to print finance charge invoices, open the File menu and select Print Forms | Invoices to open a window like this:

Graphical user interface, table

Description automatically generated

Invoices with an FC preceding the number are finance charge invoices ready for printing.

Lots to Learn

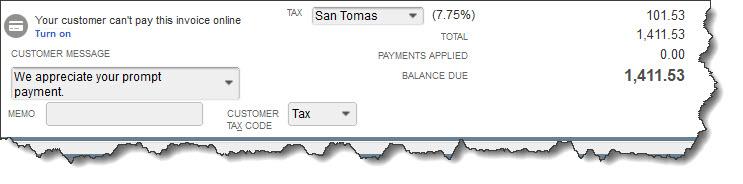
Besides knowing whether you can charge finance charges on existing finance charges, there are other considerations. For example, do your state’s lending laws allow you to use the phrase “finance charge” or must you use something like “late fee?” When should you assess finance charges? Have you notified your customers of your intent to begin assessing finance charges? This is definitely something they should know in advance. You might need to add this to your customer message on invoices.

We can’t tell you whether finances charges are the path you should take to improve your cash flow as there are many issues to consider. But we can help you with the mechanics of doing so and are here to answer any questions. Let us know if you want to get started using this tool, we can help.

New to QuickBooks® ? Try These 5 Activities

QuickBooks can be overwhelming when you first start using it. Here are five ways to familiarize yourself with some of its features to get you up and running in no time.

Tackling any new piece of software can be daunting. Add a complex process like accounting to the mix, like QuickBooks does, and you may feel apprehensive about your ability to learn how to use it. 

But QuickBooks was designed for small businesspeople, not for accountants nor technical wizards. It uses familiar language and forms, and it works like other Windows programs. That doesn’t mean, though, that you’ll be able to just jump in and start completing your accounting tasks. 

Here are five steps you can take to start familiarizing yourself with QuickBooks that will get you up and running in no time. We’ll assume that you’ve already created your company file. If you need help with this critical first step, let us know.

Open a sample file.

While you’re exploring QuickBooks, it’s a good idea to work with a sample file. That way, you can look around and practice without risking compromising your company file. You’ll be able to see how completed records and transactions should look and try your hand at entering sample data of your own.

QuickBooks comes with sample files that allow you to practice entering data without harming your own company file.

Before you open a sample file, you’ll need to close your current company. Click on File in the upper left to open that menu, then select Close Company. A window will open that should have your company file in its list. Below that, you’ll see three boxes containing different options. Click on the down arrow next to Open a sample file, as pictured above (this may look slightly different in your version). Choose the one you want to open and click on it. QuickBooks will load again with that file open. When you’re done looking at the sample file, go to File | Close Company again. The No Company Open window should appear again. Click on your company file name and then on Open to return to your own file.

Learn where your lists are.

You’ll be storing a great deal of information in lists. QuickBooks maintains these automatically sometimes when you enter information in a record or transaction. For example, when you create a record for a product or service you sell, it goes into a master list that you can access by opening the Lists menu at the top of the screen and clicking on Item List. You’ll also open the Lists menu when you want to add options to an existing type of list, like Class List (QuickBooks allows you to assign Classes to transactions so you can group related information, like New Construction or Remodel if you’re a contractor).

You’ll sometimes select from lists of commands in QuickBooks. This is the menu for the Item List.

Try a Transaction.

There are two transactions you’ll probably be using the most: invoices and sales receipts. QuickBooks comes with templates that resemble these sales forms’ paper counterparts. You simply fill in the blanks by entering data and selecting options from drop-down lists. Open the Customers menu and select Create Invoices. Click the back arrow above Find in the upper left corner to see sample invoices. Then click the right arrow to get back to a blank form and create an invoice by clicking the down arrows in blank fields to see your sample lists.

Explore Snapshots.

Once you start entering records and transactions, you’ll want to be able to access that information in ways that provide insight on how your company is doing. You’ll eventually start running reports in QuickBooks, but the software also accomplishes this through its Snapshots. There are three of them, and they all provide these overviews by using data tables and charts. Open the Company menu and click on Company Snapshot, then click the tabs to move between Company, Payments, and Customer. You’ll learn how QuickBooks provides real-time information about your finances.

Look at the Income Tracker.

It’s easy to see the status of your invoices (and estimates) in QuickBooks. Open the Customers menu and select Income Tracker. Colored bars at the top of the screen show you what’s outstanding and what’s been paid. A list of the related transactions appears below these bars.

This partial view of the Income Tracker tells you how much money is tied up in unbilled Time & Expenses and unpaid Invoices.

As we said earlier, QuickBooks can be overwhelming when you first start to use it. We can ease that transition by providing training and helping you move your existing accounting information over to the software. If you’ve started using QuickBooks on your own and you have questions, we can always step in to offer answers.

Stay healthy, and best wishes for a more prosperous 2021.

How Do You Create Price Levels in QuickBooks?

QuickBooks allows you to create Price Levels that you can assign to customers and jobs and to individual items.

You already know that when you create a product or service record in QuickBooks, you must assign a sale price to it. But did you know that QuickBooks gives you a great deal of flexibility when to comes to pricing items you sell? The software allows you to create one or more additional Price Levels that you can access in invoices, estimates, sales receipts, credit memos, and sales orders.

There are three ways you can use these. Once you’ve created them, they’ll be available in a drop-down list in the Rate field. This means you can assign them manually to individual transactions. The second option is to assign them globally to specific customers or jobs. Once you’ve done so, that price will apply every time you create a transaction for one of them. Finally, you can create price levels for selected items.

Here’s how it works. Let’s say you want to be able to create a price level that’s 15 percent below the actual price that you can use in individual transactions. You open the Lists menu and select Price Level List. Click the arrow in the lower left corner next to Price Level and select New. A window like this will open:

You can create price levels in QuickBooks and assign them to individual sales transactions.

Fill in the field next to Price Level Name, and then click the arrow next to Price Level Type. Select Fixed %. Select decrease from the drop-down list on the next line and enter your percentage number. Round up to the nearest is an optional field, Click OK when you’re done. The next time you create a sales transaction, your new price level will be available as an option when you open the drop-down list in the Rate column.

When you need to edit or delete a price level, go to Lists | Price Level List again and click the arrow next to Price Level in the lower left corner. You have several options here. You can, for example, make a price level inactive so it doesn’t appear on the list. The field next to Price Level is labeled Reports. Click on the arrow to see what’s available there.

Customers and Jobs

You can also apply a price level you’ve created to a specific customer or job, perhaps to reward a customer for frequent purchases. When you do so, that rate will appear every time you enter a sales transaction for the customer or job you selected.

Open the Customers menu and select Customer Center. Double click on a customer or job’s name to open the record. Click on the Payment Settings tab. Click the arrow in the field next to Price Level and select the right one, then click OK.

You can assign a Price Level to specific customers or jobs.

Per Item Price Levels

QuickBooks also allows you to set custom prices for specific items that are associated with preferred customers or jobs (this option is only available if you’re using QuickBooks Premier or Enterprise). Let’s say you want to give a 10 percent discount to specific customers who purchase your website development services. Go to Lists | Price Level List and click the arrow next to Price Level in the lower left corner again, then select New (you can also get to the New command by right-clicking anywhere in the window). 

Give your price level a name (like Web Development 10 Off), then select Per Item from the Price Level Type drop-down list. Click in front of the Item you want to include. The fields in the next line should read as pictured in the image below: 10% | lower | standard price. Click Adjust. You’ll see your reduced prices in the Custom Price column in the table above.

You can establish a Price Level for specific items in QuickBooks.

Again, the rounding field is optional. When you’re finished here, click OK. The next time you create a sales transaction for a customer who is eligible for the lower price, you’ll select Web Development 10 Off from the drop-down list in the Rate column.

Feel like you’re outgrowing your current version of QuickBooks, or is it several years old? Talk to us about upgrading. We’re here to support you and to help you more effectively use the software as your business changes and grows.

Make QuickBooks® Yours: Customize the Desktop

Make QuickBooks work faster for you by changing a few settings.

Whether your business has been locked down because of the pandemic, or you’re scrambling to hold things together with fewer employees or diminishing sales, you’re probably leaning on QuickBooks more than ever. You may be watching dwindling inventory items closely or monitoring your daily cash flow or trying to collect on invoices that aren’t being paid because your customers are short on money.

QuickBooks can help with all these accounting tasks. But you certainly don’t want to waste time now just dealing with the software’s mechanics.

As always, we’re available to help as you deal with the toll that COVID-19 is taking on your company. We’d also like to suggest that you spend a little time customizing QuickBooks. Streamlining its operations will take some of the unnecessary frustration out of your work life.

Getting Around Quickly

QuickBooks tries to accommodate different work styles and preferences by providing multiple navigation methods. These are:
• The old, standard Windows menus.
• The home page’s icons.
• The Icon Bar that appears in the left vertical pane by default (you change its position by opening the View menu).

If you’re going to use the Icon Bar, we recommend that you set it up to make your most often-used tools prominent. Right-click in the toolbar and click on Customize Shortcuts to open the Customize Icon Bar window. In the upper left corner, you’ll see a list of your icons as they’re currently arranged. You can rearrange them by grabbing the small diamonds to their left with your mouse and dragging them to their new positions. You can change their labels by clicking Edit, or Delete them.

You can add almost any window in QuickBooks to your fast-access Icon Bar.

You’re not limited to the items in the list. Click Add, and the Add Icon Bar Item opens, as pictured above. Click on any of the ones you want to include in the Icon Bar, then click OK. QuickBooks allows you to add almost any screen to your Icon Bar. Navigate to the window you want to add, then open the View menu and select Add…to Icon Bar. If you never use the Icon Bar, you can collapse it by clicking the small arrow to the right of the Search box at the top of the pane. You can also close the home page by clicking the lower of the two small X’s in the upper right.

Tile Your Windows
If you regularly work with the same handful of screens, there’s a faster way to access them. Open them all, then open the Window menu and select Tile Vertically. All the windows will be displayed on the same screen, arranged vertically. If there are enough of them, they will overlap. To activate one, just click on it. You can open it to full screen by clicking the small rectangle in the upper right and return to your vertical arrangement by clicking the double rectangle in the upper right.

If you’d prefer, you can Tile Horizontally. Or, you can click Cascade to display them stacked on top of each other with only each window’s title label showing, as shown below. If you want to go back to a blank screen and start over, click Window | Close All. The Window menu also displays a list of open windows that can be used for navigation.

If you click Window | Cascade with multiple windows open, QuickBooks will stack them, with only the bottom screen showing. Click on a title label to open a different window.

The Desktop View

There are other ways you can make QuickBooks work the way you want it to. Open the Edit menu and select Preferences, then Desktop View. Click on the My Preferences tab if it’s not already highlighted. There are several preferences here. Look under the Desktop heading. You can have QuickBooks open to the configuration of windows you want. Your options are:

• Save [the windows that are already open] when closing company.
• Save current desktop (a specific set of windows).
• Don’t save the desktop (always open to just the home page).

Click the Company Preferences tab to add or remove icons from the home page. This is also where you turn features on and off.

We’re Still Here

All these suggestions may seem minor to you. But they will save time. More important, they will give you a better sense of control over the hours you spend on accounting tasks. And with so many things out of our control right now, creating a software environment that is tailored to your workflow can benefit you.

We know that you may be struggling right now to maintain your financial health, as well as your physical health. More than ever, we hope you’ll contact us if you have a QuickBooks or general accounting problem that we could solve. We’ll be happy to do what we can to help you through during this very challenging period.

Using QuickBooks’ Reminders and Calendar

Now, more than ever, you need QuickBooks to track what needs to be done.

COVID-19 has transformed the entire U.S. small business landscape in just a few short months. Companies are struggling to stay afloat. We all just want to get back to “normal,” but it’s unclear when that will happen.

We’d like to help you as much as possible during these uncertain times. One of the ways we can do that is by supporting you as you keep a close watch on your income and expenses. QuickBooks is our go-to tool for that purpose, and we hope you’re making the best possible use of the software right now.

There are steps you can take to ensure that QuickBooks is working quickly and well for you, and that you’re attending to the work you must do every day. The software’s Reminders and Calendar can help you stay current with your accounting.

Setting Up Reminders

You don’t want to let anything slip through the cracks right now. It’s nearly impossible to keep up with your QuickBooks tasks without using the software’s Reminders feature. Before you start using this, you’ll have to set up its structure. Open the Edit menu and select Preferences | Reminders. This window will open:

A screenshot of a cell phone

Description automatically generated

You can tell QuickBooks which situations should trigger Reminders.

This window should open to the My Preferences screen. Click the box in front of Show Reminders List when opening a Company file to create a checkmark. Then click Company Preferences. You’ll see a list of QuickBooks “events,” like Checks to Print. You can tell QuickBooks how many days in advance you’d like to be warned about this pending activity by entering a number in the box in front of days before check date. You can also request that this appear in either Summary or List form. If you don’t want to be notified about any of them, click the button below Don’t Remind Me.  When you’re done here, click OK.

The next time you open QuickBooks, your reminders will appear in a window on top of your home page. When you double-click on one, the transaction or other item will open. Two icons in the upper right of the Reminders screen open your Preferences and a blank To Do form. Here, you can schedule a call, task, appointment, etc. and associate it with a customer, vendor, or employee if desired. This item will then appear in your Reminders list. 

A screenshot of a social media post

Description automatically generated

The Reminders window appears when you open the related Company file; you can add To Do’s manually.

A Graphical View

QuickBooks’ Reminders are not the only way you can ensure that you’re meeting your accounting obligations. You can use the Calendar to see what you’ve scheduled and accomplished every day.

As you did with Reminders, though, you should visit this tool’s Preferences page (Edit | Preferences | Calendar). Here, you’ll only need to work with the options under the My Preferences tab. You can choose from among a Daily, Weekly, or Monthly view, or just have QuickBooks Remember last view. Your calendar can display your choice of a Weekly view: a Fixed view of 5 or 7 days or a Variable view of 5/7 days. And, you can show All Transactions, To Do, Transactions Due, or choose one type of transaction (Invoice, Sales Receipt, Bill, etc.).

A screenshot of a cell phone

Description automatically generated

How would you like your Calendar displayed? QuickBooks lets you choose from among options.

You can also define Upcoming and Past Due Settings. You can Hide or Show these, Show only if data exists, or remember the last settings. QuickBooks allows you to choose the number of days’ worth of data that will be displayed for both Upcoming data and Past due data.

You can open the Calendar itself from the Company menu and by clicking a link in the Toolbar or on the Home Page. You’ll see a graphical calendar in the View you selected. Every day where there’s been—or is scheduled to be—activity will say either Due or Entered, with the corresponding number of transactions in parentheses. Below that is a list of Transactions Entered; you can double-click on any of them to see the actual transaction form. 

A list of upcoming and past due transactions appears in the right vertical pane. Fields and buttons at the top of the screen allow you to change the View and limit the list to a specified type of transaction. You can also add To Do’s from this page.

We hope these tools are helpful for you as you navigate through today’s choppy financial waters. Please do let us know if we can assist you in managing your company’s critical accounting tasks. We want you to keep your business going as best you can until we get to the other side of the ongoing crisis.

How to Back Up and Move a Company File in QuickBooks®

Your QuickBooks company file is gold. Make sure you know how to back it up and restore it properly.

You may not think of your QuickBooks company file as being portable. It lives safely on the hard drive of your desktop and/or laptop computer. You wouldn’t want it to be anywhere else, right?

However, the most common reason businesses move these critical files is because they’ve purchased a new computer or they may also want to share their data. QuickBooks allows you to create a backup file that you can save to a USB drive or CD, or to another folder on your company’s network. Once it’s available at its destination computer (where a copy of QuickBooks has already been installed), you (or another recipient) will be able to restore it.

Note: These instructions were created using QuickBooks 2018. If you don’t see what’s being described here in your version, contact us.

Making a Backup

You shouldn’t wait until you have to move a QuickBooks company file before backing it up, though. This is something you should be doing regularly. 

Before you start, make sure your copy of QuickBooks is updated, which shouldn’t be a problem if you’re set up with automatic updates. If you’re not, and you’ve ignored those messages about updates that appear when you open QuickBooks, we can help you launch a manual update and configure QuickBooks to automatically update.

With QuickBooks in Single-User Mode, open the File menu and hover over Back Up Company. Select Create Local Backup. You’ll see this window:

A screenshot of a cell phone

Description automatically generated

You can save your QuickBooks backup copy locally or online.

Intuit offers a service called Intuit Data Protect ($99.95 annually) that allows you to back up your company file online (we can help you explore this if you’re interested). Let’s assume here, though, that you have a USB drive plugged into your computer and are ready for your backup.

Click the button next to Local backup, then the Options button. In the window that opens, you’ll select your destination location and answer a few questions about your backup. One of these gives you the option to get a reminder to back up your file every x times you close QuickBooks, should you choose to do manual backups. 

Click OK to return to the Create Backup window, then click Next. The following screen gives you the option to save your file and/or schedule future (automatic) backups. If you choose to simply save it now, check that button and click Next to verify the destination location and file name.

Note: Before you save your backup file, give it a name that is different from your regular company file. Write down the exact file name and its location.

Click Save. A small window will open displaying your progress, and you’ll get a confirmation message when the file has been saved with a .qbb extension. You can now take the removable storage device to the destination computer, where QuickBooks should already be installed.

Warning: If you want to schedule automatic backups by clicking on one of the two options in the Create Backup window, please consult with us first. Automated processes in QuickBooks can save time and effort, but when you’re dealing with your irreplaceable company file, you must get it right.

Restoring a Backup File

Once that’s done, open the File menu and select Open or Restore Company on the destination computer. This window will appear:

A screenshot of a cell phone

Description automatically generated

QuickBooks displays this window when you select File | Open or Restore Company.

Click the button in front of Restore a backup copy. Click Next and select Local backup. Then click Next again. Click the down arrow next to the Look in field and click on the location of your backup file to display its contents. Browse until you find the file (it should end in .qbb), then highlight it by clicking on it. Click Open.

QuickBooks displays a window that asks where you want to restore your file. You’ll click Next to find it in the Save Company File as window. The Save in field should point to your main QuickBooks directory (like QuickBooks 2018) and the File name field should show the correct file name. 

When everything looks correct, click Save. QuickBooks will convert your .qbb file to the standard QuickBooks file type, .qbw, and open it.

Care Needed

Losing your QuickBooks data, as you know, would be absolutely disastrous. But there may be occasions when you’ll need to open a backup copy of your company file on a different computer. We would be happy to walk you through this the first time you do it; in fact, we highly recommend it. As always, we’re available to work with you on any QuickBooks issues you’re experiencing – or to get you up and running for the first time.

Sales Receipts, Invoices, and Statements in QuickBooks®

QuickBooks allows you to create multiple types of sales forms for different situations. Here’s a look at what they are and when to use them.

When you buy something at a store, you want a piece of paper that shows what you purchased and what you paid. If you receive products or services before you pay for them, you certainly expect to receive a bill. And if you have several transactions with the same company and want clarification on what you’ve paid, and what you owe for a specific time period, the company can usually send you a summary.

Your customers want the same things. That financial documentation might be difficult for you to provide if you’re still doing your accounting manually on paper.

Fortunately, QuickBooks has a solution. Or, rather, several solutions. The software includes templates for all of the sales forms that you’ll probably ever need: invoices, sales receipts, and statements. Here’s an introduction to when and how to use them.

Sales Receipts

A screenshot of a cell phone

Description automatically generated

When a customer pays you on the spot, you can create a sales receipt.

When you receive full payment for a product or service at the time of the sale, the correct form to use in QuickBooks is the Sales Receipt. Click the Create Sales Receipts icon on the home page or open the Customers menu and select Enter Sales Receipts. You’ll see a form like the partial one pictured above.

Click the down arrow in the Customer:Job field and select the correct one or <Add New>. If you assign transactions to Classes, pick the right one in that list. The Template field should default to the appropriate form. If you’ve created more than one sales receipt template, select the one that you want. Click the icon above the correct payment type.

Tip: Want to be able to accept credit cards and eChecks? You’re likely to get paid faster by some customers. You’ll also be able to accept payments on your smartphone or tablet and create receipts. Talk to us about adding this capability.

Select the appropriate Item(s) from that drop-down list and enter a Qty (Quantity). Be sure to apply the sale’s Tax status by opening that list. (If you know that you’re responsible for paying sales tax on at least some of your sales but you haven’t set this tracking up in QuickBooks yet, we can work with you on that. It’s important.) When you’ve finished filling in the table with all the goods or services you sold, you can save the transaction and either print it or email it to your customer.

Invoices

A screenshot of a cell phone

Description automatically generated

After you’ve completed the top half of an invoice, you’ll see something like this at the bottom.

You’ll create and send Invoices to customers when you’ve received either a partial payment or no payment at the time of the sale. Those completed transactions become a part of your total Accounts Receivable (money owed to you). Click Create Invoices on the home page or go to Customers | Create Invoices. Fill out the fields at the top of the screen like you did with your sales receipt; the forms are almost the same. Invoices, though, have Bill To and Ship To addresses, as well as fields for the sale’s Terms and Due Date.

You shouldn’t have to do anything with the bottom half of the screen (pictured above) unless you want to include a Customer Message, since the information here is carried over from the top of the screen. Check to make sure the Tax Code is correct, though.

It’s important to note, it’s an either/or situation when it comes to creating an invoice and a sales receipt for the same transaction. It’s best to not use sales receipts for invoice payments, as it can cause issues.

Statements

A screenshot of a cell phone

Description automatically generated

When you create statements, you’ll first choose the customers who should receive them.

Statements are very useful when you have multiple customers who are past due on their payments (you can find this out by running the A/R Aging Summary report, which you’ll find under Reports | Customers & Receivables). Click the Statements link on the home page or go to Customers | Create Statements.  You’ll first have to select the customer(s) who should be on your list, as pictured above. There are several other options on this page that will help you refine this group. When you’re done, QuickBooks will automatically generate them, and you can print or email them.

You’ll save a lot of time when you use QuickBooks’ sales forms. Your bookkeeping will also be more accurate, and it will be easier to track down specific transactions. If you use them conscientiously, you’ll be able to run reports that provide comprehensive overviews of various elements of your finances.

Do you have questions about any of this, or are you just getting started with QuickBooks? We’re happy to schedule a consultation to determine what your needs are and how we can assist. Contact us, and we’ll set something up.

Start 2020 Right: Get into the Report Habit

It’s a good time to start new habits – or refresh old ones. Running reports regularly will help you make better business decisions.

Whether or not you made New Year’s resolutions, you probably look at January as a fresh start in personal and professional matters. Unfortunately, we can’t help you join a gym or organize your closets or meet your monthly sales goals.

What we can do, though, is encourage you to start a new habit that may actually leave you more time for those activities and even improve your company’s financial bottom line. We’re talking about committing to using the reporting tools QuickBooks offers.

You can’t possibly know how your business is doing unless you take advantage of this critical feature. It’s the payoff for all the hard work you do keeping up with your daily accounting workflow. Here are five things you should try.

Visit QuickBooks’ Report Center: 

As you know. QuickBooks devotes an entire menu to reports, dividing them into types (Sales, Purchases, Inventory, etc.). When you hover your mouse over one of these categories after opening the Reports menu, you’ll see a list of all related reports. 

Click on Report Center, though, and you’ll see a kind of home page for reports. They’re categorized by type, just like in the main Reports menu, but there’s much more you can do here.

A screenshot of a cell phone

Description automatically generated

Click on a report name in the Report Center and you’ll have numerous options.

When you click on the graphic representing a report, you’ll first be able to change the date range by clicking on the down arrow. Then you can Run the report, see a brief explanation by clicking Info, click on Fave to add it to your list of Favorites, or open Help. The tabs at the top of the screen allow you to toggle between these Standard views, reports you’ve Memorized, Favorites, Recent, and Contributed (report templates created by individuals outside of Intuit). 

If you know exactly what reports you want to run it’s probably easier to just use the Reports menu, but the Report Center is a great place to learn about and organize your content.

Customize Your Reports:

You’re probably used to changing the date range on your reports, but have you ever explored any of QuickBooks’ other customization tools? You can use them on any report. Click the Customize Report button in the upper left. Click on the Display tab, and you can change the report’s columns by checking or unchecking entries in the list. Filters are more complex, and you may need our help setting up very specific, multi-filter reports. They offer a way to pare down your report to contain just the data you want. You could, for example, prepare a report that only includes one or more Transaction Types or customers who live in a specified state.

Memorize Your Reports:

Once you’ve changed columns and filters in a report you’ll run frequently, you can save those settings so you don’t have to go through all of that again. Open any report and click the Memorize button in the upper toolbar. The window that opens will ask if you want to save that customized report to a Memorized Report Group, which you can do by clicking the box and opening the list of groups. Either way, you can find your report by opening the Reports menu and selecting Memorized Reports.

A screenshot of a cell phone

Description automatically generated

If you want to create a new Memorized Report Group, open the Reports menu and click Memorized Reports | Memorized Report List. Open the Memorized Report drop-down menu and select New Group.

Schedule Your Reports:

The best way to get your report habit started is by creating a schedule of reports you need to see regularly. You can do this by setting up Reminders (Company | Reminders). Click the gear icon in the upper right corner to specify your Preferences and the + (plus) sign to add a reminder. QuickBooks 2017 and later versions offer a scheduling tool that allows you to share reports with others, but please don’t try this on your own. It’s a complicated procedure with many rules.

You’ve probably noticed that there is a report category called Accountant & Taxes. Some of these should be created monthly or quarterly, but you’ll need our help analyzing them as well. 

In the coming year, we strongly encourage you to expand your skills at generating reports. You can’t make realistic, effective plans for the future of your company without knowing its current financial state and its history. So start the year off right in 2020, and let us know how we can help.

How to Clean Up QuickBooks for 2020

We know December is a busy month. However, take some time now to make sure QuickBooks is ready for 2020.

Yes, it’s here again: the end of the year. You probably have a lengthy to-do list full of tasks that must be done before December 31. There’s one task—or rather, a series of tasks—that you should definitely add to that list: year-end QuickBooks cleanup. Following the guidelines provided here will do three things. It will:

  • Ensure that you’ve processed every 2019 transaction (or that you know why you can’t).
  • Give you a sense of closure, knowing that you’ve dealt with all your 2019 financial data.
  • Allow you to start your 2020 QuickBooks activities with as clean of a slate as possible.

First Things First

Before you start looking at transactions and running reports, check to make sure that your fiscal year is recorded correctly in QuickBooks. Open the Company menu and select My Company. Click the pencil icon in the upper right to open the Company Information window, then click Report Information in the tabs to the left. This window opens:

A picture containing screenshot

Description automatically generated

Is your company’s fiscal year recorded correctly in QuickBooks? If not, please contact us. Don’t try to fix this on your own.

Account For All Of Your Income

You certainly want to have received all the money owed to you by December 31 if at all possible. So, run a report to see which customers have outstanding, overdue balances. Open the Reports menu and select Customers & Receivables | A/R Aging Summary

The first column here will read Current. You don’t have to worry about these customers. It’s the next four columns that will require follow-up. If your default payment terms are 30 days, you’ll see columns for 1-30, 31-60, 61-90, and >90. Customers with dollar amounts in those columns have not met their obligations and are past due by those date ranges. 

Note: If your default terms are different (like 15 days), you’ll need to customize the report. In the toolbar at the top, you’ll see a field labeled Interval (days). Change it to reflect your own default terms and click Refresh in the upper right corner. 

If your report contains only a sea of zeroes in those four columns, everyone is paid up. If not, you can send statements to anyone who is at least one day past due to remind them of what they owe. Open the Customers menu and select Create Statements to see this window:

A screenshot of a cell phone

Description automatically generated

Partial view of the Create Statements window

Make sure the Statement Date is correct since QuickBooks will use this to calculate aging. Then you can either enter a specific Statement Period or request All open transactions as of Statement Date. If you choose the latter, you’ll most likely want to limit the statements to customers whose payments are overdue. So, you’d click in the box in front of Include only transactions over [your number here] days past due date.

Below these options, you’ll be able to indicate which customers should receive statements. The most common choice is All Customers (who fall into the group you just defined), but you can also send to one or multiple customers, for example. QuickBooks will display a list if you select one of these. The right pane of this window contains several additional options that you can check or uncheck. When you’re satisfied, you can Preview, Print, or E-mail the statements.

Pay Outstanding Bills

You should also try to settle your Accounts Payable before the end of the year. Open the Reports menu and select Vendors & Payables | A/P Aging Summary. Look for dollar amounts in the columns that show aging beyond the first column. You can also run the Unpaid Bills Detail report and look at the Aging column, as pictured here:

A screenshot of a cell phone

Description automatically generated

Look in the aging column of this report to see which bills are past due and by how many days.

Note: QuickBooks has multiple Preferences that relate to reports and aging. We can go over these with you if you haven’t explored them.

There are other tasks you should complete before December 31, some of which may require our assistance. These include reconciling all accounts, running year-end reports, and clearing any deposits that remain in the Undeposited Funds account. We’re here if you need us now, otherwise we can connect in the New Year.

Setting Up Sales Tax in QuickBooks®, Part 2

Now that you have your sales taxes set up, you’ll be able to use them in transactions and reports.

Last month, we talked about the process of setting up sales taxes in QuickBooks. To recap a bit, you first have to go to Edit | Preferences | Sales Tax to make sure the software is set up correctly for this use. This means you’ll need to understand exactly what your state and local sales tax rules are. You can learn this by going to your state’s Department of Revenue or Department of Taxation website.

State sales taxes are considered Items in QuickBooks; you create them like you would create product records. When local sales taxes are also required, you can set up Sales Tax Groups. You’ll be assigning these Items as well as Tax Codes to customers.

Using Sales Taxes

Once you have sales taxes set up, you can start using them in transactions. You can create them on the fly from within transactions, but we recommend taking care of this important housekeeping task before you start.

Image1

QuickBooks applies the Sales Tax Item or Sales Tax Group that you assigned to the customer on your invoices. You can see the others that are available.

Start by creating an invoice. When you reach the Tax column for your first line item, you’ll see that QuickBooks has already assigned Tax or Non to it based on the information in the item’s record.  You can mix taxable and non-taxable items on the same invoice. You can also add a new sales tax on the fly from the invoice itself. Click the down arrow in the Tax column and select <Add New>

Be sure you’re not required to pay sales tax on an item when Non is selected. You may not have to charge sales tax on, for example:

  • Nonprofit organizations
  • Out-of state sales
  • Items that your customers will resell

Tip: If you’d like, you can create more specific sales tax codes for these situations. You could use OOS for out-of-state sales, for example, LBR for labor, and NPO for nonprofit organization.

QuickBooks already includes Sales Tax Codes Tax and Non, but you can add additional ones that are more descriptive.

Be very careful with your sales tax classifications in QuickBooks. As we said last month, such errors will be discovered in a sales tax audit, should you ever be subject to one. 

Once you’ve entered all the line items in the invoice, look down toward the bottom of the screen, directly beneath the table containing invoiced items and above the Total. QuickBooks will have calculated the sales tax due using the Sales Tax Item or Group you assigned to that customer during setup, placing it in the Tax field.

Look to the left of those numbers, and you’ll see the actual rate that was applied. To the left of that is a drop-down list containing the correct Sales Tax Item or Sales Tax Group. Click the down arrow if you want to see the list of other options. And in the lower left of the screen, you’ll see the Customer Tax Code.

The Sales Tax Center

Image3

The Manage Sales Tax window

When it’s time to pay sales taxes, you’ll open the Vendors menu and select Sales Tax | Manage Sales Tax. From the screen that opens, you’ll be able to:

  • Access Sales Tax Preferences.
  • Generate sales tax reports that will help you fill out required forms.
  • Visit related screens.

There are two reports you’ll need to run: Sales Tax Liability (displays total sales, amounts that are taxable and at what rates, taxes collected, and how much sales tax is due to each taxing agency) and the Sales Tax Revenue Summary (breaks down total sales into taxable and non-taxable). These reports are, of course, customizable, so you can filter them, for example, by Sales Tax Code.

A Delicate Balance

Collecting the correct amount of sales tax on taxable items and submitting the right tax totals to the right agencies takes vigilance. You don’t want to charge customers for unnecessary taxes, but you also don’t want to end up paying taxes you should have invoiced out of your own pocket. 

We can help you get this straight from the start. It’s much easier to spend some time setting up sales tax accurately in QuickBooks than it is to go back and untangle inaccurate records. Give us a call and we’ll set up a consultation.