What Can QuickBooks Online’s Mobile App Do?

If you haven’t checked out QuickBooks Online’s free mobile app, you might be surprised at how much it can do.

There was a time when leaving the office meant you were done with work for the day. These days, many homes are offices. And easy mobile access has made it difficult to get away from work.

That can be a good thing, especially if you’re a small business owner who must keep a close eye on what goes on outside of regular hours. Many productivity websites have mobile companion apps that make it possible to pick up where you left off when you were sitting at your laptop or desktop.

QuickBooks Online is one of them. Its mobile apps (iOS and Android, which look and work similarly) can’t replicate absolutely everything on the website. For example, you can’t work with projects or pay contractors or define sales taxes or run most reports. But they do a good job of providing the tools you’d most likely need when you’re away from your regular workspace. Let’s take a look at them.

A Terrific User Experience

Intuit did a great job designing its mobile apps to be easy to use on small screens. It takes very little time to learn how to navigate around, and individual working screens are clean, attractive, and understandable. 

When Should You Use Apps?

There are only two things that QuickBooks Online’s apps can do that the desktop version can’t: track mileage and snap photos of receipts. There are other situations when it’s very convenient to have the apps available, like creating a sales receipt or invoice for a customer in person, adding basic details for a new customer or vendor, or checking your account balances. It’s probably best to do the bulk of your work on your desktop or laptop when you can, to avoid errors caused by small—and abbreviated—screens.

Navigation Icons

The apps open to a screen called Today, which is their version of a desktop application’s Dashboard. There are links to actions like creating an invoice and looking up a customer, as well as a to-do list, the QB Assistant (a support tool), your account balances, a link to recent transactions, and real-time information about the status of your invoices and bills.

The other three icons at the bottom of the screen serve as navigation tools. The one on the far right labeled Menu opens two screens that can be toggled back and forth. One is Shortcuts, pictured below, a series of links to common actions. The other, All, opens a more traditional, comprehensive menu of links to individual app functions, like a Profit and loss report, Sales receipts, and Products & services.

The QuickBooks Online app’s Shortcuts screen

Besides those functions, there are links to other financial activities on the All screen. The ones you’d be most likely to use remotely are:

  • Transactions. The ones you’ve imported from your banks are available via this shortcut, as well as any you’ve entered manually on your desktop or phone. You can also get to the list by clicking on an account name on the Today screen.
  • Receipt snap. Using your phone’s camera, you can take a picture of a receipt. The app will pull some of its data and deposit it on an expense form that’s accessible on the app and the desktop version, where you can fill in the blanks and see the picture. 
  • Invoices and Estimates. View, modify, and add them.
  • Customers and Vendors. Abbreviated versions of your records.
  • Expenses and Bill Pay.
  • Mileage. Enter trip data manually or automatically, through your phone’s location services.

Data entry on the mobile apps is as easy as it is on the browser-based version of QuickBooks Online.

About Your Business

Another bottom-of-screen icon takes you to My business, which provides an update (charts and numbers) of your income, expenses, and profitability. And another is Cash flow. Cash flow is actually a pretty complex accounting concept that you can’t fully absorb on a mobile phone screen, but it’s very important that you have a good understanding of how your company is doing. You can ask us about this.

Give It A Try

January is always a good time to develop new habits. We’ll be talking about some of these next month, but in the meantime, you might download and explore QuickBooks Online’s mobile app. You probably won’t need our help learning to use it, but we’re always happy to step in and assist when you’re having trouble with desktop QuickBooks Online.

5 QuickBooks Online Tasks You Should Do Before January 1

It’s probably your busiest month of the year. But there are things you can do to make your return from the holidays less stressful.

December always goes by so quickly. Seems like you’ve just finished Thanksgiving dinner and it’s time to ring in the New Year. You could probably spend the entire month on your personal obligations. But it’s also the end of the year, which means your busiest period if you’re a retailer. Even if you’re not, you probably have sales goals to try to meet. And you may have employee issues that need to be addressed before the calendar turns over.

On top of all of this, you should be closing out your books for the current year (as much as you can) in preparation for the new one. If you’ve been using QuickBooks Online conscientiously all year, your job will be a lot easier. But you’ll still need to carve out some time for year-end tasks.

We don’t expect that you’ll necessarily be able to wrap absolutely everything up by New Year’s Eve. You may be waiting for your customers and employees to do their part. But here are five things you can do amidst all of your other personal and professional plans that will help you get a jump on January.

Analyze your 2022 sales.

You won’t have your final numbers until the year is over, but you can get a good start in December. There are several QuickBooks Online reports that can give you a clear, understandable look at your 2022 sales. Click Reports in the toolbar and scroll down to Sales and customers. You can run reports that will tell you what your sales were by Class, Customer, Customer Type, and Product/Service, in summary or detail. The reports are customizable, so you can specify date ranges and group the results by, for example, Transaction Type, Customer, and Account.

You can customize and run QuickBooks Online’s Sales reports.

Warning: If you’re not clear about whether you should run reports in Cash or Accrual mode, let us help you with this. The distinction is important.

Know What You Owe

If money is tight at the end of the year, this will be a challenge. But you don’t want to come back from the holidays to a lot of past-due notices. To see what still needs to be paid, click Reports again and scroll down to What you owe. If you want the straight scoop right away, run Unpaid Bills. For a more detailed look, create the Accounts payable aging detail report. This groups your outstanding payables by days past due.

Know Who Still Owes You Money

This is a question that’s probably on your mind all year, but it’s especially important as the year winds down. It may be difficult to get delinquent customers to pay up in December, but you should at least know where you stand with them. Click the Reports tab again and scroll down Who owes you. Generate two reports there: Accounts receivable aging detail and Open Invoices

You might also want to spend an hour coming up with some strategies that would encourage customers to pay faster. If you’re at a loss about this, we could sit down together and come up with a plan.

Create statements for past-due customers

Customer statements are something like reports. They display sales transactions within a given period. Statements can serve two purposes. Sometimes, customers just want a list of their invoices and payments for their records. You can also use statements as a reminder to customers who are past due on their accounts.  Click New in the upper left corner, and then click Statement under Other.  There are three types, but you’d be most likely to create and send two of them:

  • Open Item. Displays all open, unpaid invoices for the last 365 days. 
  • Transaction Statement. Lists all transactions for the selected date range.

You can send statements to customers to remind them of overdue payments or just to provide a record of transactions for a given period.

Clean up your customers and vendor lists

If you only have a few of each, your list is probably current. But if you’ve been adding customers or vendors for years without ever editing the list, you’re probably spending too much time scrolling. You don’t have to delete them. You can just make them inactive. Click Sales in the toolbar, then Customers. If you know a customer has no open activity and you want to hide them, click in the box in front of the company or customer’s name. Repeat this for as many as you want, then click Batch actions in the upper left, then Make inactive.

A Busy Month

Don’t worry if you don’t get to all of these by the end of the year. But do add them to your January task list if you don’t. You might also consider having us run the standard financial reports that are available in QuickBooks Online Reports, under For my accountant. You can create reports like Trial Balance yourself, but they can be hard to analyze accurately. We’d be happy to set up a time after the first of the year to go over these after all of your 2022 transactions are in.

Use QuickBooks Online Effectively: 7 Best Practices

Here are seven ways you can be safe, compliant, and productive when you’re using QuickBooks Online.

“Best practices” is a phrase that human resources professionals have been using for decades. But every type of profession has its own best practices, whether they call it that or not. These guidelines are not enforceable rules, though some managers may build them into their official policies. They just describe the way work should be done to achieve optimal outcomes and keep data organized and secure.

You may have heard of Generally Accepted Accounting Principals (GAAP). Public companies are required to adhere to them, and many other businesses large and small follow these rules and procedures.  

We’re not going to discuss GAAP in this month’s column. Rather, we’re going to talk about more general best practices for accounting, actions you can build into your QuickBooks Online work to make that time more productive and in line with what other successful businesses do.

How Do They Help?

Accounting best practices have numerous benefits. For example, they:

  • Help maintain the integrity of your QuickBooks Online data files.
  • Improve the  accuracy of your accounting work.
  • Save time.
  • Provide insight on the financial health of your business.

When you incorporate best practices into your work, you may even find that your relationships with customers and vendors get better because you’re handling their businesses ? conscientiously.

7 Suggestions For You

Here are seven guidelines that we try to follow. We hope you will, too.

Track your 1099 vendors

Graphical user interface, text, application

Description automatically generated

If your business employs contractors, make sure that you indicate their 1099 status in their vendor records.

Changes in the economy over the last few years have led some people to take on part-time (or even full-time) contract work. You should be creating vendor records for these individuals. Click Expenses in the tool bar and then select the Vendors tab. As you’re completing a record, you’ll see a section labeled Additional info. Check the box in front of Track payments for 1099. You can create and deliver your 1099s using QuickBooks Online when the time comes.

Reconcile, reconcile, reconcile

Once you’ve downloaded cleared transactions from your financial accounts, it’s important that you reconcile them. This is probably one of your least favorite tasks to undertake, but QuickBooks Online simplifies it for you some, walking you through the process. Reconciling accounts regularly can help you:

  • Discover errors and missing transactions.
  • Get a more accurate picture of your cash flow.
  • Make your reports more precise

Keep your lists up to date

Your QuickBooks Online company file can grow substantially over the years. Though the site has great search capabilities, you may still be scrolling to find the entries you want. This isn’t as big a problem for lists like Payment Methods or Terms, but overly lengthy lists of Products and Services, Customers, and Vendors can become unwieldy over time. Try to keep them current. If you don’t want to delete them completely, you can make individual records inactive by clicking an Action link in the listing table for each.

Graphical user interface

Description automatically generated

If your QuickBooks Online Lists are getting too lengthy, you may be able to make some of the records Inactive.

Categorize and classify everything that you can

Your QuickBooks Online company file consists of hundreds or thousands of individual records and transactions. Though each is a separate entity, there will be many times when you want to be able to assemble groups of related ones. For example, you might want a list of all of your customers in a specific ZIP code or all services that go into the creation of a marketing program.

There’s more than one way to get this information quickly. You can customize reports. Assign Classes, Categories, and Tags. View a Project. Whatever method(s) you choose, do use them consistently. They can provide insight in a wide variety of ways that will help you make better business decisions.

Warning: Before you start making lists of these classification tools and assigning them, think carefully about what they should be. You can always add to and edit the lists, but you’ll want to make them as focused and flexible as you can. Let us know if you need help with this.

Assign user permissions carefully

QuickBooks Online makes it possible to restrict users to specific areas and functions on the site. Use these tools. You can find them by clicking the gear icon in the upper right and then Manage users. You trust your employees or you wouldn’t have hired them, but you need to put controls in place to protect your sensitive company data.

Use QuickBooks Online’s reports

Are you taking advantage of QuickBooks Online’s report templates? It’s absolutely essential that you keep up with reports in areas like Who owes you and What you owe. We can help with this. We can also generate and analyze the standard financial reports that you occasionally need, like Statement of Cash Flows and Profit and Loss.

Don’t leave QuickBooks Online running and walk away

This should go without saying if you’re in a multi-person office. Also, don’t use the QuickBooks Online mobile app on a public Wi-Fi network when you’re out and about. Your company file contains information about your customers, vendors, and employees that should never be compromised.

More Than Common Sense

These best practices may seem like common sense to you if you’ve been using QuickBooks Online for a while. But when you first start using web-based financial applications, they might not be second nature to you. That’s why we’re sharing them with you, to remind you that conscientious use of QuickBooks Online is critical to the safety, accuracy, and usefulness of your company data. As always, we’re here to answer any question you have.

How to Give Your QuickBooks Online Forms a New Look

Your sales forms are a part of your company’s identity. Make them professional, personalized, and polished.

Your first impression of a business probably comes from a website or a mailing or an advertisement. The second might be from an invoice or sales receipt. What does it say about that company if its printed or digital sales forms are poorly designed or hard to read or just plain unattractive?

Customers form opinions about you not only from the quality of your products or services, but also by the professionalism and aesthetics of your written communications. Putting some effort into making them look good isn’t superficial. It’s an important part of your branding.

QuickBooks Online provides the tools you need to make your sales forms appealing, understandable, and consistent. They enhance your image and have impact on your customers’ overall impression of your business. Here’s how you can make them a part of your identity.

Where Do You Start?

QuickBooks Online comes with a default invoice form to get you started. You can either edit this one or create a new one. You can also make your own estimates and sales receipts. 

Click the gear icon in the upper right corner and select Custom form styles under Your Company. You’ll see the default invoice labeled Standard. We’ll leave that one as is and create a new one so there’s always a clean version. Click the down arrow next to New style in the upper right and select Invoice. You’ll see a copy of the default invoice, like this:

Table

Description automatically generated

This is QuickBooks Online’s default invoice template. You can make a copy of it and modify it for your own company.

You’ll see your modification options in the left pane of this screen. Your choices are divided into three different sections. Before you start working with them, enter a name for your new template in the field at the top. QuickBooks Online will have suggested a name, but you can change it to something descriptive that you’ll remember, like My Modified Invoice 1022

Changing the Form’s Look

The first tab, Design, should be highlighted. From here, you can:

  • Change up the template. Choose from one of the six options that QuickBooks Online offers.
  • Add a logo. Browse your system files to find your logo.
  • Splash on some color. Select a color palette from the ones offered.
  • Get choosy with your font. Select a new font type and size.
  • Edit print settings. Change the margins and other print options.

Editing the Content

When you’re done there, click the Content tab. You’ll notice that your invoice, which appears in the right pane, is grayed out. There are three pencil icons on the right side of the form. Click the one in the upper right corner, next to the invoice number. The top third of the form becomes active, and the content in the left pane changes to match the fields on the right. As you make changes in the left pane, like checking a box to add a phone number, the actual sample invoice changes to reflect that.

Graphical user interface, text, application

Description automatically generated

When you add, edit, or delete content in the left vertical pane…

Text

Description automatically generated

…the changes are reflected in the sample invoice in the right pane. Your company information will appear like this across all of your sales forms.

As you click on the other two pencil icons in the sample invoice, the left pane displays your options for those content areas. You have control over all of the content on your forms. It’s even possible to add your own custom fields. Let us know if you want to do so and we’ll show you how.

Readying Customer Emails 

The third tab on the customization screen, labeled Emails, shows you what your form will look like when you email it to your customer. Again, your working area is in the left pane, with the finished result appearing on the right. You have multiple options here, including text for the subject line, greeting, and message. You can also edit the text for reminder emails. 

When you’re done customizing, you can preview the PDF that will be attached to your customer emails. Then click Done. Your new invoice will appear on the Custom form styles page. Whenever you want to modify an existing sales form, click Edit at the end of its row. You can also make any form the default by opening the Edit menu and clicking Make default

Making your sales forms the best that they can be doesn’t really take that long. And it will demonstrate to your customers that you care not only about the quality of your products and/or services, but also about your communications with them. If we can be of any help as you work with forms modification in QuickBooks Online, please let us know. We’ll be happy to walk you through the process.

How QuickBooks© Online Tracks Products and Services, Part 1

What products and services does your company sell? Do you have enough to fulfill existing and future orders? QuickBooks Online can tell you.

Most small businesses maintain a changing inventory of multiple products. Even if you sell one-of-a-kind goods, you need to know what you’ve sold and what’s available. And if your company sells services, you also have to keep track of what you’re able to offer customers.

QuickBooks Online can meet these needs. It allows you to create detailed records for both products and services. If you carry inventory, it can make sure that you always know what’s available to sell. When you enter sales and purchase transactions, the site draws on the records you’ve created to help you complete invoices, sales receipts, purchase orders, etc., without having to leave the form you’re working on.

Creating your records initially can take some time. And your products and services require regular monitoring and maintenance. But if you’re conscientious about these tasks, you’re not likely to run short on inventory or have too much money tied up in products that aren’t selling fast enough.

Preparing QuickBooks Online

Before you begin creating records and tracking inventory, you need to make sure that QuickBooks Online is set up correctly. Click the gear icon in the upper right. Under Your Company, click Account and settings. Click the Sales tab in the toolbar. You’ll see the Products and services section near the middle of the screen.

Graphical user interface, text, application, chat or text message

Description automatically generated

Make sure you’ve turned on the Products and services features you’re going to need.

Toggle the slider buttons on and off by clicking on them, and be sure to save your changes when you’re done. One option allows you to turn on price rules. This is still classified as a beta feature, but it’s live on the site. It’s also quite complicated to set up and can create confusion for your customers and revenue loss for you if it’s not done correctly. Let us help if you want to use this tool.

Creating Your Product and Service Records

Your first task, of course, is to build your product and service records. Hover your mouse over Sales in the left vertical toolbar on the home page and select Products and Services. The screen that opens is your home base for dealing with inventory and services. Eventually, it will contain a detailed table containing information about both. Two large buttons at the top of the page warn you when you have Low Stock or you’re Out of Stock.

Click New in the upper right corner. A vertical panel slides out from the right displaying your four options for Product/Service information. They are:

  • Inventory. If you buy and/or sell products whose quantities you must track, these items are considered inventory.
  • Non-inventory. You may have products that you buy and/or sell, but you don’t need to track the amount you have in stock. These are considered non-inventory.
  • Service. These are, well, services that you provide to customers, like landscaping or web design. You might sell these by the hour or project, for example.
  • Bundle. You might call these assemblies. Bundles are multiple products and/or services that you sell as a package for one price.

Click on Inventory for this example. Here is a partial view of the pane you’ll see:

Graphical user interface, text, application, email

Description automatically generated

You can track your inventory levels and reorder points when you create inventory product records in QuickBooks Online.

To create a product or service record, just fill in the blanks on the form and save it. Some fields are optional. In fact, only three are required: Name, Initial quantity on hand, and As of date. Of course, your inventory tracking and the use of product and service records in transactions and reports will be much more effective if you complete as many of the fields as possible. We recommend that you at least provide answers in some additional fields (some of which aren’t shown here), including:

  • Category (will be useful in reports, for example)
  • Reorder point (will keep you from running out of items)
  • Inventory asset account (you can leave the default, Inventory Asset)
  • Description (for sales forms)
  • Sales price/rate (what the customer will be charged)
  • Description (for purchase forms)
  • Cost (what you pay to buy it)
  • Expense account (often Cost of Good Sold, but you can ask us to be sure)

Next month, we’ll discuss how QuickBooks Online makes these records available as you complete other tasks, like transactions. In the meantime, please let us know if you have other questions we can answer that would help you use QuickBooks more effectively. We hope you’re enjoying your summer!

Keeping Up With Receivables: Know Who Owes You

QuickBooks Online provides numerous ways for you to know which customers owe you money – and who is late.

There are so many financial details to keep track of when you’re running a small business. You have to make sure your products and services are in good shape and ready to sell. You have to stay current with your bills. Orders need to be processed as quickly as possible, as do estimates and invoices. And you may have numerous questions from customers and vendors that must be addressed.

Your number one priority, however, is ensuring that your customers are paying you. Whether you accept credit cards or bank transfers or issue sales receipts for cash and checks, you need to always know where you stand with incoming payments. “Are my receivables current?” should be a question you’re asking yourself or your staff frequently.

QuickBooks Online offers numerous ways to know whether you’re being paid for your products and/or services and who might be falling behind. That information is critical to your understanding of how your receivables are stacking up against your payables. You should be able to gauge whether you’re making a profit, staying even, or losing money. Here’s a look at the tools you can use.

Learning When You Launch

QuickBooks Online provides a good overview of your current cash flow as soon as you log into the site and see your two-pronged Dashboard. The first thing you see when you click the Business overview tab is a cash flow forecast that goes up to 24 months. Other content includes a profit and loss graph and charts showing expenses, income (including open and overdue invoice totals), and sales. Your account balances are there, too.

This is helpful data, but it’s broad. To get far more detailed information, hover your mouse over Sales in the toolbar and select All Sales. The horizontal bar across the top displays dollar and transaction totals for estimates, unbilled activity, overdue (invoices), open invoices, and (invoices) paid last 30 days. When you click one of the bars, the list changes to show only that particular set of transactions.

Graphical user interface

Description automatically generated with medium confidence

Partial view of the toolbar at the top of the Sales Transactions page

The table of transactions is interactive. That is, there’s an Action column at the end of each row. Click the down arrow next to any of the activity listed there, and you’ll see a menu of options. Depending on the status of each, these options include commands like Receive payment, Send reminder, Print packing slip, Send, and Void. 

Running Reports

The Sales Transactions page provides more of your receivables nuts and bolts than the Business overview screen does. But to get the most in-depth, customizable, comprehensive view of who owes you, you’ll need to run reports. Click Reports in the toolbar and scroll down to Who owes you

There are three columns here. You’ll land on Standard, which is a complete list of all of the pre-formatted reports that QuickBooks Online offers. Click Custom reports to see the reports you’ve customized and saved. Management reports opens a list of three reports that can be viewed by a variety of date ranges: Company Overview, Sales Performance, and Expenses Performance. You can view, edit, and send these, as well as export them as PDF and Microsoft Word files.

There are five reports listed under Who owes you that you should be creating on a regular basis. How regularly? That depends on the size of your business. The greater your sales volume, the more frequently you should run them.

When you select A/R Aging Summary, you’ll see at a glance which customers have current balances and those that are 1-30, 31-60, 61-90, and 91+ days past due. A few customization options appear at the top, like Report period, Aging method, and Days per aging period. To really zero in on the precise data set you want, click Customize. The panel that slides out from the right contains option in several areas: General, Rows/Columns, Aging, Filter (by customer), and Header/Footer.

Graphical user interface

Description automatically generated

QuickBooks Online helps you target the data set that you want.

There are four other reports that can help you track your receivables:

  • Open Invoices displays a list of invoices that still contain a balance.
  • Unbilled Time tells you about any billable time that hasn’t been invoiced.
  • Unbilled Charges lists billable charges that haven’t been invoice.
  • Customer Balance Summary simply provides all open balances for you customers.

These are all very simple reports that you shouldn’t have any trouble customizing and running. They can give you a complete picture of where your receivables stand. But there are other reports that will require our help. These are standard financial reports that should be created monthly or quarterly, including Statement of Cash Flows, Profit and Loss, and Balance Sheet. You’ll need these critical financial statements if, for example, you’re applying for a loan or trying to attract investors. Please let us know if you want us to run and analyze these so you can get a detailed, comprehensive view of your financial health.

How QuickBooks© Online Helps You Track Mileage

With gas prices so high, you need to track your travel costs as closely as possible. Consider getting a tax deduction for your business mileage.

If you drive even a little for business, it’s easy to let mileage costs slide. After all, it’s a pain to keep track of your tax-deductible mileage in a little notebook and do all the calculations required. If you do rack up a lot of business miles, you probably forget to track some trips and end up losing money.

QuickBooks Online offers a much better way. Its Mileage tools include simple fill-in-the-blank records that allow you to document individual trips. You can either enter the starting point and destination and let the site calculate your mileage and deduction or enter the number of miles yourself.

If you use QuickBooks Online’s mobile app, it can track your miles automatically as you drive (as long as you have the correct settings turned on). Here’s a look at how all of this works.

Setting Up 

To get started, click the Mileage link in QuickBooks Online’s toolbar. The screen that opens will eventually display a table that contains information about your trips, but you need to do a little setup first. Click the down arrow next to Add Trip in the upper right corner and select Manage vehicles. A panel will slide out from the right. Click Add vehicle.

A picture containing text

Description automatically generated

You’ll need to supply information about your vehicles before you can start entering trips.

You’ll need to supply the vehicle’s year, make, and model. Do you own or lease it, and on what date was the vehicle purchased or leased and put into service? Do you want to have your annual mileage calculated by entering odometer readings or have QuickBooks Online track your business miles driven automatically? When you’re done making your selections and entering data, click Save.

Entering Trip Data

You can download trips as CSV files or import them from Mile IQ, but you’re probably more likely to enter them manually. Click Add Trip in the upper right corner. In the pane that opens, you’ll enter the date of the trip and either the total miles or start and end point. You’ll select the business purpose and vehicle and indicate whether it was a round trip. When you’re done, click Save. The trip will appear in the table on the opening screen, and your current possible total deduction will be in the upper left corner, along with your total business miles and total miles.

If you want to designate a trip as personal, click the box in front of the trip in that table. In the black horizontal box that appears, click the icon that looks like a little person, then click Apply. Now, the trip will appear in the Personal column and will not count toward your business tax-deductible mileage. 

Graphical user interface, text, application

Description automatically generated

When you select a trip in the Mileage table, you can mark it as personal so it’s not included in your business tax-deductible miles.

Personal Trips Can Count, Too

If you use your vehicle(s) for personal as well as business purposes, tracking some of those miles can also mean a tax deduction. For tax year 2022, you can deduct 18 cents per mile for your travel to and from medical appointments. Note: Medical mileage is only deductible if medical exceeds a certain percent of AGI. Be sure to check with the IRS yearly tax code, as they update the mileage amounts annually.

And if you do volunteer work for a qualified charitable organization, the miles you drive in service of it can be deducted at the rate of 14 cents per mile. You can also claim the cost of parking and tolls, as long as you weren’t reimbursed for any of these expenses. Obviously, the IRS wants you to keep careful records of your charitable mileage, and QuickBooks Online can provide them.

QuickBooks Online doesn’t track these deductions, but you’ll at least have a record of the miles driven.

Auto-Track Your Miles

The easiest way to track your mileage in QuickBooks Online is by using its mobile app. You can launch this and have it record your mileage automatically as you’re driving. Versions are available for both Android and iOS, and they’re different from each other. They also have more features than the browser-based version of QuickBooks Online, like maps, rules, and easier designation of trips as business or personal.

Graphical user interface, application

Description automatically generated

The iOS version of Mileage in the QuickBooks Online app

In both versions, you’ll need to click the menu in the lower right corner after you’ve opened the QuickBooks Online app and select Mileage. Make sure Auto-Tracking is turned on. Your phone’s location services tool must be turned on, too. There are other settings that vary between the two operating systems. You can search the help system of either app to make sure you get your settings correct if the onscreen instructions aren’t clear enough.

Of course, you won’t see the fruits of your mileage deductions until you file your 2022 taxes. But you can factor these savings in as you’re doing your tax planning during the year. Please let us help if you’re having any trouble with QuickBooks Online’s Mileage tools, or if you have questions with other elements of the site.

With gas prices so high, you need to track your travel costs as closely as possible. Consider getting a tax deduction for your business mileage.

Some Small Businesses Are Recovering. Is Yours?

The COVID-19 pandemic isn’t over, but many small businesses are on the upswing. How QuickBooks Online can help if yours isn’t.

Intuit recently did a survey documenting the financial losses that many small businesses had experienced since March 2020. Not surprisingly, the report, Intuit QuickBooks Small Business Recovery, found that COVID-19 has had a significant impact on the financial health of U.S. small businesses.

But many of the companies surveyed have proved to be resilient. As of March 31, 2021, 61 percent of them saw an annual revenue increase compared to pre-COVID days.

How would you have answered the survey? If indeed you did suffer financial and personnel losses because of the pandemic, has your business started to rebound yet? If not, there are actions you can take in QuickBooks Online to help in your recovery. Here are some of them.

Transactions: Watch your income and expenses like a hawk.

QuickBooks Online provides excellent transaction-tracking tools that help you document income and expenses.

How much time do you spend working with your downloaded transactions? If you take advantage of the excellent tools QuickBooks Online provides, you may notice patterns that you’ll want to explore and modify. For example, are you spending too much in one or more particular areas? When and where is your income dipping?

It’s critical that you connect to as many online financial institutions as possible, so you get a complete picture of your income and expenses. Once you have, click on Transactions in the toolbar, which should open to the Banking page. If you’re only going there to make sure there are no unrecognized entries, you’re missing out on some of QuickBooks Online’s transaction-tracking tools. In the image above, we’ve specified a vendor and chosen a Category and Tags. This will make your reports more meaningful and actionable.

If you don’t know what it means to Find Match, we can show you how that works. It’s a real time saver. 

Sales: Make it easier for customers to pay you.

We’ve written about accepting online payments in this column before. It’s especially important if you’re struggling. You may actually be losing sales if you don’t let potential customers pay online through a credit card or bank account transfer. And existing customers may pay faster if they can do business with you in that way.

QuickBooks Payments makes this possible. There are some nominal fees involved, but the potential increase in your income should more than cover them. Let us know if you want us to help you set up a merchant account.

When you set up a merchant account through QuickBooks Payments, you may find that your customer base will grow, and existing customers will pay faster.

Expenses: Categorize expenses with tax time in mind.

You’ve probably already filed your 2020 income taxes, but we’re well into 2021, and it’s not too early to start thinking about your current tax situation. QuickBooks Online helps you track your income carefully, but it’s equally important to make sure you know what your tax-related expenses are. You want to get every deduction and credit you can. So when you’re looking at transactions, like we described above, make very certain that you’re assigning the correct categories to each of them. 

We can help you run reports on a quarterly basis that should be of help when you make estimated tax payments. That way, you may be able to reduce your quarterly obligation during the 2021 tax year and won’t have to wait until you file in 2022 to see savings.

Time: Make sure your billable hours are billed.

Unless you have an organized, easy-to-use method for tracking billable time, some hours are likely to fall between the cracks. QuickBooks Online provides effective tools in this area. As you go through your downloaded transactions, you may see expenses that can be billed to a customer. Select the Customer/project and check the Billable box so you’ll be able to include it on their next invoice.

You can mark expenses as billable to customers in your Transactions register.

As you create time entries for you and/or your employees, you can also mark those hours as billable.

Reports: Run basic, critical reports regularly.

You can’t know how your business is doing financially unless you create reports. Besides the quarterly and standard financial reports we can run and analyze for you, you can—and should—be generating reports yourself through QuickBooks Online. Here are some of the ones we suggest:

  • Budget vs. Actuals. If you’ve put the time and effort into creating a budget, it’s critical that you gauge your progress regularly and make adjustments as needed.
  • Open Invoices. Who have you billed that hasn’t paid?
  • Accounts Receivable Aging Detail. Who owes you, and how far behind are they?
  • Sales by Product/Service Detail. What is selling well and what isn’t? You can make decisions about your product and service lines by viewing this report. This is especially important when your sales are sluggish.
  • Business Snapshot. This is a series of charts and lists that provides a quick visual overview of key data.

QuickBooks Online can’t, of course, revive your business if the pandemic has created conditions that are out of your control. But that shouldn’t stop you from controlling what you can, no matter what your situation is. It was designed not only to automate and streamline your daily accounting work, but also to provide the information you need as you evaluate your present situation and plan for the future. Please call on us if you need help making optimal use of QuickBooks Online.

Should You Charge Late Fees? QuickBooks Can Help

Do you have a lot of aging receivables? Assessing finance charges can speed up customer payments.

Have your customers been submitting payments later than usual these last several months? It wouldn’t be surprising. Many businesses are struggling to pay bills these days. Still, you need to get paid – and on time. Tardy receivables have a negative impact on your own cash flow.

We’ve discussed ways to encourage prompt payment in past columns. For example, you can start accepting credit/debit cards and direct bank transfers, make sure invoices go out immediately after a sale, or offer a premium like a small one-time discount for paying on time 12 months in a row to name a few.

You can also assess finance charges on remittances that come in after the due date. QuickBooks provides the tools to allow this.

Setting It Up

Before you start charging extra for late payments, you’ll need to do some setup work in QuickBooks. Open the Edit menu and select Preferences, then Finance Charge. Click the Company Preferences tab. You’ll see a window like this:

Graphical user interface, text, application

Description automatically generated

You can set your own preferences for assessing finance charges in QuickBooks.

You’ll have to answer these questions and enter your responses in the window:

What will your Annual Interest Rate (%) be?

What will you set as a Minimum Finance Charge?

Will you allow a Grace Period? This is the number of days given to your customers to make their payments after the due date before finance charges kick in. This is typically from 15-21 days.

Where should captured finance charges go? In this example, the Finance Charge Account has been assigned to Other Income

Do you want to Assess finance charges on overdue finance charges? Some jurisdictions don’t allow you to charge interest on overdue interest charges. If you want to do this, check on your local lending laws – specifically state usury laws which may limit the amounts that can be charged.

When will you start to Calculate charges? In this example, the due date is selected. So, QuickBooks will start to add finance charges 21 days after the stated due date. If you choose invoice/billed date, you’ll want to make your grace period longer. This can be rather a confusing concept. Contact us if you want a deeper explanation.

Assessing Finance Charges

There’s one more issue on the Preferences screen that you’ll need to resolve. QuickBooks offers two ways to notify customers about finance charges. You can’t include them on invoices, like you may be used to seeing on credit card bills. Rather, you have to print separate invoices that only contain the finance charges. 

If you put a check in the box in front of Mark finance charge invoices “To be printed,” you can print them out separately. If you leave the box blank, the finance charges will appear on the customer’s next statement. Click OK when you’re done with this window.

Graphical user interface, table

Description automatically generated

QuickBooks can find the overdue invoices that need to have finance charges applied and display them in a window like this one.

Open the Customers menu and select Assess Finance Charges. A window like the one in the image above will open. Make sure that the Assessment Date is the actual date you want to assess charges, which may not be the current date. Click in the Assess column to create a checkmark for every customer you want to charge. When you’re done, click Assess Charges.

When you’re ready to print finance charge invoices, open the File menu and select Print Forms | Invoices to open a window like this:

Graphical user interface, table

Description automatically generated

Invoices with an FC preceding the number are finance charge invoices ready for printing.

Lots to Learn

Besides knowing whether you can charge finance charges on existing finance charges, there are other considerations. For example, do your state’s lending laws allow you to use the phrase “finance charge” or must you use something like “late fee?” When should you assess finance charges? Have you notified your customers of your intent to begin assessing finance charges? This is definitely something they should know in advance. You might need to add this to your customer message on invoices.

We can’t tell you whether finances charges are the path you should take to improve your cash flow as there are many issues to consider. But we can help you with the mechanics of doing so and are here to answer any questions. Let us know if you want to get started using this tool, we can help.

New to QuickBooks® ? Try These 5 Activities

QuickBooks can be overwhelming when you first start using it. Here are five ways to familiarize yourself with some of its features to get you up and running in no time.

Tackling any new piece of software can be daunting. Add a complex process like accounting to the mix, like QuickBooks does, and you may feel apprehensive about your ability to learn how to use it. 

But QuickBooks was designed for small businesspeople, not for accountants nor technical wizards. It uses familiar language and forms, and it works like other Windows programs. That doesn’t mean, though, that you’ll be able to just jump in and start completing your accounting tasks. 

Here are five steps you can take to start familiarizing yourself with QuickBooks that will get you up and running in no time. We’ll assume that you’ve already created your company file. If you need help with this critical first step, let us know.

Open a sample file.

While you’re exploring QuickBooks, it’s a good idea to work with a sample file. That way, you can look around and practice without risking compromising your company file. You’ll be able to see how completed records and transactions should look and try your hand at entering sample data of your own.

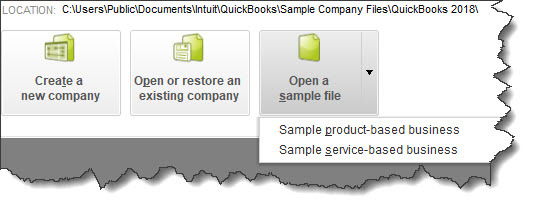
QuickBooks comes with sample files that allow you to practice entering data without harming your own company file.

Before you open a sample file, you’ll need to close your current company. Click on File in the upper left to open that menu, then select Close Company. A window will open that should have your company file in its list. Below that, you’ll see three boxes containing different options. Click on the down arrow next to Open a sample file, as pictured above (this may look slightly different in your version). Choose the one you want to open and click on it. QuickBooks will load again with that file open. When you’re done looking at the sample file, go to File | Close Company again. The No Company Open window should appear again. Click on your company file name and then on Open to return to your own file.

Learn where your lists are.

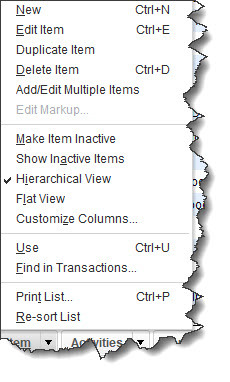
You’ll be storing a great deal of information in lists. QuickBooks maintains these automatically sometimes when you enter information in a record or transaction. For example, when you create a record for a product or service you sell, it goes into a master list that you can access by opening the Lists menu at the top of the screen and clicking on Item List. You’ll also open the Lists menu when you want to add options to an existing type of list, like Class List (QuickBooks allows you to assign Classes to transactions so you can group related information, like New Construction or Remodel if you’re a contractor).

You’ll sometimes select from lists of commands in QuickBooks. This is the menu for the Item List.

Try a Transaction.

There are two transactions you’ll probably be using the most: invoices and sales receipts. QuickBooks comes with templates that resemble these sales forms’ paper counterparts. You simply fill in the blanks by entering data and selecting options from drop-down lists. Open the Customers menu and select Create Invoices. Click the back arrow above Find in the upper left corner to see sample invoices. Then click the right arrow to get back to a blank form and create an invoice by clicking the down arrows in blank fields to see your sample lists.

Explore Snapshots.

Once you start entering records and transactions, you’ll want to be able to access that information in ways that provide insight on how your company is doing. You’ll eventually start running reports in QuickBooks, but the software also accomplishes this through its Snapshots. There are three of them, and they all provide these overviews by using data tables and charts. Open the Company menu and click on Company Snapshot, then click the tabs to move between Company, Payments, and Customer. You’ll learn how QuickBooks provides real-time information about your finances.

Look at the Income Tracker.

It’s easy to see the status of your invoices (and estimates) in QuickBooks. Open the Customers menu and select Income Tracker. Colored bars at the top of the screen show you what’s outstanding and what’s been paid. A list of the related transactions appears below these bars.

This partial view of the Income Tracker tells you how much money is tied up in unbilled Time & Expenses and unpaid Invoices.

As we said earlier, QuickBooks can be overwhelming when you first start to use it. We can ease that transition by providing training and helping you move your existing accounting information over to the software. If you’ve started using QuickBooks on your own and you have questions, we can always step in to offer answers.

Stay healthy, and best wishes for a more prosperous 2021.