Keeping Up With Receivables: Know Who Owes You

QuickBooks Online provides numerous ways for you to know which customers owe you money – and who is late.

There are so many financial details to keep track of when you’re running a small business. You have to make sure your products and services are in good shape and ready to sell. You have to stay current with your bills. Orders need to be processed as quickly as possible, as do estimates and invoices. And you may have numerous questions from customers and vendors that must be addressed.

Your number one priority, however, is ensuring that your customers are paying you. Whether you accept credit cards or bank transfers or issue sales receipts for cash and checks, you need to always know where you stand with incoming payments. “Are my receivables current?” should be a question you’re asking yourself or your staff frequently.

QuickBooks Online offers numerous ways to know whether you’re being paid for your products and/or services and who might be falling behind. That information is critical to your understanding of how your receivables are stacking up against your payables. You should be able to gauge whether you’re making a profit, staying even, or losing money. Here’s a look at the tools you can use.

Learning When You Launch

QuickBooks Online provides a good overview of your current cash flow as soon as you log into the site and see your two-pronged Dashboard. The first thing you see when you click the Business overview tab is a cash flow forecast that goes up to 24 months. Other content includes a profit and loss graph and charts showing expenses, income (including open and overdue invoice totals), and sales. Your account balances are there, too.

This is helpful data, but it’s broad. To get far more detailed information, hover your mouse over Sales in the toolbar and select All Sales. The horizontal bar across the top displays dollar and transaction totals for estimates, unbilled activity, overdue (invoices), open invoices, and (invoices) paid last 30 days. When you click one of the bars, the list changes to show only that particular set of transactions.

Graphical user interface

Description automatically generated with medium confidence

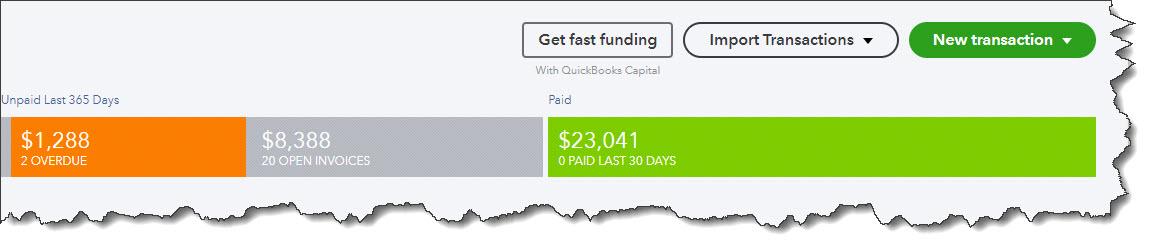
Partial view of the toolbar at the top of the Sales Transactions page

The table of transactions is interactive. That is, there’s an Action column at the end of each row. Click the down arrow next to any of the activity listed there, and you’ll see a menu of options. Depending on the status of each, these options include commands like Receive payment, Send reminder, Print packing slip, Send, and Void. 

Running Reports

The Sales Transactions page provides more of your receivables nuts and bolts than the Business overview screen does. But to get the most in-depth, customizable, comprehensive view of who owes you, you’ll need to run reports. Click Reports in the toolbar and scroll down to Who owes you

There are three columns here. You’ll land on Standard, which is a complete list of all of the pre-formatted reports that QuickBooks Online offers. Click Custom reports to see the reports you’ve customized and saved. Management reports opens a list of three reports that can be viewed by a variety of date ranges: Company Overview, Sales Performance, and Expenses Performance. You can view, edit, and send these, as well as export them as PDF and Microsoft Word files.

There are five reports listed under Who owes you that you should be creating on a regular basis. How regularly? That depends on the size of your business. The greater your sales volume, the more frequently you should run them.

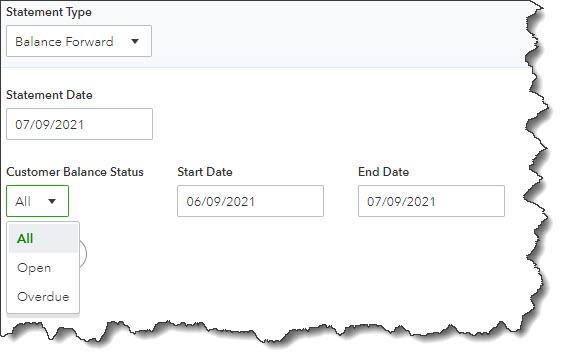
When you select A/R Aging Summary, you’ll see at a glance which customers have current balances and those that are 1-30, 31-60, 61-90, and 91+ days past due. A few customization options appear at the top, like Report period, Aging method, and Days per aging period. To really zero in on the precise data set you want, click Customize. The panel that slides out from the right contains option in several areas: General, Rows/Columns, Aging, Filter (by customer), and Header/Footer.

Graphical user interface

Description automatically generated

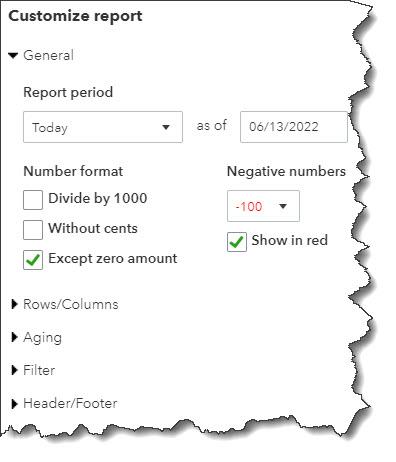
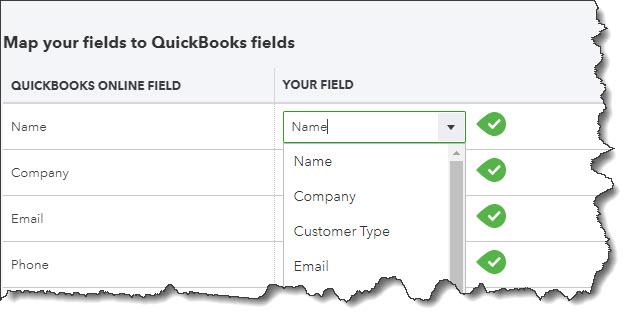
QuickBooks Online helps you target the data set that you want.

There are four other reports that can help you track your receivables:

  • Open Invoices displays a list of invoices that still contain a balance.
  • Unbilled Time tells you about any billable time that hasn’t been invoiced.
  • Unbilled Charges lists billable charges that haven’t been invoice.
  • Customer Balance Summary simply provides all open balances for you customers.

These are all very simple reports that you shouldn’t have any trouble customizing and running. They can give you a complete picture of where your receivables stand. But there are other reports that will require our help. These are standard financial reports that should be created monthly or quarterly, including Statement of Cash Flows, Profit and Loss, and Balance Sheet. You’ll need these critical financial statements if, for example, you’re applying for a loan or trying to attract investors. Please let us know if you want us to run and analyze these so you can get a detailed, comprehensive view of your financial health.

How QuickBooks© Online Helps You Track Mileage

With gas prices so high, you need to track your travel costs as closely as possible. Consider getting a tax deduction for your business mileage.

If you drive even a little for business, it’s easy to let mileage costs slide. After all, it’s a pain to keep track of your tax-deductible mileage in a little notebook and do all the calculations required. If you do rack up a lot of business miles, you probably forget to track some trips and end up losing money.

QuickBooks Online offers a much better way. Its Mileage tools include simple fill-in-the-blank records that allow you to document individual trips. You can either enter the starting point and destination and let the site calculate your mileage and deduction or enter the number of miles yourself.

If you use QuickBooks Online’s mobile app, it can track your miles automatically as you drive (as long as you have the correct settings turned on). Here’s a look at how all of this works.

Setting Up 

To get started, click the Mileage link in QuickBooks Online’s toolbar. The screen that opens will eventually display a table that contains information about your trips, but you need to do a little setup first. Click the down arrow next to Add Trip in the upper right corner and select Manage vehicles. A panel will slide out from the right. Click Add vehicle.

A picture containing text

Description automatically generated

You’ll need to supply information about your vehicles before you can start entering trips.

You’ll need to supply the vehicle’s year, make, and model. Do you own or lease it, and on what date was the vehicle purchased or leased and put into service? Do you want to have your annual mileage calculated by entering odometer readings or have QuickBooks Online track your business miles driven automatically? When you’re done making your selections and entering data, click Save.

Entering Trip Data

You can download trips as CSV files or import them from Mile IQ, but you’re probably more likely to enter them manually. Click Add Trip in the upper right corner. In the pane that opens, you’ll enter the date of the trip and either the total miles or start and end point. You’ll select the business purpose and vehicle and indicate whether it was a round trip. When you’re done, click Save. The trip will appear in the table on the opening screen, and your current possible total deduction will be in the upper left corner, along with your total business miles and total miles.

If you want to designate a trip as personal, click the box in front of the trip in that table. In the black horizontal box that appears, click the icon that looks like a little person, then click Apply. Now, the trip will appear in the Personal column and will not count toward your business tax-deductible mileage. 

Graphical user interface, text, application

Description automatically generated

When you select a trip in the Mileage table, you can mark it as personal so it’s not included in your business tax-deductible miles.

Personal Trips Can Count, Too

If you use your vehicle(s) for personal as well as business purposes, tracking some of those miles can also mean a tax deduction. For tax year 2022, you can deduct 18 cents per mile for your travel to and from medical appointments. Note: Medical mileage is only deductible if medical exceeds a certain percent of AGI. Be sure to check with the IRS yearly tax code, as they update the mileage amounts annually.

And if you do volunteer work for a qualified charitable organization, the miles you drive in service of it can be deducted at the rate of 14 cents per mile. You can also claim the cost of parking and tolls, as long as you weren’t reimbursed for any of these expenses. Obviously, the IRS wants you to keep careful records of your charitable mileage, and QuickBooks Online can provide them.

QuickBooks Online doesn’t track these deductions, but you’ll at least have a record of the miles driven.

Auto-Track Your Miles

The easiest way to track your mileage in QuickBooks Online is by using its mobile app. You can launch this and have it record your mileage automatically as you’re driving. Versions are available for both Android and iOS, and they’re different from each other. They also have more features than the browser-based version of QuickBooks Online, like maps, rules, and easier designation of trips as business or personal.

Graphical user interface, application

Description automatically generated

The iOS version of Mileage in the QuickBooks Online app

In both versions, you’ll need to click the menu in the lower right corner after you’ve opened the QuickBooks Online app and select Mileage. Make sure Auto-Tracking is turned on. Your phone’s location services tool must be turned on, too. There are other settings that vary between the two operating systems. You can search the help system of either app to make sure you get your settings correct if the onscreen instructions aren’t clear enough.

Of course, you won’t see the fruits of your mileage deductions until you file your 2022 taxes. But you can factor these savings in as you’re doing your tax planning during the year. Please let us help if you’re having any trouble with QuickBooks Online’s Mileage tools, or if you have questions with other elements of the site.

With gas prices so high, you need to track your travel costs as closely as possible. Consider getting a tax deduction for your business mileage.

Too Many Transactions in QuickBooks© Online? Create Rules

It’s important to categorize transactions, but it takes time. If every day brings several dozen into QuickBooks Online, you can automate this process.

One of the cardinal rules of accounting is this: Go through your new transactions every day. If you wait until there are too many of them, you’re likely to give them short shrift. You may miss problems, just as you might skip categorizing some of them because it simply takes too long.

But correct categorization is essential. Your income taxes and reports will not be accurate if you fail to assign the right category to all of your transactions. QuickBooks Online makes this easy.

The site also provides a way for you to accelerate the process by automating it. It allows you to create Rules. That is, if a transaction contains a specific piece of information, a name or an amount, QuickBooks Online allows you to indicate how it should be categorized. This kind of automation will save you time and may even prevent errors – as long as you use it carefully. Here’s how it works.

Defining Your Rules

We’ll use an easy example to explain how QuickBooks Online’s Rules work. Let’s say your shipping costs have started to increase lately, and you want to make sure you’re seeing any UPS transactions that go above a specified dollar amount, and that they’re categorized accurately. Hover your mouse over Transactions in the toolbar and click on Banking (assuming you’re downloading your bank transactions). Select an account to work with by clicking on it, and make sure the For review bar is highlighted. 

Click on a transaction to open it. (If you’ve never explored what you can do with a downloaded transaction, study this box carefully while you’re there, and contact us with any questions.) On the bottom line, you’ll see a link labeled. Create a rule. Click on it, and a panel slides out from the right, as pictured below:

Graphical user interface

Description automatically generated

The upper half of the Create rule panel

This portion of the Create rule panel is fairly self-explanatory. Give your rule a descriptive name (we entered UPS 25 Plus) and indicate whether it should be applied to Money in or Money out. If you want to select a specific bank account or card, click the down arrow in the field to the right and select it. Otherwise, choose All bank accounts. Next, decide whether a transaction has to meet Any of the conditions you’re going to specify or All of them. In this case, we want All

Now you have to describe the conditions under which a transaction will be affected. We want transactions whose Description Contains The UPS Store. We also want to identify purchases from The UPS Store whose total is more than $25. So you’d click + Add a condition. In the row that opens, click the down arrow in the Description field and select Amount. Click the down arrow again in the next field and choose Is greater than. The final field in the row should contain 25.00.

You could keep adding conditions, but that’s all we need for this rule. You can click Test rule if you want to find out how many transactions in your For review list would meet your specifications.

Next, you want to Assign attributes to the transactions selected. Your options here are Transaction type, Category, Payee, Tags, Class, and Memo. The first two are required and the third is recommended. The last three are optional. If you want QuickBooks Online to automatically confirm transactions this rule applies to, click the Auto-confirm button so it’s showing green. If you choose this option, your matching transactions will be modified to meet your criteria and moved directly into the Categorized queue. You won’t see them in For review. So consider this carefully.

When you’re done here, click Save.

Graphical user interface

Description automatically generated

The lower half of the Create rule screen

Warning: QuickBooks Online allows you to create new categories directly from this window. But accurate categorization is so critical that we’d rather you schedule a session with us to go over your list of categories and make any modifications necessary.

To recap: Any expense over $25 that comes into your For review queue whose Description reads The UPS Store will be automatically categorized and moved into the Categorized queue.

QuickBooks Online’s Rules can save you time, but if they’re not created correctly, you may have errors in your company file without even knowing it. We recommend that you let us help you set these up from the start to avoid this. If you’re new to downloading transactions onto the site, you may also want to consult with us.

Hiring An Independent Contractor? How QuickBooks Online Can Help

Are you taking on a worker who’s not an employee? QuickBooks Online includes tools for tracking and paying independent contractors.

The COVID-19 pandemic created millions of self-employed individuals and small businesses. Whether they chose to, or circumstances forced them to, these new entrepreneurs had to learn new ways to get paid and to prepare their income taxes.

If you’re thinking about taking on a contract worker, you, too, will have to educate yourself on the paperwork and processes required to comply with the IRS’ rules for his or her compensation. It’s much easier than hiring a full-time employee, but it still takes some knowledge of how QuickBooks Online handles these individuals.

You’ll also need to make certain that the person you’re hiring is indeed an independent contractor and not an employee. The IRS takes this distinction very seriously. If you’re at all unsure of your new hire’s employment status, we can help you sort it out.

Creating Records for Contractors

Once new contractors have accepted your offer, you’ll need to have then fill out an IRS Form W-9. You can download a copy here. Employees complete the more detailed Form W-4 so that the employer can withhold income taxes correctly, but you won’t have to withhold taxes for your contract workers. They will be responsible for calculating and paying quarterly estimated taxes and filing an IRS Form 1040 every year. 

You, though, will be responsible for sending them an IRS Form 1099-NEC (Non-Employee Compensation) every January if you paid them more than $600 during the previous year. You do not need to send a 1099-NEC to a corporation or to an LLC that is treated as a C Corp or an S Corp. 

Graphical user interface, text, application

Description automatically generated

You can complete the Vendor Information window for each independent contractor, checking the box in front of Track payments for 1099.

Using the information the contractors provide, you can create records for them in QuickBooks Online. If you don’t have a QuickBooks Payroll subscription, you can set them up as 1099 vendors. Click the Expenses tab in the toolbar and then on the Vendors tab. Click New vendor in the upper right to open the Vendor Information window. Complete the fields for the worker and be sure to check the box in front of Track payments for 1099, as shown in the partial image above.

The vendor records you create will appear in QuickBooks Online’s Vendors list (again, Expenses | Vendors). Click on one to open it. You can toggle between two tabs here. The first, Transaction List, will eventually display all your financial dealings with that contractor. Vendor Details opens the record you just created, which you can edit from this screen.

Paying Contractors

When independent contractors send you invoices, you’ll return to this same screen. There are three ways you can pay them. Click the down arrow next to New Transaction in the upper right corner to see your options (or look down at the end of the row while you’re in list view). You can record the debt as a Bill if you want to pay it later (or if that’s the way you structure your recordkeeping). If you’re paying it right away, you can create an Expense or write a Check

Graphical user interface, text, application, chat or text message

Description automatically generated

You can choose an option from this vendor action menu to pay your independent contractors.

When you click one of these, QuickBooks Online opens a form with many of the contractors’ details already filled in. You’ll need to complete any additional fields at the top of the screen, and then either record the payment or debt under Category details or Item details, depending on how you do your bookkeeping. Either way, you’ll be able to enter the quantity and rate and/or amount and mark it billable (with a markup percentage, if you’d like) to a customer or project.

You’re probably going to want our help here, since there’s more than one way to pay independent contractors. If you subscribe to QuickBooks Payroll, you can use the service’s contractor features, which include the ability to invite your contractors to fill out their own records in QuickBooks Online. You may also want to add an account to your Chart of Accounts, and we’d want to offer guidance there. And you need to ensure that you’re classifying payments correctly, so they’ll appear in 1099 reports and 1099s themselves.

Creating records for independent contractors and paying these individuals seem like they should be simple operations. But anytime you’re dealing with payroll issues, you’re dealing with peoples’ livelihoods – and the IRS. We strongly encourage you to let us help you get this right. Contact us, and we’ll make sure you’re handling your worker payments with absolute accuracy.

How to Automate Email Reminders for Overdue Customers 

One way to keep your company’s cash flow positive is by sending email reminders to overdue customers. QuickBooks® Online can automate this. 

Most small businesses struggle with cash flow. How do you get customers to pay by the due date, or at least not long after? We’ve written about some of the possible solutions. Accept credit/debit cards and direct bank payments. Send statements regularly. Offer a discount for early payment if it makes financial sense for you.

QuickBooks Online offers another tool for accelerating incoming payments: automated reminders. If you set these up, you won’t have to spend so much time keeping up with past-due remittances. It’s easy to do, and you can personalize your messages. You can even do this manually if you come across an individual customer who needs a nudge.

What about reminders for yourself? QuickBooks Online doesn’t come with a to-do list that you can use to enter tasks that must be done. But there are still ways to tie a digital string around your finger so you don’t fall behind on your own critical chores.

If you feel like you’re being too intrusive by sending out payment reminders, think about how you feel when you receive one yourself. Often, a financial obligation has simply slipped your attention. You want to maintain a good working relationship with your vendors, so you might even welcome such an email or letter.

Setting Up the Automation

To get started, click the gear icon in the upper right corner. Under Your Company, click on Account and Settings. Click the Sales tab and scroll down to Reminders. Click the pencil icon way over to the right to open the options here, then click the on/off button next to Automatic invoice reminders to activate them. Click the down arrow next to Default email message for invoice reminders to open the template.

Graphical user interface, text, application, email

Description automatically generated

QuickBooks Online includes email templates for late payment reminders that you can edit.

If you’ve ever done a mail merge, this will look familiar to you. QuickBooks Online replaces the text in [brackets] with data from your company file. So it will prepare an email for every customer that is past due and replace the bracketed content with your own customer and company names and invoice numbers. Of course, you can choose not to personalize the emails, but it’s likely to be more effective if you do. Everything in the template can be edited, and you can check a box to have a copy sent to you.

Below this email template are three reminder-scheduling blocks. Click the button next to Reminder 1 to turn it on. You’ll see that you can set up a reminder to go out to customers either on the due date or a specified number of days (3, 7, 14, 30, or 90) before or after.  

QuickBooks Online checks the due dates for your invoices and will automatically send the email reminder out to everyone who meets the criteria. If a customer record has an email address in it, a reminder will be dispatched even if you didn’t send the original invoice through email.

Graphical user interface, text, application

Description automatically generated

You can schedule automatic invoice reminders to every customer who meets the criteria you’ve specified.

To set up additional, different reminders, you can do so in the Reminder 2 and Reminder 3 blocks. When you’ve finished, click Save. You can always go back in and edit these. To see who received reminders, click on Sales in the left vertical toolbar, then Invoices. The word Reminded should appear in the Status column.

If you’d rather dispatch reminder emails manually, you can do so in QuickBooks Online. With the same Sales | Invoices screen open, click on the down arrow next to Receive payment at the end of the row and select Send reminder. If you want to send reminders to multiple customers, click the box in front of each name to create a checkmark. Click the down arrow next to Batch actions right above the table and select Send reminder.

Reminding Yourself

We wish that QuickBooks Online had a reminder feature like QuickBooks Desktop does, that greets you every time you launch the software and displays tasks that need to be done. But there are still ways to remind yourself that invoice and bill payments are running late. You just have to make a habit of checking certain data screens regularly. For example, you should be visiting:

  • The Business Overview element of the home page. There’s an Income graph that shows you how much money is tied up in overdue invoices (and open invoices).
  • The Invoices and All Sales screens that you can see by clicking on Sales in the left vertical toolbar.
  • Reports, like Accounts receivable aging detail, Open Invoices, Unbilled charges, and Unbilled time.

If you just started using QuickBooks Online this year and are struggling with it, we’re available to set up training sessions and answer questions. And, of course, we’re always here for longtime users, too. The COVID-19 pandemic is still affecting a lot of small businesses, and we understand you may be facing difficult issues. If we can help you better use QuickBooks Online to manage your finances, please contact us.

How to Maintain Customer Records in QuickBooks Online

Your customers are your company’s lifeblood. Make sure their records are thorough and up-to-date.

When companies buy other companies, what’s often considered the most critical asset? The customer list. When a business is damaged and data possibly lost, which set of records do they most hope to recover? The customer list.

You probably spend most of your time in QuickBooks Online working with transactions and reports, but your customer records deserve equal time. If they’re incomplete or otherwise not maintained well, you lose time filling in the blanks when you’re trying to complete a task that requires complete customer profiles. Your searches and reports may not tell the whole picture. Your relationships can suffer, and you may miss out on sales opportunities.

QuickBooks Online provides excellent tools for creating and maintaining comprehensive customer and sub-customer records. Here’s a look at how it all works.

Moving Your Customer Data In

There are two ways to create customer records in QuickBooks Online. If you have an existing database in Outlook, Excel, Gmail, or Google Sheets, you can import it. This will save you an enormous amount of time, but it’s a challenging process. You select the file you want to import, and then you have to “map” it by matching the fields in your database to fields in QuickBooks Online. You’ll likely need our help with this.

Graphical user interface, application

Description automatically generated

To import a customer file into QuickBooks Online, you’ll have to “map” its fields. We can help you with this.

Your other option is to enter records manually. This is time-consuming, but the more information you can include about your customers from the start, the better. You can always edit your records to add, delete, or modify what you originally entered.

To get started, hover over Sales in the toolbar and click on Customers. Then click on New Customer in the upper right corner to open the Customer information window. The only field you’re required to complete is Display name as. You may want to do this if you have a new customer on the phone and you want to concentrate on the conversation. You can take notes about their contact information and fill in the record later, when you’re off the phone.

But wherever possible, as we’ve already said, complete as many fields as you can.  You’ll enter name and billing and shipping address and phone number(s) on the opening screen. You can also supply contact details like fax number and website. 

Creating Sub-customers

You’ll notice a checkbox that says Is sub-customer. QuickBooks Online lets you “nest” related records under the “parent” record. This can be an actual customer, but many people use it to document jobs they’re doing for the customer. So if you’re a contractor, for example, you might have sub-customers like Sun deck and Spa

If you want to set up such a record, enter the job name and click in the box next to Is sub-customer. Two fields will open below that allow you to select the parent customer and to indicate the sub-customer’s billing status. The remainder of the fields will automatically fill in with the parent customer’s contact information.

Graphical user interface, text, application

Description automatically generated

You can set up jobs as sub-customers in QuickBooks Online. 

Supplying Details

When you’re setting up individual customers, you should add as much detail as you possibly can to each record, beyond basic contact information. QuickBooks Online’s record templates display a number of tabs running horizontally across the window. The most important of these are:

  • Tax info. Are the customers taxable or exempt? If taxable, what is his or her Default tax code? (If you haven’t set up sales taxes yet and need to, please let us help. It’s complicated.)
  • Payment and billing. Do they have preferred payment and/or delivery methods? Will you be assigning default payment terms, like Net 30 or Due on receipt? What is their Opening balance? If they’re brand-new customers who have never ordered from you, this will be $0.00. If they’re existing, active customers, enter any outstanding balance they have with you as of the date that you enter. This must be correct, to avoid any problems with the customers’ ongoing balances. Questions? Ask us.

Other tabs here are self-explanatory. When you’ve entered everything you can, click Save. The new record will now appear in the Customers list and will be available to select from the drop-down list in transactions.

There will be times when you have to refer back to these forms to answer questions. By maintaining detailed, accurate customer records, you’ll be ready to respond. If you have questions about any of the information requested, or about other elements of QuickBooks Online that are puzzling you, please contact us so we can set up a consultation.

Expand QuickBooks Online’s Features: Use Integrated Apps

Are you finding that you need more flexibility in an area of QuickBooks Online? Maybe it’s time to try an integrated app.

When you first started using QuickBooks Online, you probably found that it supplied the tools you needed to manage your accounting – and then some. But if your business has grown or become more complex, you may need more functionality and flexibility in one or more areas, like time tracking and billing.

There are hundreds of add-on applications that integrate well with QuickBooks Online in the QuickBooks Apps store, which you can find here. Many of these apps are free, but most have subscription fees. They’re designed to amplify the power of QuickBooks Online’s own features. The site will remain your home base, but you’ll have to learn enough about the add-on apps to understand how they work and how they integrate with QuickBooks Online.

Here are some of the most popular add-on solutions from the QuickBooks Apps site.

Expensify

QuickBooks Online allows you to record expenses. Its thorough form templates ask you for numerous details, like the vendor, product or service, amount, and billable status. Completed expenses appear in a table. You can run any of several related reports, like Expenses by Vendor Summary. If you use the QuickBooks Online mobile app, you can snap photos of receipts that are turned into expense forms by QuickBooks Online and partially completed with the receipt data.

Graphical user interface, application

Description automatically generated

Using the QuickBooks Online mobile app, you can snap photos of receipts and complete the expense forms provided.

But Expensify ($5-9 per month for one user) does more. It’s a robust expense management system that handles everything from receipt processing to next-day reimbursement. Where QuickBooks Online only supports basic expense tracking, Expensify allows you to create expense reports and follow them through multi-level approvals. It features automatic credit card reconciliation and expense policy enforcement, as well as bill pay and invoices/payments. Two-way synchronization with QuickBooks Online means you can work in either application and your data will be replicated in the other, as is the case with all of these integrated solutions.

QuickBooks Time

Formerly known as TSheets, this powerful time-tracking application builds on QuickBooks Online’s time management and payroll features. QuickBooks Time ($8-10 per user per month plus $20-40 monthly base fee) is now owned by Intuit, so it’s embedded directly in QuickBooks Online. 

Your employees can track their hours on any device, from any location, and they will instantly be available in QuickBooks Online so managers can review, edit, and approve timesheets. That data can then be used in areas like invoicing, job costing, and payroll. Advanced features include scheduling capabilities, overtime monitoring, GPS tracking, and real-time reports. The Who’s Working window shows you where your staff members are working and what they’re doing, in real time. 

Method:CRM

QuickBooks Online does a good job of helping you create profiles of customers and storing them for quick retrieval. But some businesses need more than that. They need true Customer Relationship Management (CRM). Method:CRM ($28-49 per month per user; discounts for annual subscriptions) is an excellent partner for QuickBooks Online in this area.

Graphical user interface, application

Description automatically generated

You can record and store customer details in QuickBooks Online, but Method:CRM adds true Customer Relationship management to the site.

When you integrate Method:CRM with QuickBooks Online, you no longer have to do duplicate data entry to keep track of your customers and their sales profiles and histories. You get a shared lead list and activity tracking (emails and phone calls), and your customer records contain the information a sales team needs, like customer details, interaction, transactions, and services performed. Leads are stored in Method:CRM until they’re customers, and you can track sales opportunities from a customer’s initial interest through the final sale. 

Two More Advanced Integrated Apps

QuickBooks Online provides basic inventory-tracking capabilities, but if your business has more complex needs, an integrated application like SOS Inventory ($49.95-149.95 per user per month) should be able to meet them. Built for QuickBooks Online from the ground up, the application offers advanced features like sales orders and order management, assemblies, serial inventory, and multiple locations. And if you need more sophisticated bill pay, invoicing, and payment processing (with multiple automated approval levels) than QuickBooks Online offers, you might look into the highly-regarded Bill.com ($39-69 per user per month).

Growth Is Good, But Challenging

We wanted to introduce you to a few of the hundreds of integrated apps available for QuickBooks Online because you should know that there are options for expanding on the site’s built-in capabilities. As your business grows, so does your need for more sophisticated accounting. QuickBooks Online may still be able to serve you well with the help of one or more of these add-ons.

You may also want to explore the possibility of upgrading your version of QuickBooks Online. We encourage you to consult with us if you’re outgrowing QuickBooks Online. We can help you explore the options so you can spend your time planning for your company’s future instead of wrestling with your accounting application.

Record Expenses in QuickBooks Online and On Your Phone

The money you spend to run your business must be recorded conscientiously for your taxes and reports. Here’s how to do it.

You undoubtedly keep a very close watch on the money coming into your business. You record payments as soon as they come in and deposit them in your company’s bank account. But are you as careful about your purchases?

It’s easy to go out to lunch with a client and forget to save the receipt. You figure it’s not that much money, anyway. Or you pick up a ream of printing paper and a cartridge at the office supply store and neglect to record the purchase. When you disregard even small expenses, you can have two problems. One, your books won’t be accurate. And two, you never know how an extra $42.21 under Meals and Entertainment might affect your income taxes.

QuickBooks Online provides two ways to enter expenses. You can create a record on the site itself. Or you can snap a photo with your phone using the QuickBooks Online mobile app to document the money spent. Here’s how these two methods work.

Documenting At Your Desk

Let’s say you just had lunch with a vendor to discuss some products you’re planning to buy for a project you’re doing for a customer. You charged it to your company credit card, which you track in QuickBooks Online. You still have to enter it as an expense on the site so that when your credit card statement comes, you can match the credit card transaction to the expense you recorded.

Hover over Expenses in the navigation toolbar and click on Expenses. Click the down arrow in the New transaction button and select Expense. Fill in the fields at the top of the screen with details like Payee, Payment date, and any Tags you want to specify. Under Category details, select the correct category from the drop-down list and enter a Description and Amount

Graphical user interface, text, application, email

Description automatically generated

QuickBooks Online allows you to thoroughly document expenses. You can attach a picture of a receipt if you’d like.

Since you’re going to bill this to the customer as a part of your project fee, click in the Billable box to create a checkmark. Select the Customer/Project. Add a Memo to remind yourself of the reason for the lunch (very important!) and attach a photo of the receipt if you take one. Click Save. Your record of the lunch will now appear on the Expense Transactions screen. It will also show up in the Expenses by Vendor Summary and Unbilled Charges reports, among others.

Recording on the Road

In the example we just went through, attaching a photo of the receipt was the last thing we did to record an expense in QuickBooks Online. There’s another way to document a purchase that starts with a photo of a receipt and should save you a bit of data entry: using the QuickBooks Online mobile app. The app uses Optical Character Recognition (OCR) to “read” the receipt and transfer some of its data to fields on an expense record. 

(If you haven’t installed the QBO app on your smartphone, you should. You can do a lot of your accounting work that synchronizes automatically with QBO. It’s free, too.)

Open the app and log in. On the opening screen, you’ll see an icon labeled Snap Receipt. Click on it, and your phone’s camera will open (you’ll be asked for permission to use it). Position your phone over the receipt and move it around until you see the blue box covering the content of the receipt.  Take the picture. You’ll see it displayed on the phone with a message saying, “Use this photo.” If it seems OK, click the link. 

A message on the screen will tell you that the upload is complete and that the app is extracting the information from it. Click “Got it!” It should only take about a minute for your receipt to appear in the list on the Receipt snap screen. You’ll see the details that the app has pulled from your receipt. Tap the matching expense and click Done on the next screen.

Graphical user interface

Description automatically generated

You can snap a photo of the receipt in the QuickBooks Online mobile app, and some fields will be automatically entered on a receipt form in QBO.

When you’re back at your computer, open QuickBooks Online and go to Transactions | Receipts. At the end of the row that contains your receipt, click the down arrow next to Delete and select Review. QBO will display the partially-completed receipt form next to the photo you took of the receipt. Fill in any missing fields and save the transaction. Click Create expense on the screen that opens. Then open the Expenses menu and select Expenses, and there should be an entry for the receipt you just added.

This tool isn’t perfect, of course. Every receipt has different fields in different places, and sometimes they’re just not very readable. But in our tests, the app picked up an average of four fields.

Documenting your expenses using one of these two methods is so important. It will help you remember why you stored the receipt and make your reports more accurate. As long as you’re categorizing each transaction correctly, it will also make your tax preparation easier and faster and ensure that you’re charging customers for billable expenses. And if you’re ever audited, your careful work will come in handy.

QuickBooks Online does expense management well, but there are enough moving parts in these recording tools that you may have some questions. We’re here, as always, to answer them.

8 QuickBooks Online Tips

There are always more things to learn about the applications we use every day. Here are some tips for expanding your use of QuickBooks Online. 

We tend to fall into the same old patterns once we’ve learned how to make a computer application work for us. We learn the features we need and rarely venture beyond those unless we find we need the software or website to do more. 

QuickBooks Online is no exception. It makes its capabilities known through an understandable system of menus and icons, labeled columns and fields, and links. But do we really see what else it can do? Expanding your knowledge about what QuickBooks Online can do may help you shave some time off your accounting tasks and better manage the forms, transactions, and reports that you work with every day. Here are some tips.

Edit lines in transactions. Have you ever been almost done with a transaction and realize you need to make some changes farther up in the list of line items? Don’t delete the transaction and start over. QuickBooks Online comes with simple editing tools, including:

  • Delete a line. Click the trash can icon to the right of the line. 
  • Reorder lines. Click the icon to the left of the line, hold it, and guide it to the new position. This is tricky. You may have to work with it a bit.
  • Clear all lines and Add lines. Click the buttons below your line items, to the left.
Graphical user interface

Description automatically generated

Click the More link at the bottom of a saved transaction to see what your options are.

Explore the More menu. Saved transactions in QuickBooks Online have a link at the bottom of the screen labeled More, as pictured above. Click it, and you can Copy the transaction or Void or Delete it. You can also view the Transaction journal, which displays the behind-the-scenes accounting work, and see an Audit history, which lists any actions taken on the transaction. 

Create new tabs. Do you ever wish you could display more than one screen simultaneously so you can flip back and forth between them? You can. Right click on any link in QuickBooks Online, like Sales | Customers,  and select Open link in new tab

Use keyboard shortcuts. Not everyone is a fan of these, mostly because they can’t remember them. Hold down these three keys together to see a list: Ctrl+Alt+?. Some common ones include those for invoices (Ctrl+Alt+i) and for expenses (Ctrl+Alt+x).

Modify your sales forms. Do you need more flexibility than what’s offered in your sales forms? It may be there. Click the gear icon in the upper right and select Account and settings under Your Company. Click the Sales tab. In the section labeled Sales form content, notice that you can add fields for Shipping, Discounts, and Deposits by clicking on their on/off switches. You can also add Custom fields and Custom transaction numbers.

Add attachments. Sometimes it’s helpful to have a copy of a source document when you enter a transaction. To attach a receipt to an expense, for example, look in the lower left corner of the transaction. Click Attachments and browse your system folders to find the file, then double click on it.

Graphical user interface

Description automatically generated

Record expenses made with credit cards. Who doesn’t use credit cards for expenses sometimes? You can track these purchases in QuickBooks Online, as pictured above. Click the gear icon in the upper right and select Chart of Accounts under Your Company, then click New in the upper right. Select Credit Card from the drop-down list under Account Type. Enter Owner Purchase in the Name field and then Save and Close. When you create an expense, select Owner Purchase as the Payment account

Previous Transaction Button. Are you trying to find a transaction that you entered recently but don’t want to do a full-on search? With a transaction of the same type open, click the clock icon in the top left corner. A list of Recent Expenses will drop down. Click on the one you want.

Whether you’re new to QuickBooks Online or you’ve been using it for years, there’s always more to explore. We’d be happy to help you expand your use of QuickBooks Online by introducing you to new features, building on what you’re already doing on the site to improve your overall financial management. Call us to schedule some time.

Customers Paying Late? How to Create Statements

There are many ways to encourage delinquent customers to pay. QuickBooks Online’s statements may be effective for you.

After the year-plus you’ve just experienced, the last thing your small business needs is customers who are behind on their payments to you. You may have been giving them a break because you know that they’re struggling, too, but things have been looking up for many companies in the past few months. It’s time for you to be more proactive about calling in your debts.

There are numerous ways you can accomplish this. One of the best is to send statements in QuickBooks Online, which are detailed reminder forms that contain multiple transactions. These can be especially helpful if you’ve sent multiple invoices with no response. There are three different types you can send, depending on your needs. Here’s how you create them.

Before You Start

QuickBooks Online offers a couple of options for formatting your statements. To see these, click the gear icon in the upper right corner and select Your Company | Account and Settings. Click the Sales tab and scroll down to the Statements section. Click the pencil icon over to the far right to make any changes needed. You can:

  • List each transaction as a single line or include all of the detail lines.
  • Display an aging table at the bottom of each statement.

Click the buttons to specify your preference and then click Save and Done.

Graphical user interface, text, application, chat or text message

Description automatically generated

QuickBooks Online gives you control over some elements of your statements.

Three Statement Types

You can choose from among three different types of statements in QuickBooks Online: Balance Forward includes invoices with outstanding balances for a specified range of dates. Open Item statements contain information about all unpaid (open) invoices from the last 365 days. And Transaction Statements show every transaction in a date range that you specify. We’ll describe how to create them so you can decide which makes the most sense for a particular situation.

One Way to Create Statements

Like it does for many other actions, QuickBooks Online offers two ways to create statements. The first is easier. Click the New button in the upper left and select Statement (under Other). Click the down arrow in the field under Statement Type to see the three options there.

If you select Balance Forward, you’ll need to define three criteria (there will be similar options for the other two types):

  • Statement Date
  • Customer Balance Status (Open, Overdue, or All)
  • Start Date and End Date
Graphical user interface, text, application

Description automatically generated

QuickBooks Online makes it easy to create any of three types of customer statements.

When you’re satisfied with your statement parameters, click Apply. QuickBooks Online will display a list of the transactions that meet your criteria, along with the number of them that will be generated. Each row in the list will display the recipient’s name, email address, and balance. In the upper right corner, you’ll see the number of statements again and the total balance these customers represent. 

If you want to exclude any of these customers, click in the box in front of each to unselect them and delete the checkmark. When you’re satisfied with your list, click Save, Save and send, or Save and close. If you click Save and send, a window will open containing a preview of your statements. Thumbnails of each will appear in the left pane. Click on any to see their previews. When you’re ready, you can download, print, or send them.

If you click Save or Save and close, you’ll still be able to see the statements you’ve just generated. Click the Sales tab in the toolbar, then All Sales. Click the down arrow next to Filter and open the drop-down list under Type. Select Statements, and your list will appear. You can print or send one by selecting the correct option in the Action column. If you want to dispatch multiple statements, click in the box in front of each, and then click the down arrow next to Batch actions.

Another Method

There’s an alternate way to create statements. Click the Sales tab in the toolbar, then Customers. Select any or all of the customers in the list, then click the down arrow next to Batch actions and select Create statements. QuickBooks Online will open the Create Statements window again so you can select the type and process your statements like you did using the previous method.

We don’t expect that you’ll have much trouble working with statements, though you may want to consult with us on when they’re appropriate. We can also suggest other ways to bring your accounts receivable up to date. As always, we’re available to help you maximize and streamline your use of QuickBooks Online. Keeping your financial books current and organized is one way to ensure that you don’t fall too far behind with customer payments.