How Does QuickBooks® Online Handle Mobile Expenses?

If you purchase several items and services away from the office, QuickBooks Online can help you record them while you’re out and about.

QuickBooks Online’s mobile app, available at the Apple App Store and Google Play, can do many of the same tasks that it performs on your office desktop. You can, for example:

  • Check account balances.
  • Add and edit estimates, invoices, and sales receipts.
  • Add and edit customers, vendors, products, and services.
  • Record invoice payments.

One of the most common uses of the app, though, is the recording of expenses. Rather than coming home from a trip with your briefcase stuffed full of receipts and notes about purchases you made, you can document them on the road using your mobile device. When you get back to the office and log on to QuickBooks Online, they’ll all be there.

How It Work

Picture

You can snap a photo of a receipt with your smartphone and attach it to an expense you record in QuickBooks Online’s mobile app.
Open your QuickBooks Online mobile app and click the plus (+) sign at the bottom, then tap the Expense icon. The New Expense screen will open.  If you have a paper receipt, lay it flat on a table in a well-lighted area. Click the camera icon and then the Take Photo link. If you took the picture outside of QuickBooks Online for some reason, you’d select the Choose Existing link. Your device’s camera will open, and you’ll see four squared corners on the edges of the screen.

Hover your device over the receipt. You’ll need to position the camera so the receipt area that you want captured appears within the four corners. QuickBooks Online will provide advice along the way to help you do this. When you’re in the right place, you’ll see the phrase, Great! Snap the pic. Click the shutter icon below, and your device will snap the photo and display it. If you want to use it, click Use this photo (if you want to try again, click the X in the upper left of the screen).

QuickBooks Online will open the New Expense screen. You’ll see a miniature version of your receipt in the upper left corner. Looking at your original version—it will be too small to see here—fill in the blanks with the data from the purchase. Be sure to click the Billable button if you can bill someone else for it. Make any notes you’ll need in order to remind yourself of the transaction, and Add a Split if you need to divide the transaction between categories, customers or vendors, or billable status. Click Save when you’re done.

Automatic Synchronization

Picture

Once you’ve entered an expense in QuickBooks Online’s mobile app, it will be synchronized with your desktop, browser-based version.
Of course, no duplicate data entry is required once you’ve entered a receipt in the QuickBooks Online mobile app – the two versions always update each other.

Once you’re back at your desktop, on the browser-based version of QuickBooks Online, click Expenses in the toolbar to open the Expense Transactions screen. You should see the transaction you just created on your mobile device first in line on the list that displays. Click View/Edit at the end of that line to see it. Look toward the bottom under Item Details to see the link to an attachment that contains the photo you snapped of the receipt.

Picture

The record of the expense you entered on your mobile device will contain a link to an attachment that contains the photo of your receipt.
Of course, you don’t have to take a picture of your receipt with your mobile device. You can simply enter the details of your expense and Save the record.

​QuickBooks Online’s mobile app can help you save time and improve the accuracy of your work done away from the office. As we mentioned earlier, the app is capable of doing much more than simply recording receipts. We’d be happy to run you through its pieces to make sure your remote accounting work is done correctly.

How Do You Track Jobs in QuickBooks®?Part 1

If your business divides some of its work into specific jobs and you’re not tracking them individually, you’re missing out on valuable insight.
 
Job-costing is not just for contractors. That’s probably the most common understanding of this concept in QuickBooks, but you can also use the software’s jobs tools to track income and expenses for any related group of items and/or services.
 
Think of them as projects. If you’re an expert in business promotions, for example, you probably have multiple projects going on simultaneously that consist of materials you might need to order for your client (like special paper) and the actual work you do (design, content-creation, etc.). You could also have to track expenses like mileage, and you may price your services by the hour.
 
QuickBooks can handle all of this. If you’re conscientious about documenting all of the pieces that go into every job, you’ll be able to run reports that show you how much you spent and took in on each. This information can help you better price your services and manage your time to maximize profitability.
 
Many Elements                                            
 
In this first part of a two-column series, we’re going to explore the basic elements that go into job-tracking. Keep in mind that there are many different ways to work with jobs. How you choose to do it will depend on the structure of your business. We can help you devise a plan.
 
We’ll look at a simple example here. The first step involves setting up a job for an existing client. Even if you think you’re only going to be doing one project for them, you can still set it up as a job so you can assign all related income and expenses to it. This will make it much easier if you get additional work from the customer down the line – and if you have to bill the customer for something that’s not related to a specific project.
 
To create a job, open the Customers menu and select Customer Center. Make sure the Customers & Jobs tab is highlighted. Select the customer by clicking on it. Right-click the name and select Add Job from the drop-down list. When the New Job window opens, click the Job Info tab.
Picture

You can track your Jobs by keeping their status current in the New Job window.

Fill in the Job Name field. In this example, we’ve selected a name that’s broad enough that we’ll eventually be able to break down into specific tasks. If your customer has an outstanding balance as of the current date, that amount will appear in the Opening Balance field.
 
Enter a Job Description. The Job Type field is optional, but creating these classifications can help with advanced reports that gauge profitability. Consult with us if you want to explore these.
 
Open the Job Status list and select the correct one, then choose a Start Date and Projected End Date. You’ll document the End Date when you’re finished. Click OK.
 
Creating Item Records
 
You may already know that if you buy and/or sell products and/or services, you have to set up individual records for each one so you can include them on sales and purchase forms. You’ll need these to record income and expenses related to your Promotion job. If you’re new to QuickBooks, here’s how it works.
 
Open the Lists menu and select Item List. In the window that opens, click the arrow next to Item in the lower left corner and select New. A window like this will open:
Picture

The New Item window

​The Item Type list will drop down. Select Service. In the example above, you’re creating a record for a service you sell: Website Development. Enter that in the Item Name/Number field. Ignore the U/M Set field; this is not available in QuickBooks Pro or Premier.
 
Enter a Description and your hourly (or project) Rate. Choose the correct Tax Code status and select the Account. When you’re done, click OK.
 
Warning: You may not have an Account in your Chart of Accounts that fits the specialized income and expenses you want to track. Let us help you set one up.
 
You’ll repeat this process for other types of promotional work you do (making flyers and brochures, designing and ordering branded products, general content creation, etc.).
 
Think It Through First
 
Before you create your first job, spend time envisioning how you want it structured. Remember that every invoice or timed activity or other income or expense you enter will only be assigned to one Customer:Job, but you can include as many Items as you want. As we said, we’re happy to help you think this through and go through setup with you.
 
Next month, we’ll demonstrate how the records you’ve created can be used.

Resolve to Do These 3 Things in QuickBooks Online This Month

‘Tis the season for making resolutions and setting goals. Try exploring these three areas to dig deeper into QuickBooks Online.
By now, many New Year’s resolutions have already been made – and broken. Though they’re usually created with the best of intentions, they’re often just too ambitious to be realistic.
For example, you might decide to learn more about QuickBooks Online and keep up with your accounting chores more conscientiously in 2019. That’s hard to quantify. How will you know if you achieved that goal?
Instead, why not pick three (or more) specific areas and focus on them this month? We’ll get the ball rolling for you by making some suggestions.
Explore the QuickBooks Online mobile app:
Yes, QuickBooks Online itself is already mobile; you can access it from any computer that has an internet connection and browser. But you probably don’t always lug a laptop around when you’re away from the office, and you’re sometimes at locations where using it wouldn’t be practical. But you can always pull out your smartphone and fire up the QuickBooks online app, available for both iOS and Android.
QuickBooks Online APP

No matter how small your smartphone (this image was captured on an iPhone SE), you can still do your accounting tasks using QuickBooks Online’s app.

​QuickBooks Online’s app replicates a surprising percentage of the features found on the browser-based version. You can create, view, and edit invoices, estimates, and sales receipts for example, as well as see abbreviated customer and vendor records. Your product and service records are available there, including tools for recording expenses on the road.
Create a budget for one month:
Budgets are intimidating. That’s one reason why some small businesses don’t create them. So instead of trying to estimate what your income and expenses will be for an entire fiscal year, just build a budget for one month. In QuickBooks Online, you’d click the gear icon in the upper right, then select Budgeting. Click Add budget in the upper right to open the New Budget window.
Give it a name, like “February Budget,” and select FY2019. Leave the Interval at Monthly, and open the Pre-fill data? menu to click on Actual data – 2018 (if you have data from last year). Then click Create Budget in the lower right corner. Look at last year’s February numbers and estimate how they might change in 2019. Replace the old numbers with your new ones.
Picture QuickBooks Online

Creating a framework for a budget in QuickBooks Online is easy.

​We’re suggesting you try it for just one month, so you get a feel for how this tool works. And that experiment will probably leave you with some questions. We can help you go further and complete an annual budget.
Customize your sales forms:
Every piece of paper and email you send to your customers contributes to their impression of you. Are you presenting an attractive, consistent image of your business to them? QuickBooks Online can help with this. It offers simple (for the most part) tools that allow you to modify the boilerplate forms offered on the site – without being an experienced graphic designer.
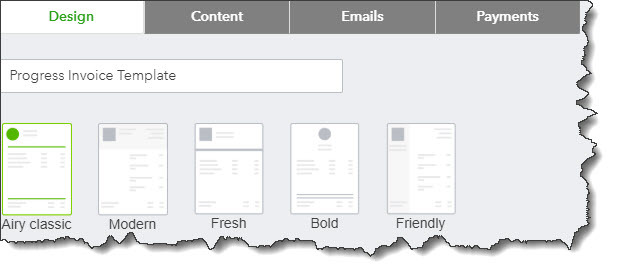
Start by clicking on the gear icon in the upper right and selecting Your Company | Custom Form Styles. Unless you’ve done some work in this area before, the screen that opens will have just one listed entry: your Master form, the one that comes standard in QuickBooks Online. To see what you can do, click Edit at the end of that line. Your four options are:

  • Design. This section contains links to modifications you can make to your sales forms’ visuals. You can, for example, add a logo or color and change the default fonts.
QuickBooks Online element tools Picture

Want to change your logo or other elements of your sales forms? QuickBooks Online has the tools.

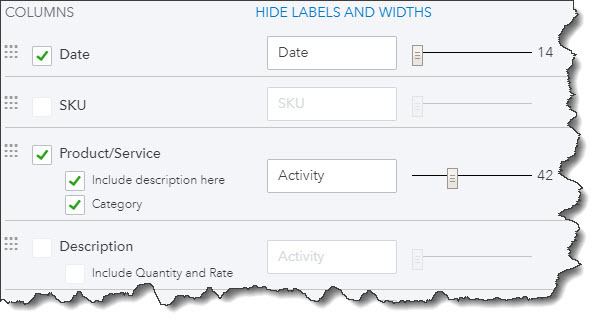
  • Content. Do you want to add or remove the standard columns (Date, Quantity, etc.) displayed on your invoices? You can do so by checking and unchecking boxes.
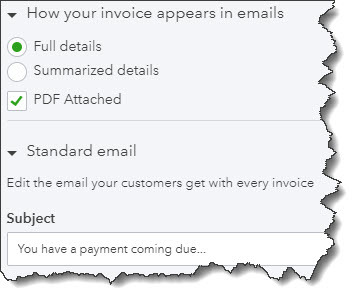
  • Emails. QuickBooks Online sends email messages with forms; you can edit them here.
  • Payments. This is a reminder that QuickBooks Online supports online payments, which can help you get paid faster.

There’s more you can do to make your sales forms look professional and polished. We can help you with these tools – and any others you want to explore to expand your use of QuickBooks Online. It’s a new year, and who knows what might come your way over the next 12 months? Contact us if you want to prepare for the new accounting challenges that 2019 might present.

How to Apply Finance Charges in QuickBooks®

You may hate to have to do it but assessing finance charges for late payments may improve your overall cash flow.
There is a myriad of ways to bring in customer payments faster and improve your cash flow. You can:

  • Get a merchant account and let customers pay you electronically
  • Offer a discount for early payments
  • Shorten the payment due cycle (21 days instead of 30 days, for example)
  • Be more aggressive about collections

QuickBooks can help you take all of these steps. It also offers a fifth option: assess finance charges for tardy remittances.
Maybe you don’t want to do this because it seems like a less-than-friendly way to treat customers – especially valued ones. But you’re not in the business of lending money, which is what you’re doing when you continue to let your accounts receivable slide. So, here’s how to do add finance charges to your payment policies.
Multiple Issues Involved
Before you can start adding finance charges to tardy payments, you’ll need to let QuickBooks know how you want them handled. Open the Edit menu and select Preferences. Click the Finance Charge tab in the left vertical pane, then the Company Preferences tab in the window that opens. You’ll see something like this:

Picture

You’ll need to decide on your QuickBooks Finance Charge settings before you can begin to apply these late fees.

hat Annual Interest Rate will you charge? Will there be a Minimum Finance Charge? Do you want to offer a Grace Period? If you’ve never worked with finance charges before, you might be at a loss as to how you should answer these questions. We can talk it through with you if you’d like, and make sure you’re selecting the correct Finance Charge Account. In our example, QuickBooks defaulted to 70100 – Other Income, which may be the best option for you.
The next question may require some research. Some jurisdictions don’t allow you to Assess finance charges on overdue finance charges; you’ll need to find out. If there’s any doubt, make sure that the box in front of that option isn’t checked.
QuickBooks also needs to know on what date it should start calculating finance charges: on the due date or invoice/billed date. Finally, check the box in front of Mark finance charge invoices “To be printed.” QuickBooks doesn’t include finance charges on invoices themselves; it bills them on separate invoices. Check this box if you want the software to print all of them as a batch.
When you’re done here, click OK.
Applying the Charges
Picture

By selecting an Assessment Date, you’re telling QuickBooks how many late days should be included in its finance charge calculations.

​When you’re ready, open the Customers menu and select Assess Finance Charges. A window like the one in the image above will open.
QuickBooks, of course, performs all of the required calculations in the background. But it must first know what specific date you plan to actually assess the charges so that it can determine the number of late days that should be included. This may not be the current date, so be sure the Assessment Date is correct before proceeding.
All you have to do here is make sure there’s a check mark in front of every finance charge that should be invoiced (they’ll probably already be there, but you should verify this). If you send statements, clear the box in front of Mark Invoices “To be printed.” The finance charges will appear on the next statement.
When you’re satisfied, click Assess Charges.
Dispatching the Charges
Your finance charges have now been recorded in QuickBooks as individual invoices. When it’s time to print, open the File menu and select Print Forms | Invoices. You’ll see your numbered finance charge invoices displayed like this:
Picture

You can see your finance charge invoices when you go to print them.

​(Of course, if you email invoices, you’d click on File | Send Forms.)
It’s a good idea to notify your customers before you start assessing finance charges. This will give them a chance to catch up, and no one will be surprised to see the extra invoices.
QuickBooks does the hefty lifting as far as calculations are concerned, but it’s very important that you set your finance charges up correctly. Customers will be annoyed by mistakes. And it’s much easier for us to help you get this tool set up right from the start than to have to go in and untangle errors. Let us know if you plan to start assessing finance charges, and we’ll help make it work for you.

Getting Started with Accounts in QuickBooks ® Online, Part 2

We covered a lot of ground last month, but there are still some things to know about working with transactions you import from your banks.
Last month, we went over the basics of managing financial transactions once you’ve downloaded them into QuickBooks Online. We walked you through the mechanics of connecting to banks and credit card companies online and described the process of reviewing imported transactions, exploring concepts like:

  • Categorizing them, and marking them as billable
  • Adding them to an account register; matching them to related transactions; or transferring them to another account
  • Using Batch actions to process related groups
Picture

We explored QuickBooks Online’s Banking features last month, including the site’s ability to work with related transactions as groups.

​This month, we’ll look at the process of setting up rules to automatically classify transactions as they come in from your banks. We’ll also provide a brief overview of the Chart of Accounts.
Bank Rules
We’ve already discussed QuickBooks Online’s ability to guess how transactions should be categorized (it’s not always right, but you can change incorrect ones). It also allows you to memorize transactions that recur on a regular basis; this also saves time and improves accuracy. There’s another way the site also uses automation to help minimize keystrokes: Bank Rules. Based on your input, it will scan incoming items and classify them, so you don’t have to. This can be very helpful when you regularly import transactions that share specific attributes.
Let’s look at how this works. Click Banking in the navigation toolbar, then click Bank Rules. Once you’ve created your own rule(s), they’ll appear in a grid on this screen. For now, click New rule in the upper right corner. Basically, you’re going to tell QuickBooks Online that when specific conditions are met, as you can see in the example below, it should take the specified action(s): assign a Transaction type, Payee, and/or Category. You can also have the transaction automatically added to your books.
Picture

You can create Bank Rules in QuickBooks Online that will automatically assign a Transaction type, Payee, and Category to imported items that meet specific conditions.

We suggest you meet with us if you’re going to take on this task. If your business processes a lot of transactions, Bank Rules can be incredibly helpful. But set them up incorrectly, and it could take many hours to untangle the errors.
Account Registers, Chart of Accounts
In this column and the last, we’ve been working with transactions as they come into QuickBooks Online directly from your financial institutions, before they appear in your account registers. When you clicked Add after you looked at—and perhaps modified—a transaction listed under For Review on the Banking page, you sent it to that account’s register.
Notice that the site’s registers look similar to their paper counterparts; you may remember recording checks and deposits in the back of your checkbook, if you’ve been in business long enough. There are two ways to see them in QuickBooks Online. When you’re on the Banking page, look over to your right. You’ll see a link labeled Go to Register. Click it, and you’ll be taken to that page for the account that’s currently active.
You can also open your account registers from the Chart of Accounts. We don’t talk much about this element of financial management because it’s not something you should be modifying. Nevertheless, it’s the heart of your accounting system. It consists of a comprehensive list of your company’s accounts, divided into assets, liabilities, income, expenses, and equity (along with subaccounts). Transactions are assigned to the appropriate account and recorded in the General Ledger, which is another element of accounting that we don’t discuss because you don’t have to deal with it in QuickBooks Online.
Picture

You can view your company’s Chart of Accounts in QuickBooks Online, but we recommend you don’t modify it.

​Click on the Accounting tab in the navigation toolbar, then Chart of Accounts. You’ll see your individual bank accounts listed here, along with a View Register link.
A Critical Concept
Again, you won’t have to deal with the Chart of Accounts, but it’s very important that you understand how to manage downloaded transactions as you move them into your bank accounts in QuickBooks Online. Mistakes here can trigger errors in reports and taxes, as well as create general confusion. We’d be happy to get you on the right path with this critical function.

Need to Create Estimates? How QuickBooks® Can Help You with This.

Estimates can be effective sales tools – if they look professional and offer attractive prices. Here’s how to create them using QuickBooks®.
You don’t need to be a car repair shop or an HVAC technician to present prospects and customers with estimates. In fact, there may be many times when an unexpected estimate—or bid, or proposal—will land you a job you didn’t necessarily expect.
Of course, the bottom line is the meat of your estimate, the price you’re willing to accept for your work performed. It’s your job to determine that. But let QuickBooks do what it does best: provide intuitive, efficient tools for creating and modifying estimates.
First Steps
Before you start creating estimates, you’ll need to make sure they’re turned on in QuickBooks. Open the Edit menu and select Preferences, then Jobs & Estimates | Company Preferences. If the Yes button below DO YOU CREATE ESTIMATES? is not filled in, click inside of it to turn on this feature. Also, the Warn about duplicate estimate numbers check box should be activated.
There are actually three ways to open an estimate form. You can click the Estimates icon on the home page or open the Customers menu and select Create Estimates. You can also open the Customer Center (Customers | Customer Center) and click on the Transactions tab. Click the New Transactions button in the toolbar and choose Estimates.
Picture

If you haven’t explored QuickBooks’ Customer Center, you should. You can do a lot of your sales work directly from there, like creating estimates.

​As you can see, you can create multiple types of sales forms from here. You can also see lists of existing and historical transactions.
Making It Yours
Before you create your first estimate, you should make sure that the form’s header, footer, and columns contain the fields you want. Use one of the three methods we just outlined to open a blank form. Then, with the Formatting tab at the top of the window active, click Customize Data Layout in the toolbar that opens to launch the Additional Customization window.
Take your time working with the options in this window. QuickBooks gives you an incredible amount of control over how your estimates will look, but don’t get ahead of yourself. Start with the most important content: the text you want to have appear. By default, the software opens a template called Custom Estimate that contains commonly-used fields, like Cost, Description, and Markup. You can easily change these by checking and unchecking their corresponding boxes.
Picture

You’ll check and uncheck boxes to indicate the fields you want to appear in the Header, Columns, and Footer of your estimates.

​You’ll notice that you can have specific fields appear on the screen and/or on printed copies of your estimates. You can also change the field names (use Bid or Proposal instead of Estimate, for example), and for columns only, the order in which they appear.
Warning: Be careful with the Markup field of your estimates. You wouldn’t want your customers to see this, so be sure that it is NOT checked in the Print column.
As you make changes to this template, you’ll see the graphical Preview over to the right change to reflect your modifications. Click Print Preview to see a larger, finished version of your template. When you’re satisfied with it, click OK. This will replace your Custom Estimate template.
Adding Templates
You probably noticed other links and icons related to the formatting of estimates. These open advanced tools that we can help you understand. Once you’ve mastered them, you can save multiple versions of your estimate templates to use in different situations. These features include:
Picture

If you want to create a different look for the Custom Estimate template or build and save a new one, you can walk through this customization wizard.

  • Customize Design. This opens a multi-step wizard that helps you select a background, font, and grid style.
  • Download Templates. You can choose from multiple pre-designed templates.
  • Basic Customization. This window supplies tools for adding a logo and changing colors and fonts.
  • Layout Designer. We only recommend this tool if you already have freeform design skills.

Just Like Invoices
Creating an estimate in QuickBooks is just like filling out an invoice. You enter data where appropriate, and select options from drop-down lists. If you don’t have any experience with sales forms and need some guidance, we’re here to help. We can set up a time to go over the entire process – and answer any other questions you might have about QuickBooks while we’re at it. So, get started and connect with us at your convenience.

Getting Started with Accounts in QuickBooks® Online, Part 1

QuickBooks Online was built to work with transactions downloaded from your online financial institutions. Here’s how to work with them.
The ability to import transactions from financial institutions into QuickBooks Online is definitely one of the best things about the site. You may have even signed up for that very reason. By now, you’ve probably already set up at least one connection. But are you using all of the QuickBooks Online’s account tools? There’s a lot you can do once you’ve imported in data from your bank or credit card provider.
We’ll explore these features in this column and the next.
First Steps
If you’re a new subscriber, you may not have established these critical links yet. It’s an easy process. Start by clicking the Banking link in the left vertical navigation pane.  In the upper right corner, click Add Account and enter the name of your financial institution if it’s not pictured. Then follow the instructions you’re given on the screen. These can vary depending on the bank or credit card provider, but you’re always at least asked to enter the user name and password that you use to log into each online.
Need help with this? Let us know.
Viewing Your Transactions
Once you’ve made a successful connection, you’ll be returned to the Bank and Credit Cards page. You should see a card-shaped graphic at the top of the screen for each account you’ve linked. Click on one. The table that opens is not your account register. The view here defaults to For Review, which refers to transactions you’ve downloaded. The All tab should also be highlighted; we’ll get to Recognized transactions later.
Picture

When you first download transactions into QuickBooks Online, before you’ve done anything with them, many will appear under For Review.

There’s a lot going on here, so don’t be surprised if you’re confused. Review each transaction by clicking on it. QuickBooks Online will have guessed at how it should be categorized, but you can change this by opening the list in the category field and selecting the correct one. It’s critical that you get this right, since it will have an impact on reports and income taxes. If you need to Split it between multiple categories, click on that button found to the right.
If the transaction is Billable, check that box and choose a customer from the drop-down list. If you don’t see this box, click the gear icon in the upper right and select Account and Settings | Expenses. Check to see that Make Expenses and Items Billable is turned On (click on Off, then check the appropriate box to turn it on).
Next, determine how you want to process the transaction by clicking on one of the three buttons at the top of the transaction box. Do you want to accept it and Add it to that account’s register? Do you want QuickBooks Online to Find (a) Match for it (like a payment that matches an invoice, for example)? Or, do you want to Transfer it to another account? Once you’ve made one of these three selections, the transactions that you’ve added or matched will move under the In QuickBooks tab (where you can still Undo them) and will be available in the account’s register.
Other Options
Picture

You can save time by using QuickBooks Online’s Batch Actions tool.

​Say you run a cross some duplicate or personal transactions that you don’t want to appear in the current account’s register. Check the box in front of each, then click the arrow in the Batch Actions box. Select Exclude Selected. They’ll then be available under the Excluded tab. You can also Accept or Modify multiple transactions simultaneously by using this tool.
So far, you’ve been viewing All your transactions. Click on Recognized to the right of it. These are transactions that are already familiar to QuickBooks Online because they’ve appeared before and/or have been matched, or because you’ve created Bank Rules for them (we’ll address that concept next month). You’ll need to address these the same way you did the transactions in the For Review section; you can either Add or Transfer them.
If you’re new to QuickBooks Online, this may all sound pretty complicated. It can be at first. But once you’ve worked with downloaded transactions for a while, you’ll understand the flow much better.  If you’re not clear on the process from the start, it can lead to trouble. Contact us at your convenience.  We’d be happy to sit down with you and go through it all using your own company’s data; the familiarity may help. 

Paying Bills in QuickBooks®: The Basics

The time-consuming part’s over once you’ve entered bills in QuickBooks. Here’s how to pay them.
Last month, we explained that the process of paying bills in QuickBooks requires two separate sets of actions. We went over what’s required to enter bills and to set up reminders, so they don’t get overlooked. This month’s column will walk you through the second step: paying the bills.
You’ll remember you must first click Enter Bills on the home page (or open the Vendors menu and select Enter Bills), which opens a graphical representation of a bill. Select a Vendor from the drop-down list and complete the remaining fields in the top box. Make sure the Amount Due carries over to the lower part of the screen under either the Expenses or Items tab and that the rest of the fields there are completed correctly before you save the bill.
Once a bill is saved, it will be available to you when you click Pay Bills on the home page. That action will open a window similar to this one:
Picture

When you click Pay Bills on QuickBooks’ home page, a screen containing a table like this will open.

​In the upper left corner, you’ll first SELECT BILLS TO BE PAID by either defining a date range or asking to see all bills that have been entered but not yet paid. To the right of those options is the Filter By field. You can open the list and click All Vendors or click on a specific vendor. Selecting an option in the Sort By field allows you to change the display order of the list of bills.
Selecting Bills
Next, you’ll have to indicate which bills you want to pay, and by what method. This may take more than one pass if you’re using different payment methods for different vendors. If that’s the case, you’ll have to select bills in batches. Click in the box in front of each bill that you want to pay (or click Select All Bills below the table).
There are several columns in the table you will see. Some will already be filled in for each vendor with information that was included in the actual bill, like REF. NO. and AMT. DUE. Others refer to discounts and credits. If you’ve already set up vendor discounts (early payment, for example) or are entitled to a credit (overpayment, returned merchandise, etc.) and have set up QuickBooks to automatically apply them to bills, they should appear in those columns.
Tip: If you are the company administrator, you can set up this option. Open the Edit menu and select Preferences | Bills. With the Company Preferences tab active, check the boxes in front of Automatically Use Credits and Automatically Use Discounts, and select the correct Default Discount Account.
Discounts and credits are rather complex concepts in QuickBooks, and we expect you might need our help with setting them up.
The final step in bill paying on this page is to enter the AMT. TO PAY at the end of each applicable row.
Dispatching Payments
If you’ve selected All Bills (or chosen a batch that will use the same payment method), you’ll need to deal with the lower half of the bill-pay screen, which will look something like this:
Picture

Whether or not you’ll be dealing with credits and discounts you’ll still have some work to do at the bottom of the bill-paying screen.

​You can click on Go to Bill if you need to see the original form; also, verify the Payment Date and Terms are correct. You can still Set Discount and Set Credits here, but again, please don’t do so until we’ve scheduled a session to go over these advanced tools if you plan to use them. Select a payment method for the bills you’ve selected; the options and account to the right of your choice will change depending on which it is.
When you’re done, click Pay Selected Bills and do any follow-up work that’s requested.
The bill-pay process in QuickBooks has a lot of moving parts, some of which may need prep work before you can actually dispatch bills. We strongly urge you to get together with us if you’re planning to use this element of QuickBooks. Although beneficial, it’s one of the more complicated processes in the software, and it must be done with extreme accuracy. When you’re ready, we can help.

How to Enter Bills in QuickBooks®

It’s not as much fun as creating invoices, but the bills must be paid. Here’s how QuickBooks helps.

​We’re in a bit of a transitional period with business bill-paying. Some paper bills still come via the U.S. Mail, however you may also be getting some through email. Others don’t come at all: You might get a reminder email, but you have to go to the vendor’s site to make a payment.
 
How do you keep track of it all so you don’t miss any due dates? You could record them on a calendar, but you’d still have to go back to the actual bill to retrieve the amount. But where is it? Is it online, in your email inbox, in a file folder, or hanging on the wall?
 
QuickBooks can organize this unpleasant process, saving time and helping you avoid confusion. Here’s how it works.
 
A 2-Step Process
 
QuickBooks divides your accounts payable tasks into two separate processes: entering bills and paying them. It requires some extra time upfront as you complete the first step, but streamlines the second so that the actual bill-paying only takes a few seconds.
 
To get started, click Enter Bills on QuickBooks’ home page to open a window like this:
Picture

Before you can pay a bill in QuickBooks, you need to create a record for it.

The toolbar for the Enter Bills window is not pictured in the image above, but you don’t need it yet. Rather, you start by clicking the down arrow in the field next to VENDOR and selecting the biller’s name from your list (or clicking <Add New> if you haven’t yet created a record for that entity). The ADDRESS should fill in automatically, as should the date.
 
If you set up default payment TERMS in that vendor’s record, your preference should show in that field and the BILL DUE date should be correct. Enter the AMOUNT DUE and complete any of the optional fields that the transaction requires (REF. NO., DISCOUNT DATE, and MEMO).
 
Since this is a utility bill, the Expenses tab should be highlighted, and the amount you entered above should appear in it. Below that is the ACCOUNT field; open that list and choose the right one. Don’t worry about the CUSTOMER:JOB and BILLABLE fields. These will only be completed when you’re charging a customer for an expense or item.
 
Warning: If you’re not familiar with the concept of assigning accounts to transactions, please schedule some time with us. This is a critical designation that affects so many other areas of QuickBooks.
 
Saving Your Work
Picture

The toolbar from the Enter Bills window

Once you save your bill, you’ll be able to access it when it’s time to apply payment. How will you remember when it’s due, though? QuickBooks can remind you – or even pay it automatically. So, before you leave the Enter Bills window, click Memorize in the toolbar pictured above.
 
The Memorize Transaction window will open with your vendor already entered in the Name field. You’ll have three options here:
 

  • Add to my Reminders list. QuickBooks can add this bill to its list of Reminders. To ensure that you’ll see this every time you open the software and can make any changes necessary, open the Edit menu and click Preferences | Reminders | My Preferences. Click in the box in front of Show Reminders List when opening a Company file. Then click the Company Preferences tab (if you’re the administrator) and find the Bills to Pay row. Click the appropriate button to indicate whether you want QuickBooks to Show Summary or Show List, and enter the number of days before due date.


  • Do Not Remind Me. Just what it sounds like.
  •  ​Automate Transaction Entry. You can only select this if the transaction will be exactly the same every time (except for the date). If the number of transactions will be limited, enter the Number Remaining. And tell QuickBooks how many Days in Advance To Enter.
Picture

If you choose the third option here, be very careful when you define the automation. You should really only do this if you’re an advanced user.

When you’re done, click OK to close the box, and save the bill.
 
Next month, we’ll talk about the second step: the actual paying of bills. In the meantime, let us know if you want to schedule a session to go over any aspect of your accounts payable – or anything else in QuickBooks.

How QuickBooks® Online Can Improve Your Company’s Financial Health

QuickBooks Online is more than just an online bookkeeper. It can help improve your cash flow, your customer relationships, your inventory readiness, and your future.

​If you’re already using QuickBooks Online, you know how much impact its bookkeeping abilities have had on your company’s accounting operations. You’re saving time, which in-turn saves money, and you’re reducing errors. When a customer or vendor calls with a question, or you yourself need to track down a critical detail to solve a problem, you’re able to find solutions quickly.
 
You may already have learned, though, that QuickBooks Online’s benefits include much more than simply getting the numbers right. When you take advantage of all it can offer, you’re likely to notice more far-reaching effects.
 
The Specifics
 
Let’s look at how QuickBooks Online accomplishes all of this. You can do much of it on your own, but we’re trained to help small businesses get the most out of QuickBooks Online. We can help you maximize the effectiveness of your accounting time so your company can:
 
Better balance between income and expenses.
Picture

QuickBooks Online provides quick, real-time overviews of your sales status.

​You can’t begin to improve your company’s cash flow until you understand where the financial bottlenecks are. QuickBooks Online provides that information for both income and expenses in a variety of ways. In the image above, you can see that there are seven past-due invoices. Click on the orange bar to see a list of them, and you can automatically send reminders. QuickBooks Online also automates the process of sending statements.
 
You can also run accounts receivable and accounts payable reports that will show where you stand with customers and vendors, like Open Invoices, Uninvoiced Time, Unpaid Bills, and Accounts Payable Aging Detail. If you determine that one of your consistent problems with cash flow is late customer payments, you can set up a merchant account through QuickBooks Online to support credit card payments and bank transfers.
 
More repeat business because of improved customer interaction.
 
Your customers are like gold. To build the best relationships possible with them, you need a clear, updated picture of their transactions, their payment details and history, and your interaction with them. QuickBooks Online provides templates for Customer Information records that provide all of that, along with their contact information and a real-time update of the status of their invoices and payments, estimates, time activities, etc. The latter is provided in the form of an interactive list with links to immediate actions you can take.
 
A more stable, profitable inventory of products.
 
If your business sells products, you know that you have to be smart about inventory levels. Stock too much and you have too much money tied up unnecessarily. Too little, and you’ll be turning customers away and possibly losing their future business. QuickBooks Online’s inventory-tracking tools help you achieve and maintain that balance, so you know both when and how much to reorder.
Picture

It’s easy to evaluate your inventory status very quickly in QuickBooks Online.

​QuickBooks Online also offers multiple inventory reports, like Inventory Valuation Detail, Physical Inventory Worksheet, and Sales by Product/Service Detail.
 
Readiness for growth.
 
You may never want to acquire another company, or move into more spacious offices, or employ dozens of individuals. However, it’s not often that a company doesn’t want to be in a position to grow. And you never know when an opportunity will present itself that would require additional capital. Would you be ready?
 
If you’ve never applied for a business loan or tried to attract investors, you don’t know how much financial information you’ll need to provide, or in what format. There are very specific reports your potential lenders or investors will want to see, standard financial statements. QuickBooks Online includes templates for these, which include a Balance Sheet, Profit and Loss, and Statement of Cash Flows.
 
Like the reports we mentioned earlier, they’re easy to generate on the site, thanks to intelligent, customizable templates. Analyzing them, though, and making sure they’re ready to be seen by third-parties takes professional expertise. We can provide that for you. We can also help you better understand and use other elements of QuickBooks Online so that you’re taking advantage of all of its benefits. Contact us soon to set up an initial consultation.