Optimizing Performance in QuickBooks Online

QuickBooks Online (QBO) is a powerful tool that helps businesses manage their finances with ease and efficiency. However, like any software, its performance can be optimized to ensure you’re getting the most out of its features. Here are some strategies to streamline your accounting processes and enhance your experience with QuickBooks Online.

1. Regularly Update Your Software

QuickBooks Online is continually updated with new features, security patches, and performance improvements. Ensuring that your software is always up to date can help you avoid bugs and take advantage of the latest enhancements. Set your account to update automatically or check for updates regularly to stay current.

2. Clean Up Your Data

Over time, your QuickBooks data file can become cluttered with unused accounts, old transactions, and outdated information. Regularly cleaning up your data can significantly improve performance. This includes merging duplicate accounts, archiving old data, and deleting unused list items. Use the built-in cleanup tools in QuickBooks to help maintain a lean, efficient data file.

3. Optimize Your Internet Connection

Since QuickBooks Online is cloud-based, a strong and stable internet connection is crucial for optimal performance. Ensure you have a high-speed internet connection and consider upgrading your bandwidth if you frequently experience slow performance. Close other applications and tabs that may be consuming bandwidth and affecting your QuickBooks experience.

4. Use Browser Best Practices

Your web browser plays a significant role in how well QuickBooks Online performs. Use a supported browser like Google Chrome or Mozilla Firefox, and keep it updated to the latest version. Clear your browser cache regularly to prevent data build-up, which can slow down performance. Additionally, using private or incognito mode can sometimes improve speed by eliminating the interference of browser extensions and cookies.

5. Streamline Your Workflow with Integrations

QuickBooks Online integrates with numerous third-party applications that can help automate and streamline various accounting tasks. Integrating your payroll, invoicing, and time-tracking systems with QuickBooks can reduce manual data entry, minimize errors, and save time. Explore the QuickBooks App Store to find tools that can enhance your workflow.

6. Customize Your Dashboard and Reports

Tailoring QuickBooks to fit your business needs can make navigation more intuitive and efficient. Customize your dashboard to display the most relevant information for your daily operations. Create and save customized reports that you frequently use, so you can quickly access the data you need without repetitive setup.

7. Train Your Team

Ensure that all team members who use QuickBooks Online are adequately trained on its features and best practices. Proper training can prevent user errors that slow down the system and lead to inaccurate data entry. Consider investing in QuickBooks Online training courses or consulting with a QuickBooks ProAdvisor to ensure your team is proficient.

8. Regularly Back Up Your Data

While QuickBooks Online automatically backs up your data, having your own backup plan adds an extra layer of security. Regularly exporting your data and storing it securely ensures you can quickly recover in the event of data loss or corruption.

By implementing these strategies, you can optimize the performance of QuickBooks Online and streamline your accounting processes. This will not only save time and reduce frustration but also ensure your financial data is accurate and up-to-date, enabling you to make better business decisions.

computer

QuickBooks®101: A Beginner’s Guide to Getting Started

Welcome to the world of QuickBooks, the go-to accounting software for small to medium-sized businesses. This beginner’s guide is designed to help you navigate through the basic features and interface of QuickBooks, simplifying your journey into the realm of accounting.

Understanding the Interface QuickBooks offers a user-friendly interface with a dashboard that presents everything you need at a glance. Key sections include ‘Banking’, ‘Sales’, ‘Expenses’, ‘Employees’, and ‘Reports’. This layout makes it easy to track your business’s financial health.

Setting Up Your Account

  1. Creating a Company File: Start by setting up a company file. This is your business’s financial profile where you record transactions, manage accounts, and prepare for taxes.
  2. Entering Your Business Information: Fill in your business name, industry, and other details. This helps QuickBooks tailor its features to your specific needs.
  3. Connecting Your Bank Account: Link your business bank account and credit cards to QuickBooks. This automates income and expense tracking, saving you time.

Exploring Basic Functions

  • Invoicing: Create professional invoices for your clients. Customizing invoices with your logo and company details is straightforward.
  • Managing Bills and Expenses: Track your bills and record expenses. This ensures that you’re always aware of your outgoings and can manage your cash flow effectively.
  • Payroll Management: If you have employees, the payroll feature simplifies managing salaries, tax deductions, and pay runs.
  • Generating Reports: QuickBooks allows you to generate various financial reports. These are vital for understanding your business’s financial performance and for tax preparation.

Support and Learning Resources Don’t feel overwhelmed. QuickBooks provides extensive support through tutorials, community forums, and customer service. Utilize these resources to deepen your understanding.

Remember, mastery of QuickBooks won’t happen overnight. Take your time to explore, practice, and utilize the various features. Your efforts will pay off in streamlined financial management and clearer insights into your business’s fiscal health. Welcome to the world of simplified accounting with QuickBooks!

We offer complete setup and training  on QuickBooks®​ Online​. 

consulting

Year-End Essentials: QuickBooks® Tips for Closing Your Books Effectively

As the year winds down, it’s crucial for small business owners and accountants to get their financials in order, especially if they’re using QuickBooks. Here are some end-of-the-year QuickBooks tips to help you close out the year smoothly and prepare for the next.

  1. Reconcile All Accounts: Ensure all your bank and credit card accounts are reconciled up to the last statement of the year. This step is fundamental for accurate financial reporting and is a must-do before closing your books.
  2. Review Outstanding Invoices: Check for any outstanding invoices and make sure they’re accurate. Send reminders for overdue payments and consider writing off any uncollectible receivables to clean up your books.
  3. Analyze Inventory Status: If your business holds inventory, perform a year-end count and adjust your records in QuickBooks. This ensures your financial statements accurately reflect your inventory levels and value.
  4. Double-Check Payroll Records: Verify that all payroll transactions have been correctly recorded and taxes are up-to-date. Don’t forget to include any year-end bonuses or adjustments in your records.
  5. Update Vendor Information: Make sure all vendor information is current, including addresses and tax ID numbers. This is crucial for the accurate filing of 1099s.
  6. Back Up Your Data: Protect your financial data by backing up your QuickBooks file. Consider storing a copy off-site or using a cloud-based service for added security.
  7. Plan for Next Year: Finally, use the year-end as an opportunity to budget and plan for the next year. Analyze the current year’s financial reports to identify trends and areas for improvement.

Remember, these steps are not just about compliance but also about gaining insights into your business’s financial health. Properly closing out your books each year sets a strong foundation for the upcoming year, helping you make informed decisions for your business’s future.

We offer complete training QuickBooks®​ Online​. 

Transforming Your Business with Remote Bookkeeping

In today’s dynamic business landscape, remote bookkeeping has emerged as a pivotal tool for companies seeking efficiency and growth. The transition from traditional, in-office bookkeeping to a remote setup offers a plethora of benefits that can transform the way businesses manage their finances.

1. Cost Efficiency

One of the most immediate benefits of remote bookkeeping is the reduction in operational costs. Businesses no longer need to allocate resources for additional office space, equipment, or on-premise software for their bookkeeping staff. This shift can lead to substantial savings, particularly for small and medium-sized enterprises (SMEs) that operate with tighter budgets.

2. Access to Expertise

Remote bookkeeping opens doors to a broader talent pool. Businesses are no longer restricted to hiring local talent and can access highly skilled bookkeepers from across the globe. This not only ensures that you have someone with the right expertise but also promotes diversity in skills and approaches to financial management.

3. Enhanced Flexibility and Scalability

As businesses grow, their financial needs become more complex. Remote bookkeeping services are inherently scalable, allowing businesses to easily adjust the level of service based on their current needs. This flexibility is crucial for startups and growing businesses that experience fluctuating demands.

4. Improved Efficiency and Productivity

With the automation of many bookkeeping tasks and cloud-based accounting software like QuickBooks, data entry becomes more efficient, reducing the likelihood of errors. This automation allows business owners and their teams to focus on core business activities rather than getting bogged down with financial paperwork.

5. Real-time Financial Insight

Remote bookkeeping enables real-time updating and access to financial data. Business owners can make informed decisions quickly, a critical aspect in today’s fast-paced business environment. The ability to access financial reports and analyses anytime and anywhere offers a significant advantage.

6. Enhanced Security

Modern remote bookkeeping services place a high emphasis on data security, employing advanced encryption and security protocols to protect sensitive financial information. This level of security is often more robust than what small businesses can implement on their own.

In conclusion, the shift to remote bookkeeping can be a transformative step for businesses. It not only streamlines financial management but also contributes to better strategic decision-making, efficiency, and overall growth. Embracing this modern approach to bookkeeping can be the key to unlocking your business’s full potential.

Transform your business today with our remote bookkeeping services.

The Benefits of Using QuickBooks for Freelancers and Independent Contractors

Being a freelancer or an independent contractor can be both rewarding and challenging. You have the freedom to work on your terms, but managing finances and keeping track of income and expenses can be a real headache. That’s where QuickBooks comes to the rescue! In this blog, we’ll explore the benefits of using QuickBooks for freelancers and independent contractors in simple terms.

  1. Easy Expense Tracking: QuickBooks simplifies tracking your business expenses. You can easily snap pictures of receipts and categorize expenses. This makes tax time a breeze, helping you save money on taxes by ensuring you don’t miss any deductions.
  2. Invoice Management: With QuickBooks, creating and sending professional invoices is a cinch. You can set up recurring invoices for regular clients, saving you time and ensuring you get paid promptly.
  3. Income Management: Keep tabs on your earnings effortlessly. QuickBooks automatically records your income, making it easy to see your cash flow and plan for the future.
  4. Tax Time Made Simple: Freelancers dread tax season, but QuickBooks can turn it into a stress-free experience. It tracks your income and expenses throughout the year, making it easy to generate accurate tax reports and even estimate your quarterly tax payments.
  5. Financial Insights: QuickBooks provides insightful reports that help you understand your financial health. You can see your profit and loss, track expenses over time, and identify areas where you can save money.
  6. Time Savings: Instead of spending hours on manual bookkeeping, QuickBooks automates many tasks. This means more time for you to focus on your work or enjoy your free time.
  7. Accessibility: QuickBooks can be accessed from anywhere with an internet connection. Whether you’re on a computer or a mobile device, you can check your financial information on the go.
  8. Simplified Collaboration: If you have an accountant or need to collaborate with others, QuickBooks allows for seamless collaboration. You can share access to your books without sharing sensitive information.
  9. Budgeting and Planning: QuickBooks helps you set budgets and track your progress. This can be incredibly useful for freelancers looking to manage their finances more effectively.
  10. Customer Support: QuickBooks offers customer support to assist you with any questions or issues. You’re not alone in managing your finances.

In conclusion, QuickBooks is a game-changer for freelancers and independent contractors. It simplifies financial management, saves time, and provides valuable insights into your business’s financial health. Plus, it can make tax season a lot less daunting. So, if you’re looking for an easy and efficient way to manage your finances, give QuickBooks a try – you won’t be disappointed!

Integrating QuickBooks with Other Business Tools: Boosting Productivity and Efficiency

In today’s fast-paced business world, maximizing productivity and efficiency is essential for staying competitive and successful. One of the most effective ways to achieve this is by integrating QuickBooks, a leading accounting software, with other business tools. By seamlessly connecting different applications and streamlining workflows, businesses can streamline operations, reduce manual tasks, and enhance overall productivity.

  1. Streamlining Data Management

Integrating QuickBooks with other business tools, such as CRM (Customer Relationship Management) systems, project management software, and inventory management solutions, can significantly streamline data management processes. The automatic synchronization of data across different platforms eliminates the need for manual data entry, reducing the chances of errors and saving valuable time.

For instance, when a new customer is added to the CRM, the integration can automatically create a corresponding entry in QuickBooks, making it easier to manage customer records, invoices, and payments without duplicating efforts.

  1. Accelerating Invoicing and Payment Processing

Integrating QuickBooks with payment gateways and billing systems can expedite the invoicing and payment processes. Customers can make payments directly through online portals, and the integration will automatically update payment statuses in QuickBooks, leaving no room for discrepancies. This not only ensures faster payments but also improves cash flow management for businesses.

  1. Enhancing Payroll and HR Management

Integrating QuickBooks with HR management tools or dedicated payroll software streamlines payroll processing and reduces manual payroll-related tasks. The integration can handle employee data, attendance records, tax calculations, and direct deposit information, ensuring timely and accurate salary disbursements. Additionally, this integration minimizes the risk of compliance issues, as all payroll data is kept up-to-date.

  1. Optimizing Inventory and Order Management

For businesses dealing with inventory, integrating QuickBooks with inventory management software is crucial. This integration enables real-time tracking of stock levels, automatic generation of purchase orders, and seamless synchronization of sales data. As a result, businesses can avoid stockouts, overstocking, and maintain efficient supply chains.

  1. Automating Expense Tracking

Integrating QuickBooks with expense tracking tools or mobile apps allows employees to easily capture and submit expenses on the go. By automating the expense management process, businesses can expedite reimbursement procedures, maintain better expense records, and gain insights into spending patterns.

  1. Centralizing Reporting and Analytics

Integrating QuickBooks with business intelligence tools consolidates financial data, allowing for more comprehensive and accurate reporting and analytics. Business owners and managers can access critical financial insights and performance metrics from a single dashboard, enabling data-driven decision-making.

Conclusion

Integrating QuickBooks with other business tools can significantly enhance productivity and efficiency within an organization. By automating processes, reducing manual tasks, and streamlining data management, businesses can focus on core operations and strategic growth. Embracing these integrations not only boosts efficiency but also helps maintain a competitive edge in the market, ultimately leading to sustainable success in the long run.

How to Use Tags in QuickBooks Online

Where is your money coming from? Where is it going? You can use tags in QuickBooks Online to find out.

QuickBooks Online offers numerous ways to help you track your sales, expenses, and profitability. If you’re using QuickBooks Online Plus or Advanced, you can create and assign Classes to transactions to differentiate between, for example, store departments or product lines. Some of the site’s reports are designed specifically for these tools, like Sales by Class and Profit and Loss by Class

You can assign Categories to products and services to gain insight into your sales and inventory. There’s a different set of Categories that you’ll use when you record bills and expenses. These are important for reporting and tax purposes. You can also add a Location field to sales transactions so you can track sales by stores, sales regions, or counties, for example.

What Are Tags?

Then there are Tags, which are fairly new to QuickBooks Online. These are customizable labels that you can assign to transactions (invoices, expenses, and bills). They’re more flexible than the tools we’ve already mentioned – they allow you to track your money any way you want. They don’t affect your books, and they’re not included in the customization criteria for reports. But there are two reports specifically designed for them: Profit and Loss by Tag Group and Transaction List by Tag Group.

Creating Your Own Tags

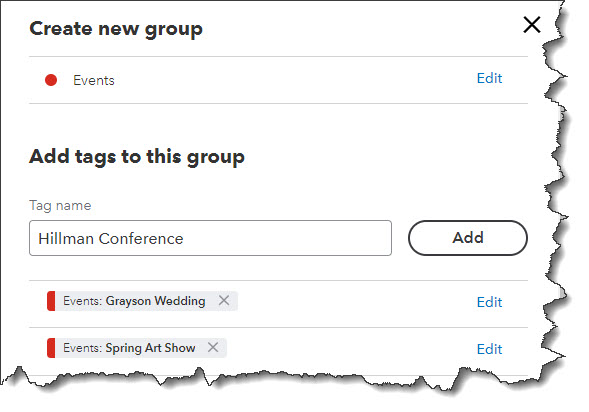
Once you’ve given your group a name, you can start adding tags to it.

Before you create a tag, you need to create a Group. Groups consist of related tags that share a common theme. For example, say you do some event planning. You might have a group titled Events. Individual events might read, for example, Grayson Wedding, Spring Art Show, and Hillman Conference.

To get started, click the gear icon in the upper right. Under Lists, click Tags to get to the tool’s home page. (You can also click on the Transactions link in the toolbar, then click the Tags tab.) Click New, then Tag group. A vertical panel slides out from the right. Enter a name in the Group name field. Click the down arrow to select a color, then click Save

Enter your tags one by one in the fields labeled Tag name. Click Add after each one until your list is complete. Click the Edit button to make any changes. When you’re finished, click Done. The main Tags page will open again, and you’ll see your new group under Tags and Tag Groups. Repeat to add as many as you’d like, up to 300 tags.

Using Tags

You can add tags to any transaction that contains a field for them

.

Let’s look at how you’d use tags in an expense. Click the Expenses link in the toolbar, then New transaction | Expense in the upper right. Click the down arrow in the Payee field in the upper left and select + Add new. Enter Billy’s Bridal in the Name field Leave the Type as Vendor and click Save. Back on the Expense screen, select the Payment account, Payment date, and Payment method for the expense (reference number is optional).

Directly below those fields, you’ll see the Tags field. Click Manage tags if you need to add or edit one; the right vertical pane you saw before will slide out. Otherwise, click in the field below Tags. Your list of tags will drop down. Select Grayson Wedding to move it into the field. You can assign as many tags as you’d like to transactions, but you can only select one tag from each group. Finish the expense and save it. 

Go back to the Tags home page, and you’ll see that there’s a link to one transaction in the Events row. At the end of each row is the Action column, where you can run a report, add a tag, and enter or delete a group. Your expense total appears in the Money Out (by tag) box above it. 

Tags are a great addition to the tools QuickBooks Online provides to help you track incoming and outgoing funds. If you’re not familiar with the others we mentioned at the beginning of this column and want to learn how to explore them, let us know. We’d be happy to walk you through their use and help you understand how they can make your finances more understandable.

How Do You Create Price Levels in QuickBooks?

QuickBooks allows you to create Price Levels that you can assign to customers and jobs and to individual items.

You already know that when you create a product or service record in QuickBooks, you must assign a sale price to it. But did you know that QuickBooks gives you a great deal of flexibility when to comes to pricing items you sell? The software allows you to create one or more additional Price Levels that you can access in invoices, estimates, sales receipts, credit memos, and sales orders.

There are three ways you can use these. Once you’ve created them, they’ll be available in a drop-down list in the Rate field. This means you can assign them manually to individual transactions. The second option is to assign them globally to specific customers or jobs. Once you’ve done so, that price will apply every time you create a transaction for one of them. Finally, you can create price levels for selected items.

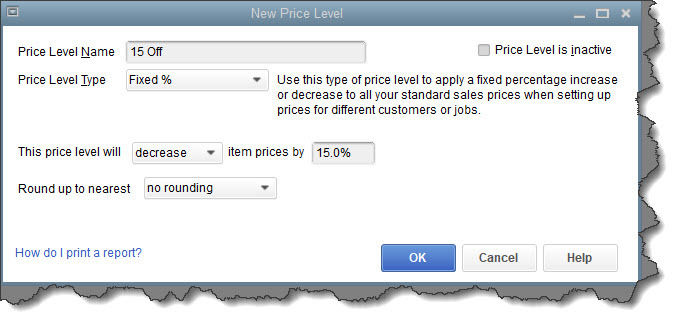
Here’s how it works. Let’s say you want to be able to create a price level that’s 15 percent below the actual price that you can use in individual transactions. You open the Lists menu and select Price Level List. Click the arrow in the lower left corner next to Price Level and select New. A window like this will open:

You can create price levels in QuickBooks and assign them to individual sales transactions.

Fill in the field next to Price Level Name, and then click the arrow next to Price Level Type. Select Fixed %. Select decrease from the drop-down list on the next line and enter your percentage number. Round up to the nearest is an optional field, Click OK when you’re done. The next time you create a sales transaction, your new price level will be available as an option when you open the drop-down list in the Rate column.

When you need to edit or delete a price level, go to Lists | Price Level List again and click the arrow next to Price Level in the lower left corner. You have several options here. You can, for example, make a price level inactive so it doesn’t appear on the list. The field next to Price Level is labeled Reports. Click on the arrow to see what’s available there.

Customers and Jobs

You can also apply a price level you’ve created to a specific customer or job, perhaps to reward a customer for frequent purchases. When you do so, that rate will appear every time you enter a sales transaction for the customer or job you selected.

Open the Customers menu and select Customer Center. Double click on a customer or job’s name to open the record. Click on the Payment Settings tab. Click the arrow in the field next to Price Level and select the right one, then click OK.

You can assign a Price Level to specific customers or jobs.

Per Item Price Levels

QuickBooks also allows you to set custom prices for specific items that are associated with preferred customers or jobs (this option is only available if you’re using QuickBooks Premier or Enterprise). Let’s say you want to give a 10 percent discount to specific customers who purchase your website development services. Go to Lists | Price Level List and click the arrow next to Price Level in the lower left corner again, then select New (you can also get to the New command by right-clicking anywhere in the window). 

Give your price level a name (like Web Development 10 Off), then select Per Item from the Price Level Type drop-down list. Click in front of the Item you want to include. The fields in the next line should read as pictured in the image below: 10% | lower | standard price. Click Adjust. You’ll see your reduced prices in the Custom Price column in the table above.

You can establish a Price Level for specific items in QuickBooks.

Again, the rounding field is optional. When you’re finished here, click OK. The next time you create a sales transaction for a customer who is eligible for the lower price, you’ll select Web Development 10 Off from the drop-down list in the Rate column.

Feel like you’re outgrowing your current version of QuickBooks, or is it several years old? Talk to us about upgrading. We’re here to support you and to help you more effectively use the software as your business changes and grows.

Make QuickBooks® Yours: Customize the Desktop

Make QuickBooks work faster for you by changing a few settings.

Whether your business has been locked down because of the pandemic, or you’re scrambling to hold things together with fewer employees or diminishing sales, you’re probably leaning on QuickBooks more than ever. You may be watching dwindling inventory items closely or monitoring your daily cash flow or trying to collect on invoices that aren’t being paid because your customers are short on money.

QuickBooks can help with all these accounting tasks. But you certainly don’t want to waste time now just dealing with the software’s mechanics.

As always, we’re available to help as you deal with the toll that COVID-19 is taking on your company. We’d also like to suggest that you spend a little time customizing QuickBooks. Streamlining its operations will take some of the unnecessary frustration out of your work life.

Getting Around Quickly

QuickBooks tries to accommodate different work styles and preferences by providing multiple navigation methods. These are:
• The old, standard Windows menus.
• The home page’s icons.
• The Icon Bar that appears in the left vertical pane by default (you change its position by opening the View menu).

If you’re going to use the Icon Bar, we recommend that you set it up to make your most often-used tools prominent. Right-click in the toolbar and click on Customize Shortcuts to open the Customize Icon Bar window. In the upper left corner, you’ll see a list of your icons as they’re currently arranged. You can rearrange them by grabbing the small diamonds to their left with your mouse and dragging them to their new positions. You can change their labels by clicking Edit, or Delete them.

You can add almost any window in QuickBooks to your fast-access Icon Bar.

You’re not limited to the items in the list. Click Add, and the Add Icon Bar Item opens, as pictured above. Click on any of the ones you want to include in the Icon Bar, then click OK. QuickBooks allows you to add almost any screen to your Icon Bar. Navigate to the window you want to add, then open the View menu and select Add…to Icon Bar. If you never use the Icon Bar, you can collapse it by clicking the small arrow to the right of the Search box at the top of the pane. You can also close the home page by clicking the lower of the two small X’s in the upper right.

Tile Your Windows
If you regularly work with the same handful of screens, there’s a faster way to access them. Open them all, then open the Window menu and select Tile Vertically. All the windows will be displayed on the same screen, arranged vertically. If there are enough of them, they will overlap. To activate one, just click on it. You can open it to full screen by clicking the small rectangle in the upper right and return to your vertical arrangement by clicking the double rectangle in the upper right.

If you’d prefer, you can Tile Horizontally. Or, you can click Cascade to display them stacked on top of each other with only each window’s title label showing, as shown below. If you want to go back to a blank screen and start over, click Window | Close All. The Window menu also displays a list of open windows that can be used for navigation.

If you click Window | Cascade with multiple windows open, QuickBooks will stack them, with only the bottom screen showing. Click on a title label to open a different window.

The Desktop View

There are other ways you can make QuickBooks work the way you want it to. Open the Edit menu and select Preferences, then Desktop View. Click on the My Preferences tab if it’s not already highlighted. There are several preferences here. Look under the Desktop heading. You can have QuickBooks open to the configuration of windows you want. Your options are:

• Save [the windows that are already open] when closing company.
• Save current desktop (a specific set of windows).
• Don’t save the desktop (always open to just the home page).

Click the Company Preferences tab to add or remove icons from the home page. This is also where you turn features on and off.

We’re Still Here

All these suggestions may seem minor to you. But they will save time. More important, they will give you a better sense of control over the hours you spend on accounting tasks. And with so many things out of our control right now, creating a software environment that is tailored to your workflow can benefit you.

We know that you may be struggling right now to maintain your financial health, as well as your physical health. More than ever, we hope you’ll contact us if you have a QuickBooks or general accounting problem that we could solve. We’ll be happy to do what we can to help you through during this very challenging period.

Sales Receipts, Invoices, and Statements in QuickBooks®

QuickBooks allows you to create multiple types of sales forms for different situations. Here’s a look at what they are and when to use them.

When you buy something at a store, you want a piece of paper that shows what you purchased and what you paid. If you receive products or services before you pay for them, you certainly expect to receive a bill. And if you have several transactions with the same company and want clarification on what you’ve paid, and what you owe for a specific time period, the company can usually send you a summary.

Your customers want the same things. That financial documentation might be difficult for you to provide if you’re still doing your accounting manually on paper.

Fortunately, QuickBooks has a solution. Or, rather, several solutions. The software includes templates for all of the sales forms that you’ll probably ever need: invoices, sales receipts, and statements. Here’s an introduction to when and how to use them.

Sales Receipts

A screenshot of a cell phone

Description automatically generated

When a customer pays you on the spot, you can create a sales receipt.

When you receive full payment for a product or service at the time of the sale, the correct form to use in QuickBooks is the Sales Receipt. Click the Create Sales Receipts icon on the home page or open the Customers menu and select Enter Sales Receipts. You’ll see a form like the partial one pictured above.

Click the down arrow in the Customer:Job field and select the correct one or <Add New>. If you assign transactions to Classes, pick the right one in that list. The Template field should default to the appropriate form. If you’ve created more than one sales receipt template, select the one that you want. Click the icon above the correct payment type.

Tip: Want to be able to accept credit cards and eChecks? You’re likely to get paid faster by some customers. You’ll also be able to accept payments on your smartphone or tablet and create receipts. Talk to us about adding this capability.

Select the appropriate Item(s) from that drop-down list and enter a Qty (Quantity). Be sure to apply the sale’s Tax status by opening that list. (If you know that you’re responsible for paying sales tax on at least some of your sales but you haven’t set this tracking up in QuickBooks yet, we can work with you on that. It’s important.) When you’ve finished filling in the table with all the goods or services you sold, you can save the transaction and either print it or email it to your customer.

Invoices

A screenshot of a cell phone

Description automatically generated

After you’ve completed the top half of an invoice, you’ll see something like this at the bottom.

You’ll create and send Invoices to customers when you’ve received either a partial payment or no payment at the time of the sale. Those completed transactions become a part of your total Accounts Receivable (money owed to you). Click Create Invoices on the home page or go to Customers | Create Invoices. Fill out the fields at the top of the screen like you did with your sales receipt; the forms are almost the same. Invoices, though, have Bill To and Ship To addresses, as well as fields for the sale’s Terms and Due Date.

You shouldn’t have to do anything with the bottom half of the screen (pictured above) unless you want to include a Customer Message, since the information here is carried over from the top of the screen. Check to make sure the Tax Code is correct, though.

It’s important to note, it’s an either/or situation when it comes to creating an invoice and a sales receipt for the same transaction. It’s best to not use sales receipts for invoice payments, as it can cause issues.

Statements

A screenshot of a cell phone

Description automatically generated

When you create statements, you’ll first choose the customers who should receive them.

Statements are very useful when you have multiple customers who are past due on their payments (you can find this out by running the A/R Aging Summary report, which you’ll find under Reports | Customers & Receivables). Click the Statements link on the home page or go to Customers | Create Statements.  You’ll first have to select the customer(s) who should be on your list, as pictured above. There are several other options on this page that will help you refine this group. When you’re done, QuickBooks will automatically generate them, and you can print or email them.

You’ll save a lot of time when you use QuickBooks’ sales forms. Your bookkeeping will also be more accurate, and it will be easier to track down specific transactions. If you use them conscientiously, you’ll be able to run reports that provide comprehensive overviews of various elements of your finances.

Do you have questions about any of this, or are you just getting started with QuickBooks? We’re happy to schedule a consultation to determine what your needs are and how we can assist. Contact us, and we’ll set something up.