How to Back Up and Move a Company File in QuickBooks®

Your QuickBooks company file is gold. Make sure you know how to back it up and restore it properly.

You may not think of your QuickBooks company file as being portable. It lives safely on the hard drive of your desktop and/or laptop computer. You wouldn’t want it to be anywhere else, right?

However, the most common reason businesses move these critical files is because they’ve purchased a new computer or they may also want to share their data. QuickBooks allows you to create a backup file that you can save to a USB drive or CD, or to another folder on your company’s network. Once it’s available at its destination computer (where a copy of QuickBooks has already been installed), you (or another recipient) will be able to restore it.

Note: These instructions were created using QuickBooks 2018. If you don’t see what’s being described here in your version, contact us.

Making a Backup

You shouldn’t wait until you have to move a QuickBooks company file before backing it up, though. This is something you should be doing regularly. 

Before you start, make sure your copy of QuickBooks is updated, which shouldn’t be a problem if you’re set up with automatic updates. If you’re not, and you’ve ignored those messages about updates that appear when you open QuickBooks, we can help you launch a manual update and configure QuickBooks to automatically update.

With QuickBooks in Single-User Mode, open the File menu and hover over Back Up Company. Select Create Local Backup. You’ll see this window:

A screenshot of a cell phone

Description automatically generated

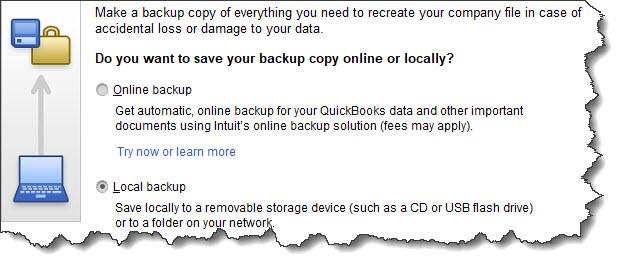
You can save your QuickBooks backup copy locally or online.

Intuit offers a service called Intuit Data Protect ($99.95 annually) that allows you to back up your company file online (we can help you explore this if you’re interested). Let’s assume here, though, that you have a USB drive plugged into your computer and are ready for your backup.

Click the button next to Local backup, then the Options button. In the window that opens, you’ll select your destination location and answer a few questions about your backup. One of these gives you the option to get a reminder to back up your file every x times you close QuickBooks, should you choose to do manual backups. 

Click OK to return to the Create Backup window, then click Next. The following screen gives you the option to save your file and/or schedule future (automatic) backups. If you choose to simply save it now, check that button and click Next to verify the destination location and file name.

Note: Before you save your backup file, give it a name that is different from your regular company file. Write down the exact file name and its location.

Click Save. A small window will open displaying your progress, and you’ll get a confirmation message when the file has been saved with a .qbb extension. You can now take the removable storage device to the destination computer, where QuickBooks should already be installed.

Warning: If you want to schedule automatic backups by clicking on one of the two options in the Create Backup window, please consult with us first. Automated processes in QuickBooks can save time and effort, but when you’re dealing with your irreplaceable company file, you must get it right.

Restoring a Backup File

Once that’s done, open the File menu and select Open or Restore Company on the destination computer. This window will appear:

A screenshot of a cell phone

Description automatically generated

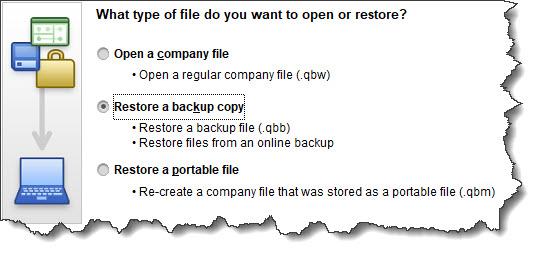
QuickBooks displays this window when you select File | Open or Restore Company.

Click the button in front of Restore a backup copy. Click Next and select Local backup. Then click Next again. Click the down arrow next to the Look in field and click on the location of your backup file to display its contents. Browse until you find the file (it should end in .qbb), then highlight it by clicking on it. Click Open.

QuickBooks displays a window that asks where you want to restore your file. You’ll click Next to find it in the Save Company File as window. The Save in field should point to your main QuickBooks directory (like QuickBooks 2018) and the File name field should show the correct file name. 

When everything looks correct, click Save. QuickBooks will convert your .qbb file to the standard QuickBooks file type, .qbw, and open it.

Care Needed

Losing your QuickBooks data, as you know, would be absolutely disastrous. But there may be occasions when you’ll need to open a backup copy of your company file on a different computer. We would be happy to walk you through this the first time you do it; in fact, we highly recommend it. As always, we’re available to work with you on any QuickBooks issues you’re experiencing – or to get you up and running for the first time.

Are You Following Best Practices in QuickBooks® Online?

“Best practices” are recommendations for the most effective way to get things done. Are you following standard procedures in QuickBooks Online?

Habits can be good things when you’re talking about getting through the workday successfully. You might have developed a habit of responding to emails quickly and preparing checklists before you go into meetings. Maybe you schedule your most challenging work for high-energy times of the day and leave less-demanding tasks for those times when you’re not as chipper.

It’s easy to fall into habits with QuickBooks Online, too. You might follow the same workflow pattern every day simply because that’s the way you’ve always done things. There’s nothing wrong with that – as long as you’re incorporating as many of the site’s best practices as you can. That is, you’ve made a habit of taking actions that will lead to the most effective use of QuickBooks Online.

Here are four habits we think you should consider developing if you haven’t already.

Go through your new transactions every day:

One of the five best things about QuickBooks Online is its ability to connect to your financial accounts and import transactions regularly. But this feature is only useful if you review your recently-downloaded transactions every day. Wait too much longer than that, and it will become too overwhelming.

A screenshot of a cell phone

Description automatically generated

We recommend you review your account transactions every day and complete any of the fields necessary.

To view an account register, you’d click Banking in the left vertical pane, and then click on the desired account at the top of the screen. When you select a transaction, a small window like the (partial) one pictured above drops down and displays your options. If you have not worked with defining and clearing downloaded transactions before, we can provide guidance here. It’s complicated.

Always assign categories to expenses:

You’ll get out of QuickBooks Online what you put into it. That is, the more conscientious you are about completing records and transactions thoroughly, the more helpful your reports will be. It’s especially important that you assign categories to expenses and mark them as billable or not. Those categorized expenses will be very important as you’re preparing your company’s income taxes. And you want to be sure that customers are billed for expenses you incur on their behalf.

Run aging reports once or twice a week:

QuickBooks Online can help you keep up with money owed to you and money you owe, but you have to take the time to stay current with that information. The site’s Dashboard provides the dollar total for unpaid invoices and links to a list, but it doesn’t tell you what bills of your own may be coming due – or are late.

We recommend you run at least two reports at the beginning and end of the week: Accounts Receivable Aging Summary and Accounts Payable Aging Summary. You can modify these reports by clicking the Customize button, but they should be good as is. You don’t want to see any numbers in any columns except the first one (Current). If you see any beyond that, it means that either incoming or outgoing payments are overdue.  Click on any number to see the transactions behind it.

Set reorder points on inventory items.

A close up of a map

Description automatically generated

Inventory-tracking in QuickBooks Online is complicated. We can help you understand it.

Keep an eagle eye on your product inventory levels. When you create an item record (Sales | Products and Services | New), be sure to enter a Reorder point. The Products and Services page tells you how many items have Low Stock or are Out of Stock. You can also see the Qty on Hand and Reorder Point in the table below those numbers.

Warning: Inventory-tracking is an advanced feature of QuickBooks Online. If you need these tools, contact us about scheduling some time to go over them thoroughly.

More to Implement

There are many other best practices that we’d recommend for your use of QuickBooks Online. Several of them have to do with reports, one of the site’s capabilities that is particularly robust but which many businesses don’t fully engage in because some of them are difficult to analyze. These include standard financial reports like Balance Sheet and Statement of Cash Flows

You’ll need these reports if you apply for financing or want to share information about your company’s financial health with a third party. The insight they provide can also be useful to you in making business decisions.  We’d be happy to create and analyze these for you on a regular basis, or to consult with you on any other aspect of QuickBooks Online that is perplexing.

Sales Receipts, Invoices, and Statements in QuickBooks®

QuickBooks allows you to create multiple types of sales forms for different situations. Here’s a look at what they are and when to use them.

When you buy something at a store, you want a piece of paper that shows what you purchased and what you paid. If you receive products or services before you pay for them, you certainly expect to receive a bill. And if you have several transactions with the same company and want clarification on what you’ve paid, and what you owe for a specific time period, the company can usually send you a summary.

Your customers want the same things. That financial documentation might be difficult for you to provide if you’re still doing your accounting manually on paper.

Fortunately, QuickBooks has a solution. Or, rather, several solutions. The software includes templates for all of the sales forms that you’ll probably ever need: invoices, sales receipts, and statements. Here’s an introduction to when and how to use them.

Sales Receipts

A screenshot of a cell phone

Description automatically generated

When a customer pays you on the spot, you can create a sales receipt.

When you receive full payment for a product or service at the time of the sale, the correct form to use in QuickBooks is the Sales Receipt. Click the Create Sales Receipts icon on the home page or open the Customers menu and select Enter Sales Receipts. You’ll see a form like the partial one pictured above.

Click the down arrow in the Customer:Job field and select the correct one or <Add New>. If you assign transactions to Classes, pick the right one in that list. The Template field should default to the appropriate form. If you’ve created more than one sales receipt template, select the one that you want. Click the icon above the correct payment type.

Tip: Want to be able to accept credit cards and eChecks? You’re likely to get paid faster by some customers. You’ll also be able to accept payments on your smartphone or tablet and create receipts. Talk to us about adding this capability.

Select the appropriate Item(s) from that drop-down list and enter a Qty (Quantity). Be sure to apply the sale’s Tax status by opening that list. (If you know that you’re responsible for paying sales tax on at least some of your sales but you haven’t set this tracking up in QuickBooks yet, we can work with you on that. It’s important.) When you’ve finished filling in the table with all the goods or services you sold, you can save the transaction and either print it or email it to your customer.

Invoices

A screenshot of a cell phone

Description automatically generated

After you’ve completed the top half of an invoice, you’ll see something like this at the bottom.

You’ll create and send Invoices to customers when you’ve received either a partial payment or no payment at the time of the sale. Those completed transactions become a part of your total Accounts Receivable (money owed to you). Click Create Invoices on the home page or go to Customers | Create Invoices. Fill out the fields at the top of the screen like you did with your sales receipt; the forms are almost the same. Invoices, though, have Bill To and Ship To addresses, as well as fields for the sale’s Terms and Due Date.

You shouldn’t have to do anything with the bottom half of the screen (pictured above) unless you want to include a Customer Message, since the information here is carried over from the top of the screen. Check to make sure the Tax Code is correct, though.

It’s important to note, it’s an either/or situation when it comes to creating an invoice and a sales receipt for the same transaction. It’s best to not use sales receipts for invoice payments, as it can cause issues.

Statements

A screenshot of a cell phone

Description automatically generated

When you create statements, you’ll first choose the customers who should receive them.

Statements are very useful when you have multiple customers who are past due on their payments (you can find this out by running the A/R Aging Summary report, which you’ll find under Reports | Customers & Receivables). Click the Statements link on the home page or go to Customers | Create Statements.  You’ll first have to select the customer(s) who should be on your list, as pictured above. There are several other options on this page that will help you refine this group. When you’re done, QuickBooks will automatically generate them, and you can print or email them.

You’ll save a lot of time when you use QuickBooks’ sales forms. Your bookkeeping will also be more accurate, and it will be easier to track down specific transactions. If you use them conscientiously, you’ll be able to run reports that provide comprehensive overviews of various elements of your finances.

Do you have questions about any of this, or are you just getting started with QuickBooks? We’re happy to schedule a consultation to determine what your needs are and how we can assist. Contact us, and we’ll set something up.

Start 2020 Right: Get into the Report Habit

It’s a good time to start new habits – or refresh old ones. Running reports regularly will help you make better business decisions.

Whether or not you made New Year’s resolutions, you probably look at January as a fresh start in personal and professional matters. Unfortunately, we can’t help you join a gym or organize your closets or meet your monthly sales goals.

What we can do, though, is encourage you to start a new habit that may actually leave you more time for those activities and even improve your company’s financial bottom line. We’re talking about committing to using the reporting tools QuickBooks offers.

You can’t possibly know how your business is doing unless you take advantage of this critical feature. It’s the payoff for all the hard work you do keeping up with your daily accounting workflow. Here are five things you should try.

Visit QuickBooks’ Report Center: 

As you know. QuickBooks devotes an entire menu to reports, dividing them into types (Sales, Purchases, Inventory, etc.). When you hover your mouse over one of these categories after opening the Reports menu, you’ll see a list of all related reports. 

Click on Report Center, though, and you’ll see a kind of home page for reports. They’re categorized by type, just like in the main Reports menu, but there’s much more you can do here.

A screenshot of a cell phone

Description automatically generated

Click on a report name in the Report Center and you’ll have numerous options.

When you click on the graphic representing a report, you’ll first be able to change the date range by clicking on the down arrow. Then you can Run the report, see a brief explanation by clicking Info, click on Fave to add it to your list of Favorites, or open Help. The tabs at the top of the screen allow you to toggle between these Standard views, reports you’ve Memorized, Favorites, Recent, and Contributed (report templates created by individuals outside of Intuit). 

If you know exactly what reports you want to run it’s probably easier to just use the Reports menu, but the Report Center is a great place to learn about and organize your content.

Customize Your Reports:

You’re probably used to changing the date range on your reports, but have you ever explored any of QuickBooks’ other customization tools? You can use them on any report. Click the Customize Report button in the upper left. Click on the Display tab, and you can change the report’s columns by checking or unchecking entries in the list. Filters are more complex, and you may need our help setting up very specific, multi-filter reports. They offer a way to pare down your report to contain just the data you want. You could, for example, prepare a report that only includes one or more Transaction Types or customers who live in a specified state.

Memorize Your Reports:

Once you’ve changed columns and filters in a report you’ll run frequently, you can save those settings so you don’t have to go through all of that again. Open any report and click the Memorize button in the upper toolbar. The window that opens will ask if you want to save that customized report to a Memorized Report Group, which you can do by clicking the box and opening the list of groups. Either way, you can find your report by opening the Reports menu and selecting Memorized Reports.

A screenshot of a cell phone

Description automatically generated

If you want to create a new Memorized Report Group, open the Reports menu and click Memorized Reports | Memorized Report List. Open the Memorized Report drop-down menu and select New Group.

Schedule Your Reports:

The best way to get your report habit started is by creating a schedule of reports you need to see regularly. You can do this by setting up Reminders (Company | Reminders). Click the gear icon in the upper right corner to specify your Preferences and the + (plus) sign to add a reminder. QuickBooks 2017 and later versions offer a scheduling tool that allows you to share reports with others, but please don’t try this on your own. It’s a complicated procedure with many rules.

You’ve probably noticed that there is a report category called Accountant & Taxes. Some of these should be created monthly or quarterly, but you’ll need our help analyzing them as well. 

In the coming year, we strongly encourage you to expand your skills at generating reports. You can’t make realistic, effective plans for the future of your company without knowing its current financial state and its history. So start the year off right in 2020, and let us know how we can help.

Still Dealing with 2019 in QBO? Clearing the Way for 2020

If you have a nagging feeling this month that you’re not caught up with your accounting tasks, it’s time to clean up your unfinished 2019 work.

It would be great if you could have closed out 2019 knowing that you were all caught up with your accounting work. You sent all your invoices, paid all your bills, and wrapped everything up with a series of reports and a proverbial bow.

Unfortunately, December rarely goes that way. You’re making last-minute adjustments for your taxes. Dealing with the holiday rush if you’re a retailer. Handling end-of-year employee issues, trying to make your monthly sales quotas, and doing something special to make your customers feel appreciated at this time of year.

On top of your daily accounting work, you’re feeling pressure in December to get a clear picture of your finances for the entire year. Then the holidays hit, and suddenly you’re ringing in the New Year without having had time for that.

Here are five things you can do clean up 2019 and make way for 2020.

1. Create two critical A/R reports: Accounts Receivable Aging Summary and Open Invoices.

This may make you feel both better and worse. On the bright side, you’ll know where you stand in terms of who owes you what and how big the problem is. On the other hand, you may find it disheartening to see how many payments are past due. These reports are easy to find. Click Reports in the left vertical pane and scroll down to Who owes you.

A screenshot of a cell phone

Description automatically generated

The Open Invoices report can show you quickly who’s past due.

Now would be an excellent time, too, to develop some strategies to be proactive and keep your accounts receivable more up to date in 2020. We’d be happy to sit down with you and help you with this difficult task.

2. Create two critical A/P reports: Accounts Payable Aging Summary and Unpaid Bills.

Add “Stay Current with Bills” to your list of 2020 goals. But first, you have to see where you stand right now. Click Reports again and scroll down to What you owe.

Who is responsible for paying bills? If it’s you, maybe it’s time to hand over that task to someone without your managerial responsibilities who can make it a priority.

3. Create statements for all customers who are past due.

Things slip for your customers toward the end of the year, too. Give them a chance to catch up. Their invoices might have gotten lost in the year-end confusion, but you need to get current with your accounts receivable. So, send statements to those in arrears.

Click +New at the top of the left vertical pane, then go to Other | Statement

4. Clean up your customer and vendor lists.

Customers and vendors come and go, but their QuickBooks records are forever unless you do something about them. You can easily make them inactive – after confirming they have no open activity. Click Sales | Customers in the left vertical pane. Click the box in front of customers you want to make inactive and then click Batch actions | Make inactive.

A screenshot of a cell phone

Description automatically generated

Cleaning up your customer and vendor lists will save you time in the future.

5. Always look carefully at your dashboard when you log in.

The block in the upper left corner is the most important here. You can see at a glance how much money you have tied up in unpaid invoices and how much money needs to be deposited. This will help you keep QuickBooks Online cleaned up.

More to Do

There are certainly other things you can do to clean up QuickBooks. For example, if you carry inventory, January is a good time to run the Physical Inventory Worksheet report and make some decisions about where your purchasing emphasis should be in 2020. Need help interpreting your product movement and sales priorities? We can help with that.

Finally, sometime this month—certainly in the first quarter of 2020—let us create the critical standard financial reports (under For my accountant in Reports) that you could actually generate in QuickBooks Online, but which would be difficult for you to analyze. These are the reports you would need if you were going to apply for a loan, for example, or request a business valuation. But the insight they provide can give you a sophisticated overview of your finances.

How to Clean Up QuickBooks for 2020

We know December is a busy month. However, take some time now to make sure QuickBooks is ready for 2020.

Yes, it’s here again: the end of the year. You probably have a lengthy to-do list full of tasks that must be done before December 31. There’s one task—or rather, a series of tasks—that you should definitely add to that list: year-end QuickBooks cleanup. Following the guidelines provided here will do three things. It will:

  • Ensure that you’ve processed every 2019 transaction (or that you know why you can’t).
  • Give you a sense of closure, knowing that you’ve dealt with all your 2019 financial data.
  • Allow you to start your 2020 QuickBooks activities with as clean of a slate as possible.

First Things First

Before you start looking at transactions and running reports, check to make sure that your fiscal year is recorded correctly in QuickBooks. Open the Company menu and select My Company. Click the pencil icon in the upper right to open the Company Information window, then click Report Information in the tabs to the left. This window opens:

A picture containing screenshot

Description automatically generated

Is your company’s fiscal year recorded correctly in QuickBooks? If not, please contact us. Don’t try to fix this on your own.

Account For All Of Your Income

You certainly want to have received all the money owed to you by December 31 if at all possible. So, run a report to see which customers have outstanding, overdue balances. Open the Reports menu and select Customers & Receivables | A/R Aging Summary

The first column here will read Current. You don’t have to worry about these customers. It’s the next four columns that will require follow-up. If your default payment terms are 30 days, you’ll see columns for 1-30, 31-60, 61-90, and >90. Customers with dollar amounts in those columns have not met their obligations and are past due by those date ranges. 

Note: If your default terms are different (like 15 days), you’ll need to customize the report. In the toolbar at the top, you’ll see a field labeled Interval (days). Change it to reflect your own default terms and click Refresh in the upper right corner. 

If your report contains only a sea of zeroes in those four columns, everyone is paid up. If not, you can send statements to anyone who is at least one day past due to remind them of what they owe. Open the Customers menu and select Create Statements to see this window:

A screenshot of a cell phone

Description automatically generated

Partial view of the Create Statements window

Make sure the Statement Date is correct since QuickBooks will use this to calculate aging. Then you can either enter a specific Statement Period or request All open transactions as of Statement Date. If you choose the latter, you’ll most likely want to limit the statements to customers whose payments are overdue. So, you’d click in the box in front of Include only transactions over [your number here] days past due date.

Below these options, you’ll be able to indicate which customers should receive statements. The most common choice is All Customers (who fall into the group you just defined), but you can also send to one or multiple customers, for example. QuickBooks will display a list if you select one of these. The right pane of this window contains several additional options that you can check or uncheck. When you’re satisfied, you can Preview, Print, or E-mail the statements.

Pay Outstanding Bills

You should also try to settle your Accounts Payable before the end of the year. Open the Reports menu and select Vendors & Payables | A/P Aging Summary. Look for dollar amounts in the columns that show aging beyond the first column. You can also run the Unpaid Bills Detail report and look at the Aging column, as pictured here:

A screenshot of a cell phone

Description automatically generated

Look in the aging column of this report to see which bills are past due and by how many days.

Note: QuickBooks has multiple Preferences that relate to reports and aging. We can go over these with you if you haven’t explored them.

There are other tasks you should complete before December 31, some of which may require our assistance. These include reconciling all accounts, running year-end reports, and clearing any deposits that remain in the Undeposited Funds account. We’re here if you need us now, otherwise we can connect in the New Year.

Have You Explored QuickBooks Online’s New 2019 Features?

Intuit keeps innovating. Here are some of the changes the company introduced for QuickBooks Online in 2019.

Whether you can see them now or not, Intuit added and enhanced a ton of new features in 2019. Some of you may not see all of them until 2020, since the company typically rolls them out slowly.

So, if you’re not in one of the first waves of users, we want you to know what’s coming. It may also be that your version of QuickBooks Online has incorporated the changes, but you just haven’t noticed them. Here’s a rundown of what’s in store for everyone on the horizon.

A new location for the Create button

Previously, you clicked on the +(plus) sign in the upper right corner to open the Create window (invoice, sales receipt, bill, single time activity, etc.). Now, you’ll see a button marked +New in the upper left corner.

Instant Deposits

If you use QuickBooks Online Payments, you’ll be able to have available credit card and bank transfer payments from customers deposited in your bank account within 30 minutes for a 1 percent fee. The funds will be directed to your U.S.-issued Visa or MasterCard debit card.

Mileage Tracker

This is a tool previously found only in QuickBooks Self-Employed, but QuickBooks Online users will now have access to it. It does just what it sounds like: allows you to track business-related mileage so you’ll have a numerical total to enter when you come to that deduction on your income tax return. You can record trips manually by entering starting and ending addresses (or the total miles). Or, if you’re using the QuickBooks Mobile app, you’ll be able to turn on GPS and let your smartphone record the mileage automatically.

A picture containing text, map

Description automatically generated

QuickBooks Online’s Mileage Tracker allows you to record business miles driven manually or automatically and calculates your tax deduction.

New navigation tools in QuickBooks Mobile app

You’ve probably gotten used to navigating from a list of features in the QuickBooks Mobile app. You should soon see an entirely different look for navigation that uses icons representing common tasks (Transactions, Expenses, Mileage, etc.). These will appear when you click on the Shortcuts tab. You’ll find the remaining tools under the All tab.

Health benefit management

QuickBooks Online now allows you to compare, buy, and manage employee health, dental, and vision coverage.

Receipt Capture

Receipts can be the bane of a business owner’s existence. Many still use the “shoebox” method, tossing receipts in a box and entering them when tax time rolls around. Not a particularly elegant solution. Now, you can snap photos of receipts and move them into QuickBooks Online in one of three ways, by:

  • Scanning through the mobile app.
  • Uploading, then dragging and dropping.
  • Forwarding through email.

Receipts are automatically categorized and matched to transactions; if there’s no match, you can create a new transaction. Your receipts appear in the Receipts dashboard under the Banking tab.

Multilingual invoicing

Do you have international customers? If so, you may be able to send them invoices in their native languages. Besides English, QuickBooks Online now supports French, Spanish, Italian, Portuguese (Brazil), and Chinese (traditional).

A close up of a map

Description automatically generated

You can now send invoices to customers in any of six languages.

One-step contractor payments

You can now select trackable details like class, project, and location by making selections from drop-down lists in the contractor payments window.

Next-day deposits

If you’re a QuickBooks Online Payments subscriber, you’ll be able to get next-day access to payments customers have made to you via credit card or ACH. You’ll have to sign up for this service, and fees apply to ACH payments (1 percent of the total deposit, up to $10).

Auto-calculated sales tax

QuickBooks Online has streamlined the process of adding sales tax to sales forms – even if you’re a cash-basis business. After you’ve done some initial setup work, QuickBooks Sales Tax will do the necessary calculations and add sales tax automatically.

Hello, 2020

We hope that 2019 has been a good year for your business, and we wish you the best in 2020. If you’re still struggling to use QuickBooks Online to maximize productivity and make better business decisions, remember that we’re here to help. We can also advise you on any of the new features Intuit has introduced. Contact us anytime to set up a consultation.

Setting Up Sales Tax in QuickBooks®, Part 2

Now that you have your sales taxes set up, you’ll be able to use them in transactions and reports.

Last month, we talked about the process of setting up sales taxes in QuickBooks. To recap a bit, you first have to go to Edit | Preferences | Sales Tax to make sure the software is set up correctly for this use. This means you’ll need to understand exactly what your state and local sales tax rules are. You can learn this by going to your state’s Department of Revenue or Department of Taxation website.

State sales taxes are considered Items in QuickBooks; you create them like you would create product records. When local sales taxes are also required, you can set up Sales Tax Groups. You’ll be assigning these Items as well as Tax Codes to customers.

Using Sales Taxes

Once you have sales taxes set up, you can start using them in transactions. You can create them on the fly from within transactions, but we recommend taking care of this important housekeeping task before you start.

Image1

QuickBooks applies the Sales Tax Item or Sales Tax Group that you assigned to the customer on your invoices. You can see the others that are available.

Start by creating an invoice. When you reach the Tax column for your first line item, you’ll see that QuickBooks has already assigned Tax or Non to it based on the information in the item’s record.  You can mix taxable and non-taxable items on the same invoice. You can also add a new sales tax on the fly from the invoice itself. Click the down arrow in the Tax column and select <Add New>

Be sure you’re not required to pay sales tax on an item when Non is selected. You may not have to charge sales tax on, for example:

  • Nonprofit organizations
  • Out-of state sales
  • Items that your customers will resell

Tip: If you’d like, you can create more specific sales tax codes for these situations. You could use OOS for out-of-state sales, for example, LBR for labor, and NPO for nonprofit organization.

QuickBooks already includes Sales Tax Codes Tax and Non, but you can add additional ones that are more descriptive.

Be very careful with your sales tax classifications in QuickBooks. As we said last month, such errors will be discovered in a sales tax audit, should you ever be subject to one. 

Once you’ve entered all the line items in the invoice, look down toward the bottom of the screen, directly beneath the table containing invoiced items and above the Total. QuickBooks will have calculated the sales tax due using the Sales Tax Item or Group you assigned to that customer during setup, placing it in the Tax field.

Look to the left of those numbers, and you’ll see the actual rate that was applied. To the left of that is a drop-down list containing the correct Sales Tax Item or Sales Tax Group. Click the down arrow if you want to see the list of other options. And in the lower left of the screen, you’ll see the Customer Tax Code.

The Sales Tax Center

Image3

The Manage Sales Tax window

When it’s time to pay sales taxes, you’ll open the Vendors menu and select Sales Tax | Manage Sales Tax. From the screen that opens, you’ll be able to:

  • Access Sales Tax Preferences.
  • Generate sales tax reports that will help you fill out required forms.
  • Visit related screens.

There are two reports you’ll need to run: Sales Tax Liability (displays total sales, amounts that are taxable and at what rates, taxes collected, and how much sales tax is due to each taxing agency) and the Sales Tax Revenue Summary (breaks down total sales into taxable and non-taxable). These reports are, of course, customizable, so you can filter them, for example, by Sales Tax Code.

A Delicate Balance

Collecting the correct amount of sales tax on taxable items and submitting the right tax totals to the right agencies takes vigilance. You don’t want to charge customers for unnecessary taxes, but you also don’t want to end up paying taxes you should have invoiced out of your own pocket. 

We can help you get this straight from the start. It’s much easier to spend some time setting up sales tax accurately in QuickBooks than it is to go back and untangle inaccurate records. Give us a call and we’ll set up a consultation.

Resolve to Do These 3 Things in QuickBooks® Online This Month

‘Tis the season for making resolutions and setting goals. Try exploring these three areas to dig deeper into QuickBooks Online.

By now, many New Year’s resolutions have already been made – and broken. Though they’re usually created with the best of intentions, they’re often just too ambitious to be realistic.

For example, you might decide to learn more about QuickBooks Online and keep up with your accounting chores more conscientiously in 2019. That’s hard to quantify. How will you know if you achieved that goal?

Instead, why not pick three (or more) specific areas and focus on them this month? We’ll get the ball rolling for you by making some suggestions.

Explore the QuickBooks Online mobile app:

Yes, QuickBooks Online itself is already mobile; you can access it from any computer that has an internet connection and browser. But you probably don’t always lug a laptop around when you’re away from the office, and you’re sometimes at locations where using it wouldn’t be practical. But you can always pull out your smartphone and fire up the QuickBooks online app, available for both iOS and Android.

No matter how small your smartphone (this image was captured on an iPhone SE), you can still do your accounting tasks using QuickBooks Online’s app.

QuickBooks Online’s app replicates a surprising percentage of the features found on the browser-based version. You can create, view, and edit invoices, estimates, and sales receipts for example, as well as see abbreviated customer and vendor records. Your product and service records are available there, including tools for recording expenses on the road.

Create a budget for one month:

Budgets are intimidating. That’s one reason why some small businesses don’t create them. So instead of trying to estimate what your income and expenses will be for an entire fiscal year, just build a budget for one month. In QuickBooks Online, you’d click the gear icon in the upper right, then select Budgeting. Click Add budget in the upper right to open the New Budget window.

Give it a name, like “February Budget,” and select FY2019. Leave the Interval at Monthly, and open the Pre-fill data? menu to click on Actual data – 2018 (if you have data from last year). Then click Create Budget in the lower right corner. Look at last year’s February numbers and estimate how they might change in 2019. Replace the old numbers with your new ones.

Creating a framework for a budget in QuickBooks Online is easy.

We’re suggesting you try it for just one month, so you get a feel for how this tool works. And that experiment will probably leave you with some questions. We can help you go further and complete an annual budget.

Customize your sales forms:

Every piece of paper and email you send to your customers contributes to their impression of you. Are you presenting an attractive, consistent image of your business to them? QuickBooks Online can help with this. It offers simple (for the most part) tools that allow you to modify the boilerplate forms offered on the site – without being an experienced graphic designer. 

Start by clicking on the gear icon in the upper right and selecting Your Company | Custom Form Styles. Unless you’ve done some work in this area before, the screen that opens will have just one listed entry: your Master form, the one that comes standard in QuickBooks Online. To see what you can do, click Edit at the end of that line. Your four options are:

  • Design. This section contains links to modifications you can make to your sales forms’ visuals. You can, for example, add a logo or color and change the default fonts.

Want to change your logo or other elements of your sales forms? QuickBooks Online has the tools.

  • Content. Do you want to add or remove the standard columns (Date, Quantity, etc.) displayed on your invoices? You can do so by checking and unchecking boxes.
  • Emails. QuickBooks Online sends email messages with forms; you can edit them here.
  • Payments. This is a reminder that QuickBooks Online supports online payments, which can help you get paid faster.

There’s more you can do to make your sales forms look professional and polished. We can help you with these tools – and any others you want to explore to expand your use of QuickBooks Online. It’s a new year, and who knows what might come your way over the next 12 months? Contact us if you want to prepare for the new accounting challenges that 2019 might present.

Who Owes You? 5 QuickBooks Online Reports That Can Tell You Fast

Keep a constant watch on your accounts receivable to improve cash flow.

Quick: How many of your invoices are unpaid? Have any of your customers gone over 30 days past due? Did you bill all of the time and expenses for that project you just completed for a customer?

If you’re doing your accounting manually, there’s simply no way to get that information quickly. Depending on your bookkeeping system, you may not be able to get it at all.

QuickBooks Online has more than one solution for this problem. You see the first one every time you log in. The Dashboard contains a graphic in the upper left corner that tells you how many invoices are overdue and unpaid. Click on the colored bar labeled OVERDUE, and you’ll see a list of invoices with the unpaid ones right at the top.

You can tell at a glance how much of your money is tied up in unpaid invoices.

While this is important information for you to have as you start your workday, it doesn’t tell the whole story. To get that, you’ll need to access some of QuickBooks Online’s reports – five of them in particular. Click Reports in the left vertical pane, and then scroll down to the heading labeled Who owes you.

These reports are listed in two columns. Each has the outline of a star next to it. Click on the star, and the report will be added to the Favorites list at the top of the page. Click on the three vertical dots next to it, and you’ll be able to Customize the report. And as you hover over the title, you’ll see a small, circled question mark. Click on this to get a brief description of the report.

There are several reports in this list that can provide insight into where your outstanding revenue is. We recommend you run five of them at least once a week – more frequently if your business sells large quantities of products and/or services. The suggested are:

Accounts receivable aging detail

This report provides a list of invoices that are overdue, along with aging information. There are several columns in the report, but you’ll want to pay special attention to the last one: OPEN BALANCE.

Tip: If you have many customers or simply a high volume of unpaid invoices, you might consider running the Accounts receivable aging summary instead.

Changing the Content

Before you run the report, you should explore the customization tools provided for it. They won’t be the same for every report, but you can start to get an idea of what can be done. Hover over the report title and click Customize. A panel like the one pictured below will slide out of the right side of the screen.

QuickBooks Online provides deep customization tools for reports.

You can see some of your customization options in the image above. Beyond these, you can also work with filters and headers/footers. When you’re satisfied with your changes, click Run report.

If you want to run a report with its default settings, just click on the report title in the list to display it.  You’ll have access to limited customization from there.

Four other reports you should be generating regularly are:

  • Customer Balance Summary: Shows you how much each customer owes your business
  • Open Invoices: Lists invoices for which there has been no payment
  • Unbilled Charges: Just what it sounds like: tells you who hasn’t been invoiced yet for billable charges
  • Unbilled Time: Lists all billable time not yet invoiced

We don’t expect you’ll have any trouble understanding reports like these; they’re fairly self-explanatory. QuickBooks Online offers many other reports, the standard financial reports that need to be generated monthly or quarterly, like Balance Sheet, Profit and Loss, and Statement of Cash Flows. You’ll absolutely need these should you apply for a loan or need to supply in-depth financials for any other reason. We can help you analyze them to get a comprehensive, detailed picture of your company’s fiscal health.