computer

QuickBooks®101: A Beginner’s Guide to Getting Started

Welcome to the world of QuickBooks, the go-to accounting software for small to medium-sized businesses. This beginner’s guide is designed to help you navigate through the basic features and interface of QuickBooks, simplifying your journey into the realm of accounting.

Understanding the Interface QuickBooks offers a user-friendly interface with a dashboard that presents everything you need at a glance. Key sections include ‘Banking’, ‘Sales’, ‘Expenses’, ‘Employees’, and ‘Reports’. This layout makes it easy to track your business’s financial health.

Setting Up Your Account

  1. Creating a Company File: Start by setting up a company file. This is your business’s financial profile where you record transactions, manage accounts, and prepare for taxes.
  2. Entering Your Business Information: Fill in your business name, industry, and other details. This helps QuickBooks tailor its features to your specific needs.
  3. Connecting Your Bank Account: Link your business bank account and credit cards to QuickBooks. This automates income and expense tracking, saving you time.

Exploring Basic Functions

  • Invoicing: Create professional invoices for your clients. Customizing invoices with your logo and company details is straightforward.
  • Managing Bills and Expenses: Track your bills and record expenses. This ensures that you’re always aware of your outgoings and can manage your cash flow effectively.
  • Payroll Management: If you have employees, the payroll feature simplifies managing salaries, tax deductions, and pay runs.
  • Generating Reports: QuickBooks allows you to generate various financial reports. These are vital for understanding your business’s financial performance and for tax preparation.

Support and Learning Resources Don’t feel overwhelmed. QuickBooks provides extensive support through tutorials, community forums, and customer service. Utilize these resources to deepen your understanding.

Remember, mastery of QuickBooks won’t happen overnight. Take your time to explore, practice, and utilize the various features. Your efforts will pay off in streamlined financial management and clearer insights into your business’s fiscal health. Welcome to the world of simplified accounting with QuickBooks!

We offer complete setup and training  on QuickBooks®​ Online​. 

How to Set Up QuickBooks® for Your E-commerce Business

Setting up QuickBooks for your e-commerce business is a great way to manage your finances, track sales, and stay on top of your financial health. Below is a step-by-step guide to help you set up QuickBooks for your e-commerce business:

  1. Choose the Right QuickBooks Version:
    QuickBooks offers different versions, including QuickBooks Online and QuickBooks Desktop. For most e-commerce businesses, QuickBooks Online is recommended because it provides easy access from anywhere with an internet connection and has a variety of integrations with e-commerce platforms.
  2. Sign Up for QuickBooks Online:
    Go to the QuickBooks website and sign up for an account. You’ll need to provide some basic information about your business during the registration process.
  3. Set Up Your Company Profile:
    After signing up, you’ll be prompted to set up your company profile. Fill in your business details, including the business name, address, industry, and tax information.
  4. Link Your Bank Accounts and Payment Processors:
    Connect your business bank accounts and any payment processors you use for your e-commerce transactions. This will enable QuickBooks to automatically import your financial data, saving you time on manual data entry.
  5. Configure Sales Tax Settings:
    If your e-commerce business is required to collect sales tax, set up your sales tax settings in QuickBooks Online. This will ensure that sales tax is accurately tracked and applied to transactions.
  6. Import Your Chart of Accounts:
    A chart of accounts is a list of all the categories where you record financial transactions. QuickBooks provides a default chart of accounts, but you can customize it to match your e-commerce business needs.
  7. Integrate E-commerce Platform:
    If your e-commerce platform supports integration with QuickBooks, set up the integration to automate the flow of data between the two systems. This integration will help streamline the process of importing sales, inventory, and customer information.
  8. Record Sales and Expenses:
    As you start making sales and incurring expenses, record them in QuickBooks. Categorize transactions correctly using the chart of accounts you set up earlier.
  9. Manage Inventory (if applicable):
    If your e-commerce business involves selling physical products, QuickBooks can help you manage your inventory. You can track the quantity and value of your products, making it easier to understand your stock levels and profitability.
  10. Reconcile Your Accounts:
    Regularly reconcile your bank accounts, credit cards, and payment processor accounts with your QuickBooks records. This process ensures that all transactions are accurately recorded and that your financial statements are up to date.
  11. Run Financial Reports:
    QuickBooks offers various financial reports, such as profit and loss (income statement), balance sheet, and cash flow statement. Use these reports to gain insights into your e-commerce business’s financial performance and make informed decisions.
  12. Set Up Budgets (optional):
    If you want to plan and monitor your e-commerce business’s financial goals, consider setting up budgets in QuickBooks. Budgets help you track your actual performance against your projected targets.

Remember that while setting up QuickBooks for your e-commerce business can be relatively straightforward, it’s essential to maintain good bookkeeping practices consistently. Regularly update your financial records, reconcile accounts, and review financial reports to keep your business financially healthy and compliant. If you’re uncertain about any aspect of the setup process, consider consulting with a QuickBooks expert for guidance.

We are happy to help!

The Benefits of Hiring a QuickBooks© ProAdvisor for Your Small Business

Small business owners often have a lot on their plate, from managing employees to overseeing daily operations, and everything in between. With so many responsibilities, it can be difficult to keep track of financial records and ensure that all finances are in order. This is where a QuickBooks ProAdvisor can help.

A QuickBooks ProAdvisor is a certified professional who is trained in using QuickBooks accounting software. Hiring a ProAdvisor can bring numerous benefits to your small business, including:

  1. Expertise and Knowledge: A QuickBooks ProAdvisor is an expert in using QuickBooks software and can offer advice and support on everything from setting up the software to creating reports and managing your finances. They have the knowledge and experience to help you make informed decisions about your business.
  2. Time-Saving: As a small business owner, you likely have a lot of tasks to manage on a daily basis. By hiring a QuickBooks ProAdvisor, you can save time and focus on other areas of your business that require your attention. A ProAdvisor can take care of your bookkeeping, payroll, and tax-related tasks, leaving you with more time to grow your business.
  3. Accurate Financial Reporting: QuickBooks ProAdvisors can help ensure that your financial records are accurate and up-to-date. This can help you make better business decisions based on accurate financial data.
  4. Cost-Effective: Hiring a full-time bookkeeper or accountant can be expensive for a small business. By hiring a QuickBooks ProAdvisor, you can get the expertise you need at a fraction of the cost.
  5. Training and Support: QuickBooks ProAdvisors can provide training and support to you and your employees, ensuring that everyone is familiar with the software and can use it effectively.
  6. Peace of Mind: With a QuickBooks ProAdvisor handling your finances, you can have peace of mind knowing that your financial records are accurate and up-to-date.

In conclusion, hiring a QuickBooks ProAdvisor can be a valuable investment for small business owners. By providing expertise, saving time, ensuring accurate financial reporting, being cost-effective, offering training and support, and providing peace of mind, a ProAdvisor can help you take your business to the next level.

How QuickBooks© Online Helps You Track Mileage

With gas prices so high, you need to track your travel costs as closely as possible. Consider getting a tax deduction for your business mileage.

If you drive even a little for business, it’s easy to let mileage costs slide. After all, it’s a pain to keep track of your tax-deductible mileage in a little notebook and do all the calculations required. If you do rack up a lot of business miles, you probably forget to track some trips and end up losing money.

QuickBooks Online offers a much better way. Its Mileage tools include simple fill-in-the-blank records that allow you to document individual trips. You can either enter the starting point and destination and let the site calculate your mileage and deduction or enter the number of miles yourself.

If you use QuickBooks Online’s mobile app, it can track your miles automatically as you drive (as long as you have the correct settings turned on). Here’s a look at how all of this works.

Setting Up 

To get started, click the Mileage link in QuickBooks Online’s toolbar. The screen that opens will eventually display a table that contains information about your trips, but you need to do a little setup first. Click the down arrow next to Add Trip in the upper right corner and select Manage vehicles. A panel will slide out from the right. Click Add vehicle.

A picture containing text

Description automatically generated

You’ll need to supply information about your vehicles before you can start entering trips.

You’ll need to supply the vehicle’s year, make, and model. Do you own or lease it, and on what date was the vehicle purchased or leased and put into service? Do you want to have your annual mileage calculated by entering odometer readings or have QuickBooks Online track your business miles driven automatically? When you’re done making your selections and entering data, click Save.

Entering Trip Data

You can download trips as CSV files or import them from Mile IQ, but you’re probably more likely to enter them manually. Click Add Trip in the upper right corner. In the pane that opens, you’ll enter the date of the trip and either the total miles or start and end point. You’ll select the business purpose and vehicle and indicate whether it was a round trip. When you’re done, click Save. The trip will appear in the table on the opening screen, and your current possible total deduction will be in the upper left corner, along with your total business miles and total miles.

If you want to designate a trip as personal, click the box in front of the trip in that table. In the black horizontal box that appears, click the icon that looks like a little person, then click Apply. Now, the trip will appear in the Personal column and will not count toward your business tax-deductible mileage. 

Graphical user interface, text, application

Description automatically generated

When you select a trip in the Mileage table, you can mark it as personal so it’s not included in your business tax-deductible miles.

Personal Trips Can Count, Too

If you use your vehicle(s) for personal as well as business purposes, tracking some of those miles can also mean a tax deduction. For tax year 2022, you can deduct 18 cents per mile for your travel to and from medical appointments. Note: Medical mileage is only deductible if medical exceeds a certain percent of AGI. Be sure to check with the IRS yearly tax code, as they update the mileage amounts annually.

And if you do volunteer work for a qualified charitable organization, the miles you drive in service of it can be deducted at the rate of 14 cents per mile. You can also claim the cost of parking and tolls, as long as you weren’t reimbursed for any of these expenses. Obviously, the IRS wants you to keep careful records of your charitable mileage, and QuickBooks Online can provide them.

QuickBooks Online doesn’t track these deductions, but you’ll at least have a record of the miles driven.

Auto-Track Your Miles

The easiest way to track your mileage in QuickBooks Online is by using its mobile app. You can launch this and have it record your mileage automatically as you’re driving. Versions are available for both Android and iOS, and they’re different from each other. They also have more features than the browser-based version of QuickBooks Online, like maps, rules, and easier designation of trips as business or personal.

Graphical user interface, application

Description automatically generated

The iOS version of Mileage in the QuickBooks Online app

In both versions, you’ll need to click the menu in the lower right corner after you’ve opened the QuickBooks Online app and select Mileage. Make sure Auto-Tracking is turned on. Your phone’s location services tool must be turned on, too. There are other settings that vary between the two operating systems. You can search the help system of either app to make sure you get your settings correct if the onscreen instructions aren’t clear enough.

Of course, you won’t see the fruits of your mileage deductions until you file your 2022 taxes. But you can factor these savings in as you’re doing your tax planning during the year. Please let us help if you’re having any trouble with QuickBooks Online’s Mileage tools, or if you have questions with other elements of the site.

With gas prices so high, you need to track your travel costs as closely as possible. Consider getting a tax deduction for your business mileage.

Hiring An Independent Contractor? How QuickBooks Online Can Help

Are you taking on a worker who’s not an employee? QuickBooks Online includes tools for tracking and paying independent contractors.

The COVID-19 pandemic created millions of self-employed individuals and small businesses. Whether they chose to, or circumstances forced them to, these new entrepreneurs had to learn new ways to get paid and to prepare their income taxes.

If you’re thinking about taking on a contract worker, you, too, will have to educate yourself on the paperwork and processes required to comply with the IRS’ rules for his or her compensation. It’s much easier than hiring a full-time employee, but it still takes some knowledge of how QuickBooks Online handles these individuals.

You’ll also need to make certain that the person you’re hiring is indeed an independent contractor and not an employee. The IRS takes this distinction very seriously. If you’re at all unsure of your new hire’s employment status, we can help you sort it out.

Creating Records for Contractors

Once new contractors have accepted your offer, you’ll need to have then fill out an IRS Form W-9. You can download a copy here. Employees complete the more detailed Form W-4 so that the employer can withhold income taxes correctly, but you won’t have to withhold taxes for your contract workers. They will be responsible for calculating and paying quarterly estimated taxes and filing an IRS Form 1040 every year. 

You, though, will be responsible for sending them an IRS Form 1099-NEC (Non-Employee Compensation) every January if you paid them more than $600 during the previous year. You do not need to send a 1099-NEC to a corporation or to an LLC that is treated as a C Corp or an S Corp. 

Graphical user interface, text, application

Description automatically generated

You can complete the Vendor Information window for each independent contractor, checking the box in front of Track payments for 1099.

Using the information the contractors provide, you can create records for them in QuickBooks Online. If you don’t have a QuickBooks Payroll subscription, you can set them up as 1099 vendors. Click the Expenses tab in the toolbar and then on the Vendors tab. Click New vendor in the upper right to open the Vendor Information window. Complete the fields for the worker and be sure to check the box in front of Track payments for 1099, as shown in the partial image above.

The vendor records you create will appear in QuickBooks Online’s Vendors list (again, Expenses | Vendors). Click on one to open it. You can toggle between two tabs here. The first, Transaction List, will eventually display all your financial dealings with that contractor. Vendor Details opens the record you just created, which you can edit from this screen.

Paying Contractors

When independent contractors send you invoices, you’ll return to this same screen. There are three ways you can pay them. Click the down arrow next to New Transaction in the upper right corner to see your options (or look down at the end of the row while you’re in list view). You can record the debt as a Bill if you want to pay it later (or if that’s the way you structure your recordkeeping). If you’re paying it right away, you can create an Expense or write a Check

Graphical user interface, text, application, chat or text message

Description automatically generated

You can choose an option from this vendor action menu to pay your independent contractors.

When you click one of these, QuickBooks Online opens a form with many of the contractors’ details already filled in. You’ll need to complete any additional fields at the top of the screen, and then either record the payment or debt under Category details or Item details, depending on how you do your bookkeeping. Either way, you’ll be able to enter the quantity and rate and/or amount and mark it billable (with a markup percentage, if you’d like) to a customer or project.

You’re probably going to want our help here, since there’s more than one way to pay independent contractors. If you subscribe to QuickBooks Payroll, you can use the service’s contractor features, which include the ability to invite your contractors to fill out their own records in QuickBooks Online. You may also want to add an account to your Chart of Accounts, and we’d want to offer guidance there. And you need to ensure that you’re classifying payments correctly, so they’ll appear in 1099 reports and 1099s themselves.

Creating records for independent contractors and paying these individuals seem like they should be simple operations. But anytime you’re dealing with payroll issues, you’re dealing with peoples’ livelihoods – and the IRS. We strongly encourage you to let us help you get this right. Contact us, and we’ll make sure you’re handling your worker payments with absolute accuracy.

Some Small Businesses Are Recovering. Is Yours?

The COVID-19 pandemic isn’t over, but many small businesses are on the upswing. How QuickBooks Online can help if yours isn’t.

Intuit recently did a survey documenting the financial losses that many small businesses had experienced since March 2020. Not surprisingly, the report, Intuit QuickBooks Small Business Recovery, found that COVID-19 has had a significant impact on the financial health of U.S. small businesses.

But many of the companies surveyed have proved to be resilient. As of March 31, 2021, 61 percent of them saw an annual revenue increase compared to pre-COVID days.

How would you have answered the survey? If indeed you did suffer financial and personnel losses because of the pandemic, has your business started to rebound yet? If not, there are actions you can take in QuickBooks Online to help in your recovery. Here are some of them.

Transactions: Watch your income and expenses like a hawk.

QuickBooks Online provides excellent transaction-tracking tools that help you document income and expenses.

How much time do you spend working with your downloaded transactions? If you take advantage of the excellent tools QuickBooks Online provides, you may notice patterns that you’ll want to explore and modify. For example, are you spending too much in one or more particular areas? When and where is your income dipping?

It’s critical that you connect to as many online financial institutions as possible, so you get a complete picture of your income and expenses. Once you have, click on Transactions in the toolbar, which should open to the Banking page. If you’re only going there to make sure there are no unrecognized entries, you’re missing out on some of QuickBooks Online’s transaction-tracking tools. In the image above, we’ve specified a vendor and chosen a Category and Tags. This will make your reports more meaningful and actionable.

If you don’t know what it means to Find Match, we can show you how that works. It’s a real time saver. 

Sales: Make it easier for customers to pay you.

We’ve written about accepting online payments in this column before. It’s especially important if you’re struggling. You may actually be losing sales if you don’t let potential customers pay online through a credit card or bank account transfer. And existing customers may pay faster if they can do business with you in that way.

QuickBooks Payments makes this possible. There are some nominal fees involved, but the potential increase in your income should more than cover them. Let us know if you want us to help you set up a merchant account.

When you set up a merchant account through QuickBooks Payments, you may find that your customer base will grow, and existing customers will pay faster.

Expenses: Categorize expenses with tax time in mind.

You’ve probably already filed your 2020 income taxes, but we’re well into 2021, and it’s not too early to start thinking about your current tax situation. QuickBooks Online helps you track your income carefully, but it’s equally important to make sure you know what your tax-related expenses are. You want to get every deduction and credit you can. So when you’re looking at transactions, like we described above, make very certain that you’re assigning the correct categories to each of them. 

We can help you run reports on a quarterly basis that should be of help when you make estimated tax payments. That way, you may be able to reduce your quarterly obligation during the 2021 tax year and won’t have to wait until you file in 2022 to see savings.

Time: Make sure your billable hours are billed.

Unless you have an organized, easy-to-use method for tracking billable time, some hours are likely to fall between the cracks. QuickBooks Online provides effective tools in this area. As you go through your downloaded transactions, you may see expenses that can be billed to a customer. Select the Customer/project and check the Billable box so you’ll be able to include it on their next invoice.

You can mark expenses as billable to customers in your Transactions register.

As you create time entries for you and/or your employees, you can also mark those hours as billable.

Reports: Run basic, critical reports regularly.

You can’t know how your business is doing financially unless you create reports. Besides the quarterly and standard financial reports we can run and analyze for you, you can—and should—be generating reports yourself through QuickBooks Online. Here are some of the ones we suggest:

  • Budget vs. Actuals. If you’ve put the time and effort into creating a budget, it’s critical that you gauge your progress regularly and make adjustments as needed.
  • Open Invoices. Who have you billed that hasn’t paid?
  • Accounts Receivable Aging Detail. Who owes you, and how far behind are they?
  • Sales by Product/Service Detail. What is selling well and what isn’t? You can make decisions about your product and service lines by viewing this report. This is especially important when your sales are sluggish.
  • Business Snapshot. This is a series of charts and lists that provides a quick visual overview of key data.

QuickBooks Online can’t, of course, revive your business if the pandemic has created conditions that are out of your control. But that shouldn’t stop you from controlling what you can, no matter what your situation is. It was designed not only to automate and streamline your daily accounting work, but also to provide the information you need as you evaluate your present situation and plan for the future. Please call on us if you need help making optimal use of QuickBooks Online.

5 Things You Should Know About the Chart of Accounts in QuickBooks Online

QuickBooks Online doesn’t require deep knowledge of accounting principles. Still, there are concepts you should understand.

You probably didn’t expect you’d have to become an accounting expert when you started your business. You knew you’d have to deal with recording income and expenses – maybe track your inventory and process a payroll. But you may not have understood just how complex financial bookkeeping could be.

That’s why you decided to use QuickBooks Online, or are at least considering it. The service is an expert on accounting, and it simplifies the process. It knows exactly how you have to document transactions to stay compliant with the rules that accountants and other businesses follow. This is good practice, and it’s absolutely necessary if, for example, you ever have to apply for financing.

One of the features of accounting systems you should understand is the Chart of Accounts. You won’t have to alter it in any way—in fact, we strongly advise against it—but you’ll encounter it when you work with transactions. Here are five things you should know about it.

What is it?

These three columns from QuickBooks Online’s Chart of Accounts display account Names, Types, and Detail Types.

QuickBooks Online’s Chart of Accounts is a list of financial categories that are used to classify your company’s transactions when you record them. If you were doing your accounting manually, you would have to create your own Chart of Accounts. But QuickBooks Online builds one for you based on the company type and industry you choose when you’re setting up the site.

Why is the Chart of Accounts important?

Some people refer to the Chart of Accounts as the “backbone” of your company file. All transactions flow to it. Its primary importance can be summed up in one word: reports. Your reports will not be accurate if your Chart of Accounts is poorly constructed or if you categorize transactions incorrectly. This becomes as issue when you want to:

  • Prepare taxes. Your income tax return will not reflect your reportable income and deductible expenses if transactions are not assigned to the right classifications.
  • Apply for financing, take on an investor, sell your company, etc.
  • Monitor your finances. You won’t get a true picture of your income and expenses, which makes it difficult to analyze your company’s fiscal health and plan for the future.

What’s in the Chart of Accounts?

There are two types of accounts. One contains information that’s used in the Balance Sheet report. These accounts will have a number in the QuickBooks Balance column that’s based on all transactions up to the current date. They include Assets (bank accounts, accounts receivable, inventory, etc.), Liabilities (unpaid bills, credit cards, payroll and sales taxes, loans, etc.), and Equity.

The remainder of the accounts are used in the Profit and Loss report, otherwise known as the Income Statement. They’re divided into Income (sales, discounts given, etc.), Cost of Goods Sold (labor, shipping, materials and supplies, etc.), Expenses (advertising, insurance, payroll, etc.), Other Income, and Other Expense. You won’t see a number in the QuickBooks Balance column for these accounts because the Profit and Loss report changes based on the date range selected.

Should I ever make any modifications to my Chart of Accounts?

You can set up bank and credit card accounts in QuickBooks Online’s Chart of Accounts.

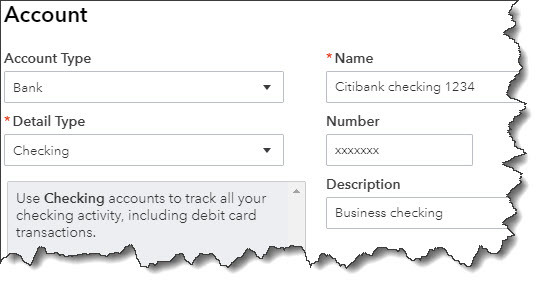
As we stated earlier, we strongly recommend that you never modify your Chart of Accounts without consulting us. However, there are two exceptions to this. You’ll want to create entries for your bank and credit card accounts. To do this, first open the Chart of Accounts by clicking the gear icon in the upper right and selecting Chart of Accounts under Your Company. When it opens, click New in the upper right corner. Choose Bank or Credit Card and fill in the blanks.

Do I need to use account numbers in the Chart of Accounts?

Generally, the smaller the business, the less need there is for this. If your business is big enough that you have dedicated A/P and A/R individuals, you may want to post transactions to account numbers.

Understanding Reports

QuickBooks Online makes it possible for you to view the Chart of Accounts and those two critical reports, Balance Sheet and Profit & Loss. Customizing and analyzing them, though, is something you should do under professional supervision. We’re happy to help here and in other advanced areas of the site. Contact us for a consultation.

4 Things You Should Know About Advanced Settings in QuickBooks® Online

Do you know about all of QuickBooks Online’s settings? What you’re missing may be important.

Looking through all the settings available in QuickBooks Online is something like reading the owner’s manual when you get a new car. You know you should do it, but you find yourself consulting it only when you encounter a problem.

Whether you’re new to QuickBooks Online, or you’ve been using it for a while, we recommend that you familiarize yourself with these important preferences.  Settings do more than turn features off and on: they can teach you about tools you might not have known were available.

Let’s explore some that you may have missed.

Closing the Books

You’ve probably heard this phrase before but do you know what it actually means in QuickBooks Online? When you set a closing date, you’re indicating that no transactions entered prior to that date should be changed.

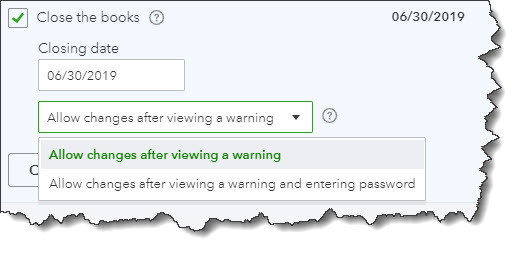
Click the gear icon in the upper right, then select Your Company | Account and Settings. Scroll down to the Advanced section in the left vertical toolbar. Under the first heading, Accounting, check the box in front of Close the books. Enter a date and choose one of the two options for exceptions, as pictured in the image below:

You can close the books as of a specific date in QuickBooks Online so users can’t change transactions entered before then.

Warning: Talk to us before you make this decision. We can discuss the pros and cons.

Categories

QuickBooks Online offers a couple ways to categorize transactions so you can see related data in searches and reports. Scroll down to Categories and click on the Off button to the right of Track classes to turn this feature on. QuickBooks Online will then add a Class field to forms like invoices, along with a drop-down list that you can build with your own options. For example, you could create categories like departments, customer types, and product lines.  You can choose to assign classes to entire transactions or to individual rows in them, and you can ask to be warned if you try to save a form without selecting a Class.

Track locations works similarly. You can assign a location (territory, store, department, etc.) to each transaction if you’d like.

Automation

By using QuickBooks Online for your daily accounting tasks, you’re already saving time. But the site offers a way to save even more with its Automation tools. Here’s what you can do:

  • Pre-fill forms with previously entered content. Once you’ve saved a transaction for a customer, vendor, or employee, you can choose to have QuickBooks Online complete some fields in the next form you create for them.
  • Automatically apply credits. Do you want QuickBooks Online to apply credits to the next invoice you create for a given customer? Most businesses do, but a specific example of a time you wouldn’t check the box would be if you’re a property manager who requires security deposits.

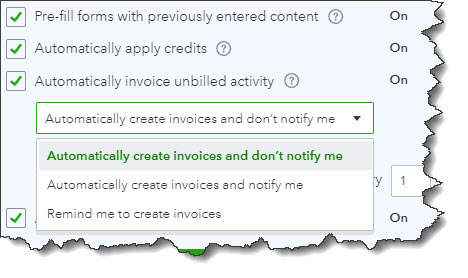
QuickBooks Online offers several automation options.

  • Automatically invoice unbilled activity. Be careful with this one. When you have customers with unbilled activity, QuickBooks Online can automatically create invoices for them on a schedule you designate. You have a few options here. You can simply ask for a reminder as the date approaches, or you can allow the site to automatically create invoices – with or without notifying you.
  • Automatically apply bill payments. When you record bill payments, QuickBooks Online can automatically apply them to the oldest recorded bill.

Time Tracking

Does your company sell services that are billed by the hour? If so, there are a couple of options you can turn on here. When you create timesheets or individual timed activities, you can add a Service field to the tracking form. You can also include a checkbox to indicate that a block of timed work is billable to customers. If you do the latter, you can opt in or out of letting users see the actual rate you’re charging customers.

Checking Your Work

QuickBooks Online refers to these as Advanced Settings for a reason. Making the wrong choices on any of them could lead to unhappy or confused customers and/or inaccuracies in your accounting file. We think you should know about these options, but we also hope you’ll schedule a consultation with us before attempting to set them up. It’s always much easier to spot problems in the making than to correct mistakes already made.

Could Your Sales Invoices Be Better? How QuickBooks Online Can Help.

Every interaction with your customers can enhance your image. Here’s how QuickBooks Online contributes to that.

Getting paid by your customers—on time, and in full—can take some effort on your part. You set smart due dates and enforce them. Price your products and services so they’re both reasonable and profitable. Accept online payments.

But are your invoices working for you here? QuickBooks Online provides sales form templates that you can usually use without modifying. But it also offers tools that support multiple kinds of customization. It helps you shape the content and appearance of your invoices and their accompanying messages to be consistent with your company’s brand.

These may be cosmetic changes, but they can affect the way customers react to communications from you. You have few chances to make an impression, so anything you can do to enhance and personalize every interaction will have impact on their impression of you. Neat, well-designed sales forms convey professionalism and attention to details.

Here’s a look at what you can do.

Editing Fields

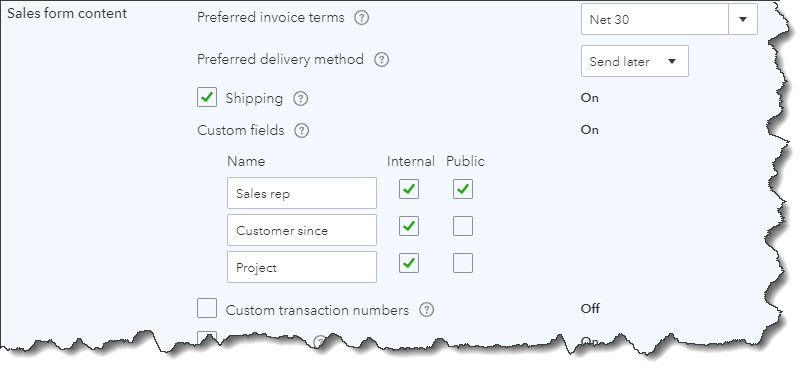
Unless you use every single field in QuickBooks Online’s default sales form template, your invoices will look sloppier than they might otherwise. The site gives you control over much of the content that your customers will see. To make changes, click the gear icon in the upper right of the screen and select Account and Settings, then Sales. You’ll see Sales form content in the left column. Click on any of the fields to the right to open a more thorough list of options.

QuickBooks Online lets you turn fields on and off in your sales forms and specify other preferences.

Click on the status (On, Off) in the right column to change it. When you’re satisfied with your selections, click Save. Then close that window by clicking the X in the upper right corner.

You have more options than these. Click the gear icon again, and then Your Company | Custom Form Styles. You’ll see that there is already a “master” form. You can either edit it or create a new one. We recommend leaving the master form alone so you always have a clean copy to consult if you get tangled up while you’re working.

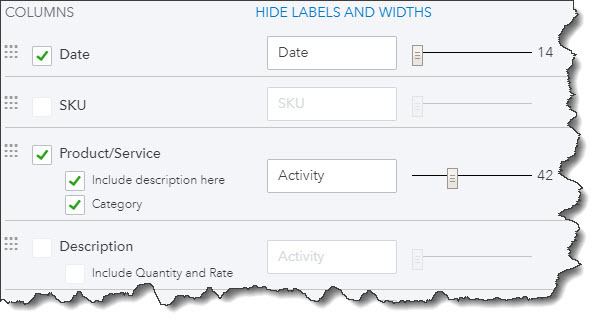
Click the down arrow in the New style box in the upper right and select Invoice. In the screen that opens, enter a descriptive name for your template in the field at the top and then click Content. A graphical representation of your invoice will appear in the right pane, grayed out. It’s divided into three sections: header, footer, and table (the middle of the invoice where you describe what you sold). Each displays a small pencil icon on the right side of the screen. Click the one in the middle to make that area more visible.

It’s easy to specify which fields should appear on your invoices, what the labels should say, and how wide the space should be.

As you check and uncheck boxes to indicate what content should be included, your invoice on the right will change to reflect your actions. You can Preview PDF by clicking that button in the lower right. When you’re satisfied with the changes you’ve made to all three sections, click on the Design tab.

Changing the Look

You don’t have to be a graphic artist to have QuickBooks Online forms that look attractive and consistent, which highlight your brand. The site provides tools that give you control over the appearance of your invoices, not just their content. Click each link below the Design tab to:

  • Choose a template.
  • Add your company’s logo.
  • Select a color scheme and fonts.
  • Change the printer settings to accommodate letterhead, for example.

 Choosing Your Words

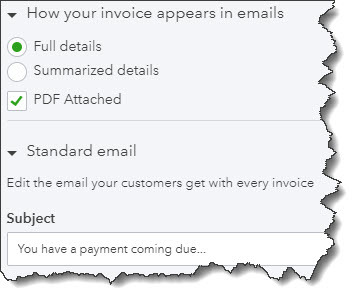
You have control over the messages that go out with your invoices.

Finally, click the Emails tab. Options here let you customize the emails that are sent to customers along with their invoices. Again, changes you make in the left pane will be reflected in the graphical version on the right side.

When you’ve completed all of your modifications, click Done.

We gave you this whirlwind tour of QuickBooks Online’s invoice customization options so you’d know what was possible. We expect you might need some assistance when you sit down to apply the concepts you’ve learned about to your own company’s sales forms. We’re available to help you present a polished, carefully-crafted image representing your brand to your customers.