APP INTEGRATION

Maximizing Efficiency: Integrating Apps with QuickBooks®

In today’s fast-paced business world, efficiency is not just a goal; it’s a necessity. One of the most effective ways to enhance efficiency is through the integration of apps with QuickBooks®, a leading accounting software. The latest apps that integrate with QuickBooks® are designed to automate tasks, streamline processes, and ultimately improve business efficiency.

1. Automation with Apps: A Game Changer

Apps like Expensify, TSheets, and Hubdoc are transforming how businesses handle everyday tasks. Expensify simplifies expense reporting by allowing users to scan receipts and automatically import them into QuickBooks®. TSheets offers time tracking solutions that integrate seamlessly with QuickBooks®, simplifying payroll and invoicing. Hubdoc streamlines data capture by fetching bills, receipts, and invoices and syncing them with QuickBooks®, making bookkeeping a breeze.

2. Streamlining Processes for Efficiency

For e-commerce businesses, apps like Shopify and WooCommerce offer direct integration with QuickBooks®. This integration means sales data flow directly into the accounting system, ensuring accuracy and saving hours of data entry. Inventory management apps like Fishbowl and SOS Inventory sync with QuickBooks® to offer real-time inventory tracking, reducing the risk of stockouts or overstock.

3. Selecting the Right Apps for Your Business

Choosing the right apps for your business needs is crucial. Here’s a simple guide:

  • Assess Your Needs: Identify the tasks or areas in your business that require more efficiency.
  • Research the Options: Look for apps that specifically address these areas and check their compatibility with QuickBooks®.
  • Read Reviews and Testimonials: Understanding the experiences of other businesses can provide valuable insights.
  • Consider Scalability: Ensure the app can grow with your business.
  • Trial and Evaluate: Many apps offer free trials. Use them to evaluate their impact on your business processes.

By integrating the right apps with QuickBooks®, businesses can automate mundane tasks, gain valuable insights, and focus more on growth and development. The key is to understand your specific needs and choose apps that align with those needs, ensuring that your business runs as efficiently as possible.

computer

QuickBooks®101: A Beginner’s Guide to Getting Started

Welcome to the world of QuickBooks, the go-to accounting software for small to medium-sized businesses. This beginner’s guide is designed to help you navigate through the basic features and interface of QuickBooks, simplifying your journey into the realm of accounting.

Understanding the Interface QuickBooks offers a user-friendly interface with a dashboard that presents everything you need at a glance. Key sections include ‘Banking’, ‘Sales’, ‘Expenses’, ‘Employees’, and ‘Reports’. This layout makes it easy to track your business’s financial health.

Setting Up Your Account

  1. Creating a Company File: Start by setting up a company file. This is your business’s financial profile where you record transactions, manage accounts, and prepare for taxes.
  2. Entering Your Business Information: Fill in your business name, industry, and other details. This helps QuickBooks tailor its features to your specific needs.
  3. Connecting Your Bank Account: Link your business bank account and credit cards to QuickBooks. This automates income and expense tracking, saving you time.

Exploring Basic Functions

  • Invoicing: Create professional invoices for your clients. Customizing invoices with your logo and company details is straightforward.
  • Managing Bills and Expenses: Track your bills and record expenses. This ensures that you’re always aware of your outgoings and can manage your cash flow effectively.
  • Payroll Management: If you have employees, the payroll feature simplifies managing salaries, tax deductions, and pay runs.
  • Generating Reports: QuickBooks allows you to generate various financial reports. These are vital for understanding your business’s financial performance and for tax preparation.

Support and Learning Resources Don’t feel overwhelmed. QuickBooks provides extensive support through tutorials, community forums, and customer service. Utilize these resources to deepen your understanding.

Remember, mastery of QuickBooks won’t happen overnight. Take your time to explore, practice, and utilize the various features. Your efforts will pay off in streamlined financial management and clearer insights into your business’s fiscal health. Welcome to the world of simplified accounting with QuickBooks!

We offer complete setup and training  on QuickBooks®​ Online​. 

The Benefits of Hiring a QuickBooks© ProAdvisor for Your Small Business

Small business owners often have a lot on their plate, from managing employees to overseeing daily operations, and everything in between. With so many responsibilities, it can be difficult to keep track of financial records and ensure that all finances are in order. This is where a QuickBooks ProAdvisor can help.

A QuickBooks ProAdvisor is a certified professional who is trained in using QuickBooks accounting software. Hiring a ProAdvisor can bring numerous benefits to your small business, including:

  1. Expertise and Knowledge: A QuickBooks ProAdvisor is an expert in using QuickBooks software and can offer advice and support on everything from setting up the software to creating reports and managing your finances. They have the knowledge and experience to help you make informed decisions about your business.
  2. Time-Saving: As a small business owner, you likely have a lot of tasks to manage on a daily basis. By hiring a QuickBooks ProAdvisor, you can save time and focus on other areas of your business that require your attention. A ProAdvisor can take care of your bookkeeping, payroll, and tax-related tasks, leaving you with more time to grow your business.
  3. Accurate Financial Reporting: QuickBooks ProAdvisors can help ensure that your financial records are accurate and up-to-date. This can help you make better business decisions based on accurate financial data.
  4. Cost-Effective: Hiring a full-time bookkeeper or accountant can be expensive for a small business. By hiring a QuickBooks ProAdvisor, you can get the expertise you need at a fraction of the cost.
  5. Training and Support: QuickBooks ProAdvisors can provide training and support to you and your employees, ensuring that everyone is familiar with the software and can use it effectively.
  6. Peace of Mind: With a QuickBooks ProAdvisor handling your finances, you can have peace of mind knowing that your financial records are accurate and up-to-date.

In conclusion, hiring a QuickBooks ProAdvisor can be a valuable investment for small business owners. By providing expertise, saving time, ensuring accurate financial reporting, being cost-effective, offering training and support, and providing peace of mind, a ProAdvisor can help you take your business to the next level.

New to QuickBooks® ? Try These 5 Activities

QuickBooks can be overwhelming when you first start using it. Here are five ways to familiarize yourself with some of its features to get you up and running in no time.

Tackling any new piece of software can be daunting. Add a complex process like accounting to the mix, like QuickBooks does, and you may feel apprehensive about your ability to learn how to use it. 

But QuickBooks was designed for small businesspeople, not for accountants nor technical wizards. It uses familiar language and forms, and it works like other Windows programs. That doesn’t mean, though, that you’ll be able to just jump in and start completing your accounting tasks. 

Here are five steps you can take to start familiarizing yourself with QuickBooks that will get you up and running in no time. We’ll assume that you’ve already created your company file. If you need help with this critical first step, let us know.

Open a sample file.

While you’re exploring QuickBooks, it’s a good idea to work with a sample file. That way, you can look around and practice without risking compromising your company file. You’ll be able to see how completed records and transactions should look and try your hand at entering sample data of your own.

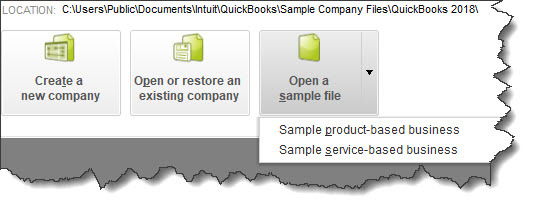
QuickBooks comes with sample files that allow you to practice entering data without harming your own company file.

Before you open a sample file, you’ll need to close your current company. Click on File in the upper left to open that menu, then select Close Company. A window will open that should have your company file in its list. Below that, you’ll see three boxes containing different options. Click on the down arrow next to Open a sample file, as pictured above (this may look slightly different in your version). Choose the one you want to open and click on it. QuickBooks will load again with that file open. When you’re done looking at the sample file, go to File | Close Company again. The No Company Open window should appear again. Click on your company file name and then on Open to return to your own file.

Learn where your lists are.

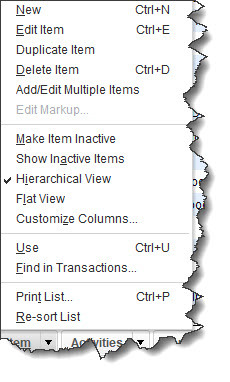
You’ll be storing a great deal of information in lists. QuickBooks maintains these automatically sometimes when you enter information in a record or transaction. For example, when you create a record for a product or service you sell, it goes into a master list that you can access by opening the Lists menu at the top of the screen and clicking on Item List. You’ll also open the Lists menu when you want to add options to an existing type of list, like Class List (QuickBooks allows you to assign Classes to transactions so you can group related information, like New Construction or Remodel if you’re a contractor).

You’ll sometimes select from lists of commands in QuickBooks. This is the menu for the Item List.

Try a Transaction.

There are two transactions you’ll probably be using the most: invoices and sales receipts. QuickBooks comes with templates that resemble these sales forms’ paper counterparts. You simply fill in the blanks by entering data and selecting options from drop-down lists. Open the Customers menu and select Create Invoices. Click the back arrow above Find in the upper left corner to see sample invoices. Then click the right arrow to get back to a blank form and create an invoice by clicking the down arrows in blank fields to see your sample lists.

Explore Snapshots.

Once you start entering records and transactions, you’ll want to be able to access that information in ways that provide insight on how your company is doing. You’ll eventually start running reports in QuickBooks, but the software also accomplishes this through its Snapshots. There are three of them, and they all provide these overviews by using data tables and charts. Open the Company menu and click on Company Snapshot, then click the tabs to move between Company, Payments, and Customer. You’ll learn how QuickBooks provides real-time information about your finances.

Look at the Income Tracker.

It’s easy to see the status of your invoices (and estimates) in QuickBooks. Open the Customers menu and select Income Tracker. Colored bars at the top of the screen show you what’s outstanding and what’s been paid. A list of the related transactions appears below these bars.

This partial view of the Income Tracker tells you how much money is tied up in unbilled Time & Expenses and unpaid Invoices.

As we said earlier, QuickBooks can be overwhelming when you first start to use it. We can ease that transition by providing training and helping you move your existing accounting information over to the software. If you’ve started using QuickBooks on your own and you have questions, we can always step in to offer answers.

Stay healthy, and best wishes for a more prosperous 2021.

Are You Following Best Practices in QuickBooks® Online?

“Best practices” are recommendations for the most effective way to get things done. Are you following standard procedures in QuickBooks Online?

Habits can be good things when you’re talking about getting through the workday successfully. You might have developed a habit of responding to emails quickly and preparing checklists before you go into meetings. Maybe you schedule your most challenging work for high-energy times of the day and leave less-demanding tasks for those times when you’re not as chipper.

It’s easy to fall into habits with QuickBooks Online, too. You might follow the same workflow pattern every day simply because that’s the way you’ve always done things. There’s nothing wrong with that – as long as you’re incorporating as many of the site’s best practices as you can. That is, you’ve made a habit of taking actions that will lead to the most effective use of QuickBooks Online.

Here are four habits we think you should consider developing if you haven’t already.

Go through your new transactions every day:

One of the five best things about QuickBooks Online is its ability to connect to your financial accounts and import transactions regularly. But this feature is only useful if you review your recently-downloaded transactions every day. Wait too much longer than that, and it will become too overwhelming.

A screenshot of a cell phone

Description automatically generated

We recommend you review your account transactions every day and complete any of the fields necessary.

To view an account register, you’d click Banking in the left vertical pane, and then click on the desired account at the top of the screen. When you select a transaction, a small window like the (partial) one pictured above drops down and displays your options. If you have not worked with defining and clearing downloaded transactions before, we can provide guidance here. It’s complicated.

Always assign categories to expenses:

You’ll get out of QuickBooks Online what you put into it. That is, the more conscientious you are about completing records and transactions thoroughly, the more helpful your reports will be. It’s especially important that you assign categories to expenses and mark them as billable or not. Those categorized expenses will be very important as you’re preparing your company’s income taxes. And you want to be sure that customers are billed for expenses you incur on their behalf.

Run aging reports once or twice a week:

QuickBooks Online can help you keep up with money owed to you and money you owe, but you have to take the time to stay current with that information. The site’s Dashboard provides the dollar total for unpaid invoices and links to a list, but it doesn’t tell you what bills of your own may be coming due – or are late.

We recommend you run at least two reports at the beginning and end of the week: Accounts Receivable Aging Summary and Accounts Payable Aging Summary. You can modify these reports by clicking the Customize button, but they should be good as is. You don’t want to see any numbers in any columns except the first one (Current). If you see any beyond that, it means that either incoming or outgoing payments are overdue.  Click on any number to see the transactions behind it.

Set reorder points on inventory items.

A close up of a map

Description automatically generated

Inventory-tracking in QuickBooks Online is complicated. We can help you understand it.

Keep an eagle eye on your product inventory levels. When you create an item record (Sales | Products and Services | New), be sure to enter a Reorder point. The Products and Services page tells you how many items have Low Stock or are Out of Stock. You can also see the Qty on Hand and Reorder Point in the table below those numbers.

Warning: Inventory-tracking is an advanced feature of QuickBooks Online. If you need these tools, contact us about scheduling some time to go over them thoroughly.

More to Implement

There are many other best practices that we’d recommend for your use of QuickBooks Online. Several of them have to do with reports, one of the site’s capabilities that is particularly robust but which many businesses don’t fully engage in because some of them are difficult to analyze. These include standard financial reports like Balance Sheet and Statement of Cash Flows

You’ll need these reports if you apply for financing or want to share information about your company’s financial health with a third party. The insight they provide can also be useful to you in making business decisions.  We’d be happy to create and analyze these for you on a regular basis, or to consult with you on any other aspect of QuickBooks Online that is perplexing.

Sales Receipts, Invoices, and Statements in QuickBooks®

QuickBooks allows you to create multiple types of sales forms for different situations. Here’s a look at what they are and when to use them.

When you buy something at a store, you want a piece of paper that shows what you purchased and what you paid. If you receive products or services before you pay for them, you certainly expect to receive a bill. And if you have several transactions with the same company and want clarification on what you’ve paid, and what you owe for a specific time period, the company can usually send you a summary.

Your customers want the same things. That financial documentation might be difficult for you to provide if you’re still doing your accounting manually on paper.

Fortunately, QuickBooks has a solution. Or, rather, several solutions. The software includes templates for all of the sales forms that you’ll probably ever need: invoices, sales receipts, and statements. Here’s an introduction to when and how to use them.

Sales Receipts

A screenshot of a cell phone

Description automatically generated

When a customer pays you on the spot, you can create a sales receipt.

When you receive full payment for a product or service at the time of the sale, the correct form to use in QuickBooks is the Sales Receipt. Click the Create Sales Receipts icon on the home page or open the Customers menu and select Enter Sales Receipts. You’ll see a form like the partial one pictured above.

Click the down arrow in the Customer:Job field and select the correct one or <Add New>. If you assign transactions to Classes, pick the right one in that list. The Template field should default to the appropriate form. If you’ve created more than one sales receipt template, select the one that you want. Click the icon above the correct payment type.

Tip: Want to be able to accept credit cards and eChecks? You’re likely to get paid faster by some customers. You’ll also be able to accept payments on your smartphone or tablet and create receipts. Talk to us about adding this capability.

Select the appropriate Item(s) from that drop-down list and enter a Qty (Quantity). Be sure to apply the sale’s Tax status by opening that list. (If you know that you’re responsible for paying sales tax on at least some of your sales but you haven’t set this tracking up in QuickBooks yet, we can work with you on that. It’s important.) When you’ve finished filling in the table with all the goods or services you sold, you can save the transaction and either print it or email it to your customer.

Invoices

A screenshot of a cell phone

Description automatically generated

After you’ve completed the top half of an invoice, you’ll see something like this at the bottom.

You’ll create and send Invoices to customers when you’ve received either a partial payment or no payment at the time of the sale. Those completed transactions become a part of your total Accounts Receivable (money owed to you). Click Create Invoices on the home page or go to Customers | Create Invoices. Fill out the fields at the top of the screen like you did with your sales receipt; the forms are almost the same. Invoices, though, have Bill To and Ship To addresses, as well as fields for the sale’s Terms and Due Date.

You shouldn’t have to do anything with the bottom half of the screen (pictured above) unless you want to include a Customer Message, since the information here is carried over from the top of the screen. Check to make sure the Tax Code is correct, though.

It’s important to note, it’s an either/or situation when it comes to creating an invoice and a sales receipt for the same transaction. It’s best to not use sales receipts for invoice payments, as it can cause issues.

Statements

A screenshot of a cell phone

Description automatically generated

When you create statements, you’ll first choose the customers who should receive them.

Statements are very useful when you have multiple customers who are past due on their payments (you can find this out by running the A/R Aging Summary report, which you’ll find under Reports | Customers & Receivables). Click the Statements link on the home page or go to Customers | Create Statements.  You’ll first have to select the customer(s) who should be on your list, as pictured above. There are several other options on this page that will help you refine this group. When you’re done, QuickBooks will automatically generate them, and you can print or email them.

You’ll save a lot of time when you use QuickBooks’ sales forms. Your bookkeeping will also be more accurate, and it will be easier to track down specific transactions. If you use them conscientiously, you’ll be able to run reports that provide comprehensive overviews of various elements of your finances.

Do you have questions about any of this, or are you just getting started with QuickBooks? We’re happy to schedule a consultation to determine what your needs are and how we can assist. Contact us, and we’ll set something up.

Still Dealing with 2019 in QBO? Clearing the Way for 2020

If you have a nagging feeling this month that you’re not caught up with your accounting tasks, it’s time to clean up your unfinished 2019 work.

It would be great if you could have closed out 2019 knowing that you were all caught up with your accounting work. You sent all your invoices, paid all your bills, and wrapped everything up with a series of reports and a proverbial bow.

Unfortunately, December rarely goes that way. You’re making last-minute adjustments for your taxes. Dealing with the holiday rush if you’re a retailer. Handling end-of-year employee issues, trying to make your monthly sales quotas, and doing something special to make your customers feel appreciated at this time of year.

On top of your daily accounting work, you’re feeling pressure in December to get a clear picture of your finances for the entire year. Then the holidays hit, and suddenly you’re ringing in the New Year without having had time for that.

Here are five things you can do clean up 2019 and make way for 2020.

1. Create two critical A/R reports: Accounts Receivable Aging Summary and Open Invoices.

This may make you feel both better and worse. On the bright side, you’ll know where you stand in terms of who owes you what and how big the problem is. On the other hand, you may find it disheartening to see how many payments are past due. These reports are easy to find. Click Reports in the left vertical pane and scroll down to Who owes you.

A screenshot of a cell phone

Description automatically generated

The Open Invoices report can show you quickly who’s past due.

Now would be an excellent time, too, to develop some strategies to be proactive and keep your accounts receivable more up to date in 2020. We’d be happy to sit down with you and help you with this difficult task.

2. Create two critical A/P reports: Accounts Payable Aging Summary and Unpaid Bills.

Add “Stay Current with Bills” to your list of 2020 goals. But first, you have to see where you stand right now. Click Reports again and scroll down to What you owe.

Who is responsible for paying bills? If it’s you, maybe it’s time to hand over that task to someone without your managerial responsibilities who can make it a priority.

3. Create statements for all customers who are past due.

Things slip for your customers toward the end of the year, too. Give them a chance to catch up. Their invoices might have gotten lost in the year-end confusion, but you need to get current with your accounts receivable. So, send statements to those in arrears.

Click +New at the top of the left vertical pane, then go to Other | Statement

4. Clean up your customer and vendor lists.

Customers and vendors come and go, but their QuickBooks records are forever unless you do something about them. You can easily make them inactive – after confirming they have no open activity. Click Sales | Customers in the left vertical pane. Click the box in front of customers you want to make inactive and then click Batch actions | Make inactive.

A screenshot of a cell phone

Description automatically generated

Cleaning up your customer and vendor lists will save you time in the future.

5. Always look carefully at your dashboard when you log in.

The block in the upper left corner is the most important here. You can see at a glance how much money you have tied up in unpaid invoices and how much money needs to be deposited. This will help you keep QuickBooks Online cleaned up.

More to Do

There are certainly other things you can do to clean up QuickBooks. For example, if you carry inventory, January is a good time to run the Physical Inventory Worksheet report and make some decisions about where your purchasing emphasis should be in 2020. Need help interpreting your product movement and sales priorities? We can help with that.

Finally, sometime this month—certainly in the first quarter of 2020—let us create the critical standard financial reports (under For my accountant in Reports) that you could actually generate in QuickBooks Online, but which would be difficult for you to analyze. These are the reports you would need if you were going to apply for a loan, for example, or request a business valuation. But the insight they provide can give you a sophisticated overview of your finances.

5 Things You Should Know About the Chart of Accounts in QuickBooks Online

QuickBooks Online doesn’t require deep knowledge of accounting principles. Still, there are concepts you should understand.

You probably didn’t expect you’d have to become an accounting expert when you started your business. You knew you’d have to deal with recording income and expenses – maybe track your inventory and process a payroll. But you may not have understood just how complex financial bookkeeping could be.

That’s why you decided to use QuickBooks Online, or are at least considering it. The service is an expert on accounting, and it simplifies the process. It knows exactly how you have to document transactions to stay compliant with the rules that accountants and other businesses follow. This is good practice, and it’s absolutely necessary if, for example, you ever have to apply for financing.

One of the features of accounting systems you should understand is the Chart of Accounts. You won’t have to alter it in any way—in fact, we strongly advise against it—but you’ll encounter it when you work with transactions. Here are five things you should know about it.

What is it?

These three columns from QuickBooks Online’s Chart of Accounts display account Names, Types, and Detail Types.

QuickBooks Online’s Chart of Accounts is a list of financial categories that are used to classify your company’s transactions when you record them. If you were doing your accounting manually, you would have to create your own Chart of Accounts. But QuickBooks Online builds one for you based on the company type and industry you choose when you’re setting up the site.

Why is the Chart of Accounts important?

Some people refer to the Chart of Accounts as the “backbone” of your company file. All transactions flow to it. Its primary importance can be summed up in one word: reports. Your reports will not be accurate if your Chart of Accounts is poorly constructed or if you categorize transactions incorrectly. This becomes as issue when you want to:

  • Prepare taxes. Your income tax return will not reflect your reportable income and deductible expenses if transactions are not assigned to the right classifications.
  • Apply for financing, take on an investor, sell your company, etc.
  • Monitor your finances. You won’t get a true picture of your income and expenses, which makes it difficult to analyze your company’s fiscal health and plan for the future.

What’s in the Chart of Accounts?

There are two types of accounts. One contains information that’s used in the Balance Sheet report. These accounts will have a number in the QuickBooks Balance column that’s based on all transactions up to the current date. They include Assets (bank accounts, accounts receivable, inventory, etc.), Liabilities (unpaid bills, credit cards, payroll and sales taxes, loans, etc.), and Equity.

The remainder of the accounts are used in the Profit and Loss report, otherwise known as the Income Statement. They’re divided into Income (sales, discounts given, etc.), Cost of Goods Sold (labor, shipping, materials and supplies, etc.), Expenses (advertising, insurance, payroll, etc.), Other Income, and Other Expense. You won’t see a number in the QuickBooks Balance column for these accounts because the Profit and Loss report changes based on the date range selected.

Should I ever make any modifications to my Chart of Accounts?

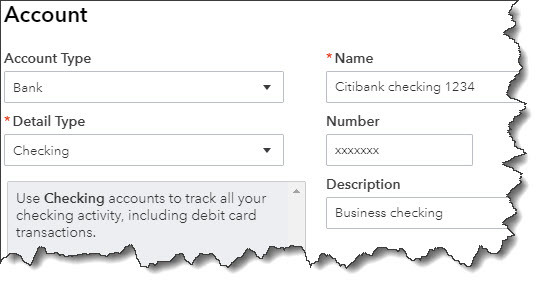
You can set up bank and credit card accounts in QuickBooks Online’s Chart of Accounts.

As we stated earlier, we strongly recommend that you never modify your Chart of Accounts without consulting us. However, there are two exceptions to this. You’ll want to create entries for your bank and credit card accounts. To do this, first open the Chart of Accounts by clicking the gear icon in the upper right and selecting Chart of Accounts under Your Company. When it opens, click New in the upper right corner. Choose Bank or Credit Card and fill in the blanks.

Do I need to use account numbers in the Chart of Accounts?

Generally, the smaller the business, the less need there is for this. If your business is big enough that you have dedicated A/P and A/R individuals, you may want to post transactions to account numbers.

Understanding Reports

QuickBooks Online makes it possible for you to view the Chart of Accounts and those two critical reports, Balance Sheet and Profit & Loss. Customizing and analyzing them, though, is something you should do under professional supervision. We’re happy to help here and in other advanced areas of the site. Contact us for a consultation.

Receive Payments the Right Way in QuickBooks®: Your Options

How you record a customer payment in QuickBooks depends on why and how you received it.

One of the reasons we like QuickBooks is because it uses language and processes that are familiar to small businesspeople. Instead of using the term “accounts receivable,” it has a menu label that says Customers and menu items that use phrases like Create Invoices and Receive Payments. You would have to go into the Chart of Accounts to find standard accounting terminology – and we never recommend that you do that without consulting with us first.

Yet when you’re doing customer-related tasks, you’re following a traditional accounts receivable workflow, a series of steps that completes a sales cycle, like Estimate | Invoice | Payment | Deposit. QuickBooks keeps it simple for you and doesn’t often force you into unfamiliar territory.

One of the more pleasant elements of accounts receivable is the process of receiving customer payments. There’s more than one way to do this, and it’s very important that you use the correct way in each situation.

Payment Methods

Before you record your first payment, you’ll need to make sure that QuickBooks is set up to accommodate its Payment Method. QuickBooks comes with some standard types, but you can add, edit, and delete your own options (though not those that are built in to the software).

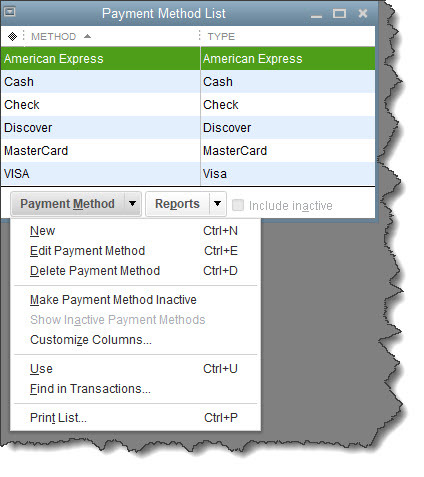
Open the Lists menu and click Customer & Vendor Profile Lists, then Payment Method List. This window will open:

You can work with Payment Method options in this window.

To use any of the commands in the Payment Method drop-down list, you’d highlight the method by clicking on it and opening the options list by clicking the down arrow in that field.

Note: When you add or change an existing entry, the window that opens contains fields for both Payment Method and Payment Type. They should be identical or at least very similar.

Settling an Invoice

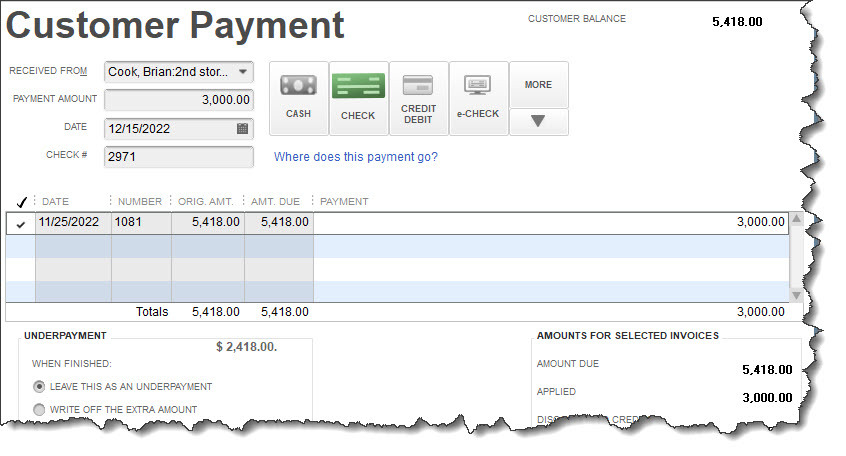
If your company sends invoices, you’ll need to record their matching payments in the Customer Payment window. Click Customer | Receive Payments or the Receive Payments icon on the home page. There’s also a button for this in the toolbar in an open invoice. However you get there, here’s what it looks like:

You’ll record payments that customers send in response to invoices in this window.

Select a customer in the RECEIVED FROM field, and any outstanding invoices will appear in the table below. The CUSTOMER BALANCE appears in the upper right corner. Enter the PAYMENT AMOUNT and verify the date.

Click in the box for the correct payment method to the right. If it’s a check, enter the number in the CHECK # field. If you choose CREDIT DEBIT, you can enter the card details in the small window that opens. If you provided this information in the customer’s record and chose that as the PREFERRED PAYMENT METHOD, it should fill it in automatically.

Note: To set a PREFERRED PAYMENT METHOD, which will save time, open the customer record and click the small pencil icon in the upper right. Click Payment Settings and complete the fields in that window.

If the customer has paid less than the balance due, you can either LEAVE THIS AS AN UNDERPAYMENT or WRITE OFF THE EXTRA AMOUNT. Select one of those two options in the lower left and save your work when you’re done.

Instant Payments

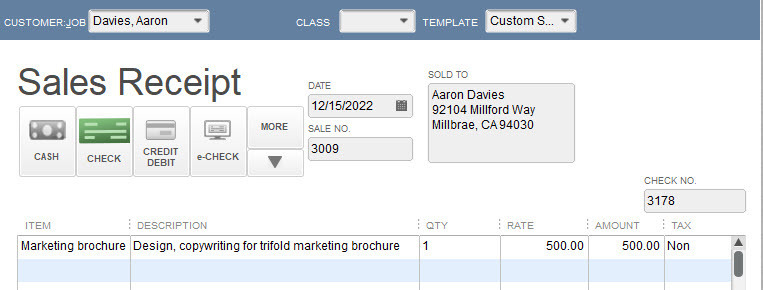
You’ll use a different form when a customer gives you a payment in exchange for the goods or services you provided, without receiving an invoice. Click Customers | Enter Sales Receipts to open a window like this:

If a customer gives you a payment without receiving an invoice, you’ll provide them with a Sales Receipt.

You’ll complete this form much like you did the CUSTOMER PAYMENT window, except you won’t be applying the payment to an existing invoice.

Tip: If you have a merchant account or are willing to get one, you can record payments and email sales receipts at remote locations on your mobile device. We can walk you through the setup.

Receiving payments from customers is one of the easier tasks you’ll do as a QuickBooks user, but if you don’t use the software’s tools correctly, your books will be difficult to untangle. We can help ensure that you’re doing this element of your work right from the start; just contact us to schedule a consultation.