Setting Up Sales Tax in QuickBooks®, Part 2

Now that you have your sales taxes set up, you’ll be able to use them in transactions and reports.

Last month, we talked about the process of setting up sales taxes in QuickBooks. To recap a bit, you first have to go to Edit | Preferences | Sales Tax to make sure the software is set up correctly for this use. This means you’ll need to understand exactly what your state and local sales tax rules are. You can learn this by going to your state’s Department of Revenue or Department of Taxation website.

State sales taxes are considered Items in QuickBooks; you create them like you would create product records. When local sales taxes are also required, you can set up Sales Tax Groups. You’ll be assigning these Items as well as Tax Codes to customers.

Using Sales Taxes

Once you have sales taxes set up, you can start using them in transactions. You can create them on the fly from within transactions, but we recommend taking care of this important housekeeping task before you start.

Image1

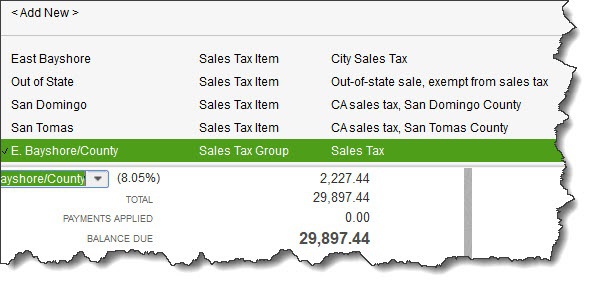
QuickBooks applies the Sales Tax Item or Sales Tax Group that you assigned to the customer on your invoices. You can see the others that are available.

Start by creating an invoice. When you reach the Tax column for your first line item, you’ll see that QuickBooks has already assigned Tax or Non to it based on the information in the item’s record.  You can mix taxable and non-taxable items on the same invoice. You can also add a new sales tax on the fly from the invoice itself. Click the down arrow in the Tax column and select <Add New>

Be sure you’re not required to pay sales tax on an item when Non is selected. You may not have to charge sales tax on, for example:

  • Nonprofit organizations
  • Out-of state sales
  • Items that your customers will resell

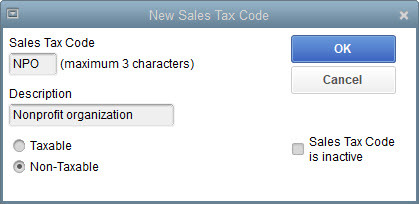
Tip: If you’d like, you can create more specific sales tax codes for these situations. You could use OOS for out-of-state sales, for example, LBR for labor, and NPO for nonprofit organization.

QuickBooks already includes Sales Tax Codes Tax and Non, but you can add additional ones that are more descriptive.

Be very careful with your sales tax classifications in QuickBooks. As we said last month, such errors will be discovered in a sales tax audit, should you ever be subject to one. 

Once you’ve entered all the line items in the invoice, look down toward the bottom of the screen, directly beneath the table containing invoiced items and above the Total. QuickBooks will have calculated the sales tax due using the Sales Tax Item or Group you assigned to that customer during setup, placing it in the Tax field.

Look to the left of those numbers, and you’ll see the actual rate that was applied. To the left of that is a drop-down list containing the correct Sales Tax Item or Sales Tax Group. Click the down arrow if you want to see the list of other options. And in the lower left of the screen, you’ll see the Customer Tax Code.

The Sales Tax Center

Image3

The Manage Sales Tax window

When it’s time to pay sales taxes, you’ll open the Vendors menu and select Sales Tax | Manage Sales Tax. From the screen that opens, you’ll be able to:

  • Access Sales Tax Preferences.
  • Generate sales tax reports that will help you fill out required forms.
  • Visit related screens.

There are two reports you’ll need to run: Sales Tax Liability (displays total sales, amounts that are taxable and at what rates, taxes collected, and how much sales tax is due to each taxing agency) and the Sales Tax Revenue Summary (breaks down total sales into taxable and non-taxable). These reports are, of course, customizable, so you can filter them, for example, by Sales Tax Code.

A Delicate Balance

Collecting the correct amount of sales tax on taxable items and submitting the right tax totals to the right agencies takes vigilance. You don’t want to charge customers for unnecessary taxes, but you also don’t want to end up paying taxes you should have invoiced out of your own pocket. 

We can help you get this straight from the start. It’s much easier to spend some time setting up sales tax accurately in QuickBooks than it is to go back and untangle inaccurate records. Give us a call and we’ll set up a consultation.

Resolve to Do These 3 Things in QuickBooks® Online This Month

‘Tis the season for making resolutions and setting goals. Try exploring these three areas to dig deeper into QuickBooks Online.

By now, many New Year’s resolutions have already been made – and broken. Though they’re usually created with the best of intentions, they’re often just too ambitious to be realistic.

For example, you might decide to learn more about QuickBooks Online and keep up with your accounting chores more conscientiously in 2019. That’s hard to quantify. How will you know if you achieved that goal?

Instead, why not pick three (or more) specific areas and focus on them this month? We’ll get the ball rolling for you by making some suggestions.

Explore the QuickBooks Online mobile app:

Yes, QuickBooks Online itself is already mobile; you can access it from any computer that has an internet connection and browser. But you probably don’t always lug a laptop around when you’re away from the office, and you’re sometimes at locations where using it wouldn’t be practical. But you can always pull out your smartphone and fire up the QuickBooks online app, available for both iOS and Android.

No matter how small your smartphone (this image was captured on an iPhone SE), you can still do your accounting tasks using QuickBooks Online’s app.

QuickBooks Online’s app replicates a surprising percentage of the features found on the browser-based version. You can create, view, and edit invoices, estimates, and sales receipts for example, as well as see abbreviated customer and vendor records. Your product and service records are available there, including tools for recording expenses on the road.

Create a budget for one month:

Budgets are intimidating. That’s one reason why some small businesses don’t create them. So instead of trying to estimate what your income and expenses will be for an entire fiscal year, just build a budget for one month. In QuickBooks Online, you’d click the gear icon in the upper right, then select Budgeting. Click Add budget in the upper right to open the New Budget window.

Give it a name, like “February Budget,” and select FY2019. Leave the Interval at Monthly, and open the Pre-fill data? menu to click on Actual data – 2018 (if you have data from last year). Then click Create Budget in the lower right corner. Look at last year’s February numbers and estimate how they might change in 2019. Replace the old numbers with your new ones.

Creating a framework for a budget in QuickBooks Online is easy.

We’re suggesting you try it for just one month, so you get a feel for how this tool works. And that experiment will probably leave you with some questions. We can help you go further and complete an annual budget.

Customize your sales forms:

Every piece of paper and email you send to your customers contributes to their impression of you. Are you presenting an attractive, consistent image of your business to them? QuickBooks Online can help with this. It offers simple (for the most part) tools that allow you to modify the boilerplate forms offered on the site – without being an experienced graphic designer. 

Start by clicking on the gear icon in the upper right and selecting Your Company | Custom Form Styles. Unless you’ve done some work in this area before, the screen that opens will have just one listed entry: your Master form, the one that comes standard in QuickBooks Online. To see what you can do, click Edit at the end of that line. Your four options are:

  • Design. This section contains links to modifications you can make to your sales forms’ visuals. You can, for example, add a logo or color and change the default fonts.

Want to change your logo or other elements of your sales forms? QuickBooks Online has the tools.

  • Content. Do you want to add or remove the standard columns (Date, Quantity, etc.) displayed on your invoices? You can do so by checking and unchecking boxes.
  • Emails. QuickBooks Online sends email messages with forms; you can edit them here.
  • Payments. This is a reminder that QuickBooks Online supports online payments, which can help you get paid faster.

There’s more you can do to make your sales forms look professional and polished. We can help you with these tools – and any others you want to explore to expand your use of QuickBooks Online. It’s a new year, and who knows what might come your way over the next 12 months? Contact us if you want to prepare for the new accounting challenges that 2019 might present.

Creating Statement Charges in QuickBooks®

There’s more than one way to bill customers for your products and services. A statement charge is one of them.

Depending on what kind of business you have, you probably have a preferred way of billing customers. If they walk into your shop and present a credit card or cash, you create sales receipts. If they order off your website, they might receive an electronic receipt. Or your arrangement may be such that you send invoices.

There’s another way that’s especially useful if your customers are responsible for paying recurring charges, like an ongoing service contract that’s billed monthly. You can enter those financial obligations directly as statement charges.

As you know, QuickBooks can create statements, summaries of a customer’s activity. These are generated automatically from the invoices, receipts, payments, and other transactions you’ve recorded over a given period of time. But did you know you can manually add charges to statements? Here’s how it works.

Creating a Statement Charge

Click the Statement Charges icon on the home page or open the Customers menu and select Enter Statement Charges. Your Accounts Receivable register appears. Open the list in the field next to Customer:Job by clicking on the down arrow and select the correct Customer:Job.

Warning: If the item will be attached to a specific job, not just a customer, be sure you choose the correct job. QuickBooks maintains a separate register for each.

Consider creating a statement charge instead of an invoice for recurring transactions that will not be billed immediately.

Change the date if necessary and open the Item list (or click <Add New> if you haven’t created an item record yet). Select the one you want and enter a quantity (Qty). QuickBooks should fill in the rate and description. The TYPE column will automatically contain STMTCH (statement charge). Click Record when you’re done. The next time you create a statement for that Customer:Job, you’ll see the transaction you just entered.

Statement Charge Limitations

Before you decide to use statement charges, keep in mind that:

  • You can’t include some information that would appear on an invoice, like sales tax and discounts.
  • Even if your charge relates to hours you worked for the customer, QuickBooks will not open a reminder window containing that information the next time you create an invoice for the customer. You’d have to Enter Time by creating a single activity or entering the hours on a timesheet.
  • You still have to bill the customers.

Billing the Customer

There are two ways to bill customers for statement charges. You can, of course, just generate statements that include the date(s) of the charge(s). The next time you create a statement for customers who have manually-entered statement charges, it will contain them, along with any other activity like invoices and payments.

We’ve covered statements before, but we’d be happy to go over this QuickBooks feature with you. This means you’ll have to enter a statement charge every month if it’s to be a recurring one. Instead, you can treat them as memorized transactions, so they’re automatically entered in the register. If you’re billing multiple customers for the same service every month, for example, this would work well.

First, you’ll need to create a Group that contains all of those customers. Open the Lists menu and select Memorized Transaction List. Right-click anywhere on that screen and click on New Group. This box will open.

If you regularly bill customers for the same service, like a monthly subscription, you can create a Group and memorize the transactions.

Give your Group a Name and click the button in front of Automate Transaction Entry. Open the list in the field next to How Often and select the billing interval. Choose the Next Date to indicate when this group billing should begin. If the charges should be entered on a limited basis, enter the Number Remaining. And be sure to fill in the Days In Advance To Enter if that’s applicable. Click OK.

Next, you’ll assign the customers who should be billed monthly to your Group. Click Statement Charges on the home page again to open your A/R register. Select each customer one at a time and right-click on the statement charge that you want to recur monthly, then select Memorize Stmt Charge. In the window that opens, give the transaction a new Name if you’d like (this will not affect the transaction, only how it’s listed). Click on the button in front of Add to Group and select the Group name from the drop-down list. Repeat for each customer you want to include.

Keeping Track

If periodic statements are your primary customer billing method, this system should work fine. But if you also send invoices and/or collect payment at the time of the sale, you’ll need to remember that your statement charges must be billed on a regular basis, too. We can go over your customer billing procedures with you to determine whether you’re using QuickBooks’ tools wisely – or whether some changes could improve your collection of payments.

4 Things You Should Know About Advanced Settings in QuickBooks® Online

Do you know about all of QuickBooks Online’s settings? What you’re missing may be important.

Looking through all the settings available in QuickBooks Online is something like reading the owner’s manual when you get a new car. You know you should do it, but you find yourself consulting it only when you encounter a problem.

Whether you’re new to QuickBooks Online, or you’ve been using it for a while, we recommend that you familiarize yourself with these important preferences.  Settings do more than turn features off and on: they can teach you about tools you might not have known were available.

Let’s explore some that you may have missed.

Closing the Books

You’ve probably heard this phrase before but do you know what it actually means in QuickBooks Online? When you set a closing date, you’re indicating that no transactions entered prior to that date should be changed.

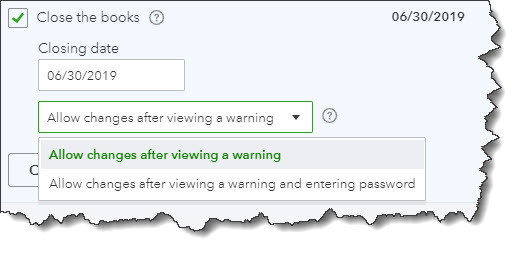
Click the gear icon in the upper right, then select Your Company | Account and Settings. Scroll down to the Advanced section in the left vertical toolbar. Under the first heading, Accounting, check the box in front of Close the books. Enter a date and choose one of the two options for exceptions, as pictured in the image below:

You can close the books as of a specific date in QuickBooks Online so users can’t change transactions entered before then.

Warning: Talk to us before you make this decision. We can discuss the pros and cons.

Categories

QuickBooks Online offers a couple ways to categorize transactions so you can see related data in searches and reports. Scroll down to Categories and click on the Off button to the right of Track classes to turn this feature on. QuickBooks Online will then add a Class field to forms like invoices, along with a drop-down list that you can build with your own options. For example, you could create categories like departments, customer types, and product lines.  You can choose to assign classes to entire transactions or to individual rows in them, and you can ask to be warned if you try to save a form without selecting a Class.

Track locations works similarly. You can assign a location (territory, store, department, etc.) to each transaction if you’d like.

Automation

By using QuickBooks Online for your daily accounting tasks, you’re already saving time. But the site offers a way to save even more with its Automation tools. Here’s what you can do:

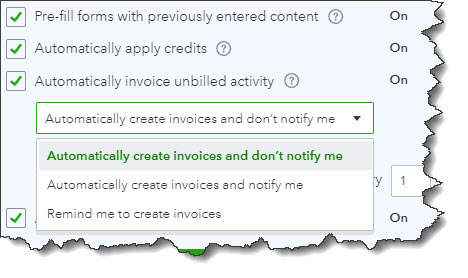
  • Pre-fill forms with previously entered content. Once you’ve saved a transaction for a customer, vendor, or employee, you can choose to have QuickBooks Online complete some fields in the next form you create for them.
  • Automatically apply credits. Do you want QuickBooks Online to apply credits to the next invoice you create for a given customer? Most businesses do, but a specific example of a time you wouldn’t check the box would be if you’re a property manager who requires security deposits.

QuickBooks Online offers several automation options.

  • Automatically invoice unbilled activity. Be careful with this one. When you have customers with unbilled activity, QuickBooks Online can automatically create invoices for them on a schedule you designate. You have a few options here. You can simply ask for a reminder as the date approaches, or you can allow the site to automatically create invoices – with or without notifying you.
  • Automatically apply bill payments. When you record bill payments, QuickBooks Online can automatically apply them to the oldest recorded bill.

Time Tracking

Does your company sell services that are billed by the hour? If so, there are a couple of options you can turn on here. When you create timesheets or individual timed activities, you can add a Service field to the tracking form. You can also include a checkbox to indicate that a block of timed work is billable to customers. If you do the latter, you can opt in or out of letting users see the actual rate you’re charging customers.

Checking Your Work

QuickBooks Online refers to these as Advanced Settings for a reason. Making the wrong choices on any of them could lead to unhappy or confused customers and/or inaccuracies in your accounting file. We think you should know about these options, but we also hope you’ll schedule a consultation with us before attempting to set them up. It’s always much easier to spot problems in the making than to correct mistakes already made.

How Do You Track Jobs in QuickBooks? Part 2

In this second of a two-part series, we’ll explore how you use the job-related records you’ve created.

Last month, we showed you how to start building a foundation for tracking jobs in QuickBooks. We explained that you can use the software’s jobs tools to track income and expenses for any related group of items and/or services (you can think of them as projects, if you prefer).

We covered three elements of preparing to use “jobs”:

  • Creating job records that you can use in transactions (example: develop promotional materials)
  • Creating item records that can be assigned to jobs (example: website development)
  • Determining whether you’ll need to create a new account in your Chart of Accounts for your job income and expenses. You should consult with us anytime you think it might be necessary to modify the Chart of Accounts.  

Using Your Job-Related Records

Now that you’ve recorded the items and jobs themselves, you can start using them in transactions, and eventually track your progress by generating reports.

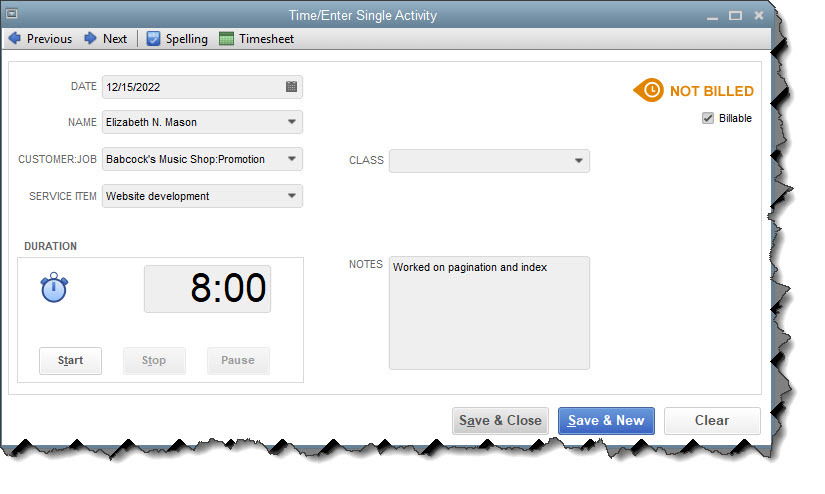
Let’s say you worked eight hours on website development for your promotion job. You’d open the Employees menu and select Enter Time | Time/Enter Single Activity to open this window:

You can enter individual, billable activities and assign them to jobs.

In the example above, you’re limited to recording one day’s work on a specific SERVICE ITEM. You’d verify the date and select from the drop-down lists to complete the fields for employee NAME, CUSTOMER:JOB, and SERVICE ITEM. You can either use the timer to time the job or enter the number of hours manually in the DURATION box. Click in the Billable box to create a checkmark and add NOTES if you’d like. The CLASS field is optional; talk to us if you’re not familiar with this feature.

 If you worked on two separate service items on the same day for that CUSTOMER:JOB, you would create two individual records. You can also enter billable activities directly on a timesheet by clicking Employees | Enter Time | Use Weekly Timesheet. Once you select the employee NAME at the top, any single activity(ies) you created that week will appear as individual records, and vice versa.

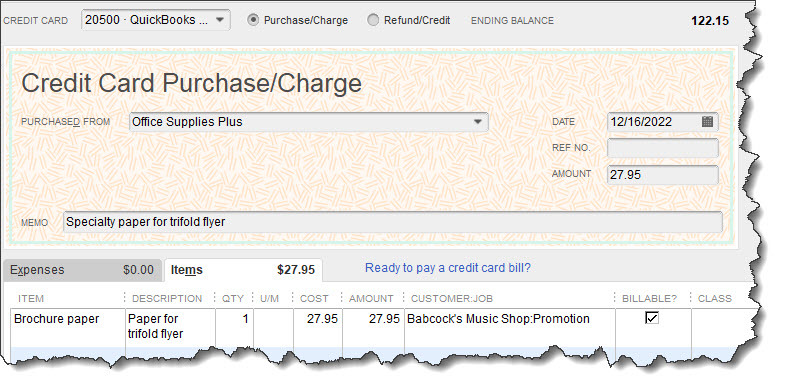
Writing a check or using a credit card for a job-related purchase that should be billed to the customer? You’d fill out these forms in QuickBooks like you usually do, making sure that you document the items or services by highlighting the Items tab, select the correct CUSTOMER:JOB, and make a checkmark in the BILLABLE? column.

If you write a check or charge your credit card for purchases that can be billed to a CUSTOMER:JOB, be sure to record it in QuickBooks.

If you’ll be doing some billable driving for your job, you should also be tracking your mileage in QuickBooks. Open the Company menu and select Enter Vehicle Mileage. If you haven’t created a VEHICLE record in QuickBooks, click <Add New> and easily do so. Complete the rest of the fields and save.

Tip: Do you want to see some of your overhead expenses on job costing reports? Create a CUSTOMER:JOB named “Overhead” and assign related costs to it.

Billing the Billables
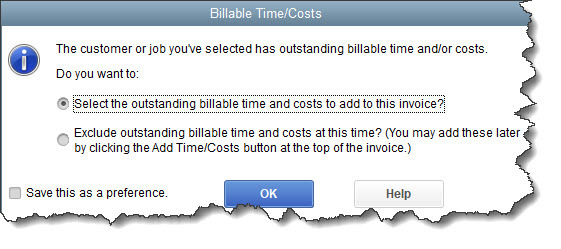
When the time comes to invoice your customers (Customers | Create Invoices), you’ll see how your careful work in QuickBooks simplifies that task. Open an invoice form and select a CUSTOMER:JOB. If you’ve entered billable items for him or her, this small window will open:

When you create an invoice for a CUSTOMER:JOB who has billable time, mileage, or other expenses, QuickBooks can automatically add them.

If you leave the first option checked and click OK, another window will open that lists all of the expenses you’ve marked as billable to the customer, arranged by type. Click in the first column of each expense you want to include and click OK. Your invoice containing those entries will open. Do any editing necessary, and then save it.

Note: You’ll probably notice two fields in the Choose Billable Time and Costs window that refer to Markup. This is an advanced concept that we can explore with you, should you want to charge customers more for expenses you’ve incurred on their behalf.

Related Reports

QuickBooks contains a wide variety of reports related to your work billing customers for jobs. Click Reports in the navigation pane or Windows menu, then Jobs, Time & Mileage to see what’s available. Choose a date range and click Run to see them appear with your own data.

If you’ve never worked with jobs in QuickBooks, we strongly recommend that you let us help you here. There are a lot of moving parts, and you don’t want to miss out on any of your efforts or expenses that are billable.