It’s more enjoyable than paying your bills. Here are three ways to process incoming money from customers.
One of the biggest problems small businesses face is maintaining a positive cash flow. It’s a constant battle. How do you keep your income running ahead of your expenses?
QuickBooks Online can help. It provides specialized forms and a mobile app that help you record and deposit the payments that are coming in. Do you ever receive payments instantly for some products and/or services? Are you ever out of the office and have to document a sale for both you and the buyer? Do you send invoices for products and/or services and need to make sure that payments get reported accurately when they come in?
QuickBooks Online supports all of these situations. It also provides a service that can automate your payments and help you get paid faster.
Applying Payments to Invoices
If you send invoices to customers for products and/or services, you can receive their payments easily using QuickBooks Online. Businesses can record payments manually, but there’s a better way that can help you get paid faster: QuickBooks Payments. This is a merchant account that allows you to accept credit card and bank payments electronically.

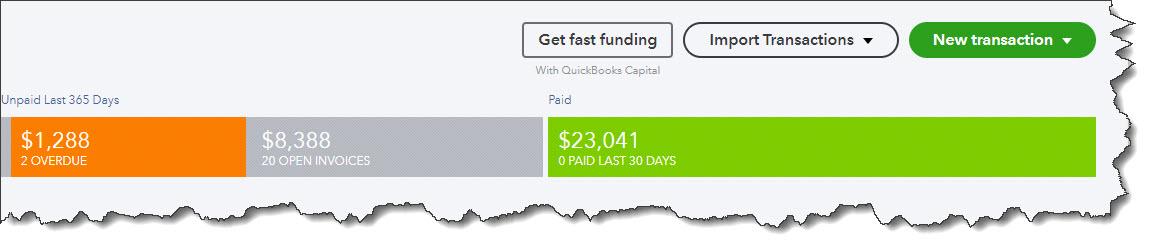
Using QuickBooks Online’s mobile app, you can check the payment status of an invoice.
Once you set this up in QuickBooks Online, your invoices will allow bank cards and electronic checks as integrated payment options. Your invoices will go out with a button that customers can click to provide bank card or check information. You’ll be able to see when invoices are viewed, paid, and deposited, as shown in the image above. You can also get notifications of invoice activity.
Of course, you can also check the payment status of the invoices you’ve sent in the browser-based version of QuickBooks Online on your desktop or laptop. Open your list of invoices on the site and click on one to highlight it. A panel will slide out from the right side of the screen displaying the invoice’s timeline.
You can also record payments manually. Look at the end of the row for an invoice that hasn’t been paid. You’ll see a Receive Payment link. Click it to open the Receive Payment screen and complete the fields that aren’t already filled in, then save the screen. There’s also a Receive Payment link on the invoice screen itself.

There’s no cost for setting up an account in QuickBooks Payments. There are only per-transaction fees. For ACH bank payments, the rate is 1%, with a maximum of $10 per transaction. Credit and debit cards (plus PayPal, Apple Pay, and Venmo) are 2.9% if they come in through an invoice, 2.4% if you use a card reader, and 3.4% if the payments are keyed in. There’s also a $0.25 fee per transaction. Payments that come in before 3 p.n. PT should be in your account the next business day.
Payments On the Road
To accept payments remotely, you’ll need to get a free card reader from Intuit that attaches to your mobile phone. Customers can tap or insert their cards or make digital wallet payments. You can also key numbers in, but, as we said earlier, the per transaction fee is higher. You’ll also need to download the GoPayment app to process transactions. The app also allows you to add labels, prices, and images so you can find the item you’re selling quickly. Multiple security measures are used to help keep this method of mobile data transmission safe.
Receiving Payment Instantly
There may be times when you provide a product or service for someone and they pay you on the spot. QuickBooks Online allows you to create and send sales receipts for just those occasions. Click +New in the upper left corner, and then click Sales receipt under Customers. QuickBooks Online then opens a form that should look familiar to you. It looks and works like an invoice or estimate. Select the Customer in the upper left corner and complete the rest of the fields as you would with any sales form. If you click Save and send when you’re done to email a copy to the customer, you can see a preview first.
About Receiving Checks

Money from payments you’ve received sometimes* go into the Undeposited Funds account.
When we created a sales receipt just now and indicated we’d received a check, the Deposit to field defaulted to Checking, because QuickBooks Online assumed we’d be depositing this check on its own. When you have multiple checks that you’re going to combine into one deposit, you should have the payment deposited to the Undeposited Funds account. This is an account that holds any payments that have come in but not yet been physically deposited in the bank (usually cash and paper checks from invoices and sales receipts). It’s a good idea to look at this account occasionally to make sure you don’t have money just sitting there.
Questions on any of this? Contact us to set up a consultation. The mechanics of receiving payments are not that difficult, but you need to make very sure you’re recording all payments properly and getting the money into your bank accounts.