Who Owes You? 5 QuickBooks Online Reports That Can Tell You Fast

Keep a constant watch on your accounts receivable to improve cash flow.

Quick: How many of your invoices are unpaid? Have any of your customers gone over 30 days past due? Did you bill all of the time and expenses for that project you just completed for a customer?

If you’re doing your accounting manually, there’s simply no way to get that information quickly. Depending on your bookkeeping system, you may not be able to get it at all.

QuickBooks Online has more than one solution for this problem. You see the first one every time you log in. The Dashboard contains a graphic in the upper left corner that tells you how many invoices are overdue and unpaid. Click on the colored bar labeled OVERDUE, and you’ll see a list of invoices with the unpaid ones right at the top.

You can tell at a glance how much of your money is tied up in unpaid invoices.

While this is important information for you to have as you start your workday, it doesn’t tell the whole story. To get that, you’ll need to access some of QuickBooks Online’s reports – five of them in particular. Click Reports in the left vertical pane, and then scroll down to the heading labeled Who owes you.

These reports are listed in two columns. Each has the outline of a star next to it. Click on the star, and the report will be added to the Favorites list at the top of the page. Click on the three vertical dots next to it, and you’ll be able to Customize the report. And as you hover over the title, you’ll see a small, circled question mark. Click on this to get a brief description of the report.

There are several reports in this list that can provide insight into where your outstanding revenue is. We recommend you run five of them at least once a week – more frequently if your business sells large quantities of products and/or services. The suggested are:

Accounts receivable aging detail

This report provides a list of invoices that are overdue, along with aging information. There are several columns in the report, but you’ll want to pay special attention to the last one: OPEN BALANCE.

Tip: If you have many customers or simply a high volume of unpaid invoices, you might consider running the Accounts receivable aging summary instead.

Changing the Content

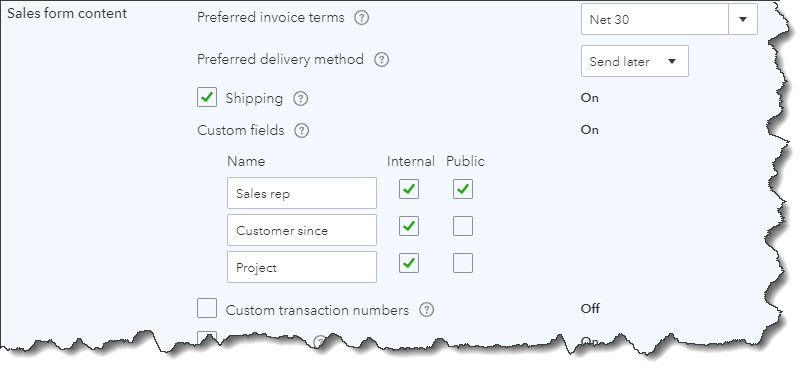
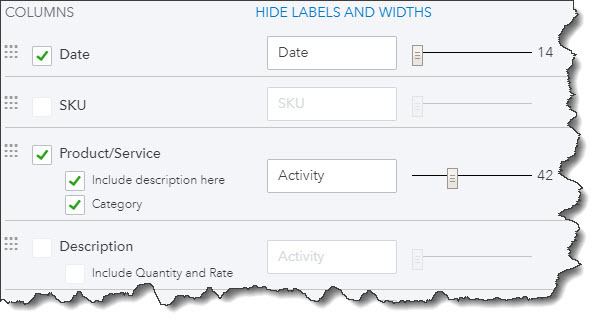
Before you run the report, you should explore the customization tools provided for it. They won’t be the same for every report, but you can start to get an idea of what can be done. Hover over the report title and click Customize. A panel like the one pictured below will slide out of the right side of the screen.

QuickBooks Online provides deep customization tools for reports.

You can see some of your customization options in the image above. Beyond these, you can also work with filters and headers/footers. When you’re satisfied with your changes, click Run report.

If you want to run a report with its default settings, just click on the report title in the list to display it.  You’ll have access to limited customization from there.

Four other reports you should be generating regularly are:

  • Customer Balance Summary: Shows you how much each customer owes your business
  • Open Invoices: Lists invoices for which there has been no payment
  • Unbilled Charges: Just what it sounds like: tells you who hasn’t been invoiced yet for billable charges
  • Unbilled Time: Lists all billable time not yet invoiced

We don’t expect you’ll have any trouble understanding reports like these; they’re fairly self-explanatory. QuickBooks Online offers many other reports, the standard financial reports that need to be generated monthly or quarterly, like Balance Sheet, Profit and Loss, and Statement of Cash Flows. You’ll absolutely need these should you apply for a loan or need to supply in-depth financials for any other reason. We can help you analyze them to get a comprehensive, detailed picture of your company’s fiscal health.

Setting Up Sales Taxes in QuickBooks, Part 1

If your business is required to collect and pay sales taxes, you can use QuickBooks’ tools to help you meet those obligations.

Next to payroll, state sales taxes represent probably the most complex element of your accounting tasks. QuickBooks can help with the mechanics, but there’s a lot you need to learn before you can start charging and paying them. For example:

  • Is your company located in a destination-based or origin-based state where taxes are concerned (do you charge sales tax based on where your customers are or where you are)?
  • Certain types of items and services are exempt from sales tax. Are yours?
  • What local taxes (city, county, etc.) must you collect, if any?
  • How often must you submit what you owe, and to what agency?

If you don’t know your state’s rules, search for your Department of Revenue (sometimes called the Department of Taxation) on Google. Or talk to us about this whole complicated process. You can’t begin to work with sales taxes in QuickBooks until you know the answers to many questions.

First Steps

Once you know what your state’s rules are, you can start setting up the sales taxes you’re required to collect and pay. Open the Edit menu and select Preferences. Click on Sales Tax, then Company Preferences. Make sure the Yes button is highlighted next to Do you charge sales tax?, then click on Add sales tax item. You’ll see this window:

In states where it’s required, you may have to at least set up a state sales tax item in QuickBooks. You may also be responsible for local (city, county, etc.) taxes.

TYPE should already be set to Sales Tax Item. Enter a name for your tax in the Sales Tax Name field; the Description should automatically appear as Sales Tax. Type in the Tax Rate (%) and the name of the Tax Agency that will collect it (select <Add New> if it’s not there already). Click OK to return to Company Preferences and continue to define additional tax rates. If there is a sales tax item you use frequently, you can select it from the Your most common sales tax item field.

Tip: Each sales tax rate is considered an Item in QuickBooks. When you have to edit or delete one, open the Lists menu and select Item List. Type sales tax in the Look for box, then Search. Right-click on your target and select your desired action from the local menu that appears.

Sales Tax Groups

When you want to combine multiple sales taxes as one item (state, county, etc.), click Add sales tax item again in Company Preferences and choose Sales Tax Group. Enter a Group Name/Number and Description. In the table below, click the down arrow in the field in the TAX ITEM column. Keep selecting individual tax rates until you’re finished, then click OK. When you use one of these groups in a transaction, the customer will only see the total tax, but reports will break them down into their individual parts.

Completing Your Preferences

The bottom half of the Company Preferences screen needs more information.

It’s important that all the entries at the bottom of the Company Preferences screen are correct before you start working with sales taxes in QuickBooks.

The first two items here are simply field labels that will appear in transactions to indicate whether or not a line item should be taxed. You should leave them as is; they’re automatically created by QuickBooks. If you want to Identify taxable amounts as “T” for Taxable when printing, click in that box to make a checkmark.

Is your QuickBooks company file set up on a cash or accrual basis? Click on the button in front of the correct choice. WHEN DO YOU PAY SALES TAX is a question that will be answered as you’re learning about your state’s sales tax requirements. When you’ve completed this section, click OK.

Assigning Tax Codes

As you create item and service records in QuickBooks, you’ll be asked to indicate whether or not they’re taxable. The Tax Code field appears at the bottom of the window, like in the image below.

You’ll need to designate every item or service you sell as taxable or non-taxable.

There’s much more you need to know about collecting and submitting sales taxes, like how to work with transactions and reports. We’ll cover those topics next month. In the meantime, let us know if we can help you set up your QuickBooks company file for this complex task.

5 Things You Should Know About the Chart of Accounts in QuickBooks Online

QuickBooks Online doesn’t require deep knowledge of accounting principles. Still, there are concepts you should understand.

You probably didn’t expect you’d have to become an accounting expert when you started your business. You knew you’d have to deal with recording income and expenses – maybe track your inventory and process a payroll. But you may not have understood just how complex financial bookkeeping could be.

That’s why you decided to use QuickBooks Online, or are at least considering it. The service is an expert on accounting, and it simplifies the process. It knows exactly how you have to document transactions to stay compliant with the rules that accountants and other businesses follow. This is good practice, and it’s absolutely necessary if, for example, you ever have to apply for financing.

One of the features of accounting systems you should understand is the Chart of Accounts. You won’t have to alter it in any way—in fact, we strongly advise against it—but you’ll encounter it when you work with transactions. Here are five things you should know about it.

What is it?

These three columns from QuickBooks Online’s Chart of Accounts display account Names, Types, and Detail Types.

QuickBooks Online’s Chart of Accounts is a list of financial categories that are used to classify your company’s transactions when you record them. If you were doing your accounting manually, you would have to create your own Chart of Accounts. But QuickBooks Online builds one for you based on the company type and industry you choose when you’re setting up the site.

Why is the Chart of Accounts important?

Some people refer to the Chart of Accounts as the “backbone” of your company file. All transactions flow to it. Its primary importance can be summed up in one word: reports. Your reports will not be accurate if your Chart of Accounts is poorly constructed or if you categorize transactions incorrectly. This becomes as issue when you want to:

  • Prepare taxes. Your income tax return will not reflect your reportable income and deductible expenses if transactions are not assigned to the right classifications.
  • Apply for financing, take on an investor, sell your company, etc.
  • Monitor your finances. You won’t get a true picture of your income and expenses, which makes it difficult to analyze your company’s fiscal health and plan for the future.

What’s in the Chart of Accounts?

There are two types of accounts. One contains information that’s used in the Balance Sheet report. These accounts will have a number in the QuickBooks Balance column that’s based on all transactions up to the current date. They include Assets (bank accounts, accounts receivable, inventory, etc.), Liabilities (unpaid bills, credit cards, payroll and sales taxes, loans, etc.), and Equity.

The remainder of the accounts are used in the Profit and Loss report, otherwise known as the Income Statement. They’re divided into Income (sales, discounts given, etc.), Cost of Goods Sold (labor, shipping, materials and supplies, etc.), Expenses (advertising, insurance, payroll, etc.), Other Income, and Other Expense. You won’t see a number in the QuickBooks Balance column for these accounts because the Profit and Loss report changes based on the date range selected.

Should I ever make any modifications to my Chart of Accounts?

You can set up bank and credit card accounts in QuickBooks Online’s Chart of Accounts.

As we stated earlier, we strongly recommend that you never modify your Chart of Accounts without consulting us. However, there are two exceptions to this. You’ll want to create entries for your bank and credit card accounts. To do this, first open the Chart of Accounts by clicking the gear icon in the upper right and selecting Chart of Accounts under Your Company. When it opens, click New in the upper right corner. Choose Bank or Credit Card and fill in the blanks.

Do I need to use account numbers in the Chart of Accounts?

Generally, the smaller the business, the less need there is for this. If your business is big enough that you have dedicated A/P and A/R individuals, you may want to post transactions to account numbers.

Understanding Reports

QuickBooks Online makes it possible for you to view the Chart of Accounts and those two critical reports, Balance Sheet and Profit & Loss. Customizing and analyzing them, though, is something you should do under professional supervision. We’re happy to help here and in other advanced areas of the site. Contact us for a consultation.

Do You Need to Bundle Products in QuickBooks®? Create Assemblies

If you frequently sell multiple inventory items grouped together, you need to learn about QuickBooks’ assemblies.

Let’s say you run a home improvement retail outlet, and one of the things you sell is doors. You might sell their parts—door frames, hinges, doorknobs, etc.—individually, in case a customer needs to replace a piece. You may also want to sell all of the individual components as a kit and give your buyer a price break for purchasing them all together.

QuickBooks calls these assemblies; sometimes they’re referred to as kits. Just as you’d create an individual inventory part, you can group related parts together and create an item that you would sell as a package.

A couple of caveats here. You can only build assemblies in QuickBooks Premier and above. If you need this feature and are using QuickBooks Pro, talk to us about upgrading. Second, we know that not all of you are using the latest versions of the software. We’ll use QuickBooks Premier 2018 in the examples here.

Under the Hood

Before you can start working with assemblies, check your QuickBooks settings to make sure they’re correct. Open the Edit menu and select Preferences, then Items & Inventory | Company Preferences. Click in the box in front of Inventory and purchase orders are active in it’s not already checked. If you want QuickBooks to deduct the quantity of items that have already been entered on sales orders, check that box (we recommend this, so you’re not selling items that have already been promised). Then make sure the button in front of When the quantity I want to sell exceeds Quantity Available is filled in, for the same reason.

Before you start building assemblies, you’ll need to make sure your Company Preferences are marked accordingly.

Creating an Assembly Item

Open the Lists menu and select Item List. Open the drop-down list under Item in the lower left corner and click New. In the window that opens, click the down arrow under Type and select Inventory Assembly. Enter an Item Name/Number in the corresponding field in the window that opens. Don’t check the Subitem of or the I purchase this assembly item from a vendor boxes, and ignore Unit Of Measure.

Again, depending on the version of QuickBooks you’re using, you may see different fields in the Inventory Information box at the bottom of this window. But there are some standard elements you should find in this window no matter the version. They include:

  • Cost. How much does it cost you to purchase all of the parts for one assembly?
  • Sales Price. What will you charge your customers per kit?
  • COGS Account. “COGS” stands for Cost of Goods Sold. What account in the Chart of Accounts will you use to track the cost of producing your assemblies? Usually, the default one in QuickBooks is fine.
  • Income Account. Which account tracks your sales of this assembly?
  • Bill of Materials (BOM). This appears as a table in QuickBooks; it’s a list of all the individual inventory parts that make up the kit, along with their Cost (to you), QTY (quantity required for each assembly), and the total BOM Cost.

Your Bill of Materials Cost is the total of all inventory items required to create an assembly.

The Inventory Information box at the bottom of this window might contain fields for information like the Asset Account, quantity On Hand, and the number of items on purchase orders and sales orders. Once your inventory assembly is saved, it will appear in your Item List.

When you need to actually create kits, you’ll open the Vendors menu and select Inventory Activities, then Build Assemblies. You’ll select the Assembly Item from the drop-down list in the upper left corner, which will open a list of the components needed and their quantity on hand. You’d enter the number of kits you want (the maximum possible appears below the table) and then click one of the Build buttons. The next time you look at the kit in your Item List, you’ll see that its quantity has increased.

The concept of assemblies is easy to understand, but if you haven’t worked with accounts and inventory much, you may find creating kits in QuickBooks to be a bit of a challenge. Inventory levels can be a real problem if they get out of whack, and accounts must be assigned correctly to avoid inaccuracies in reports and taxes. We’d be happy to work with you as you get started with this task.

How to Use Progress Invoicing in QuickBooks® Online

Does your business do work for clients over weeks or months? Consider using QuickBooks® Online’s progress invoicing.

Let’s say you’re doing a job or project for a customer that is going to take a long time, but you don’t want to wait until you’re finished to get paid. Or you’ve agreed to let a customer pay for something in multiple payments. QuickBooks can help. You can create an estimate upfront for the work or products and send a series of invoices at different intervals until the bill is paid off. This is called progress invoicing.

Before you can use this tool, you’ll need to make sure it’s turned on. Click the gear icon in the upper right and select Account and Settings. Click the Sales tab. Look for Progress Invoicing in the left column. If that option isn’t On, click the pencil icon in the far-right column and click in the box to create a checkmark and Save it. Then click Done in the lower right corner.

Creating a Template

You’ll need to use a special template for progress invoicing. Click the gear icon again and select Custom Form Styles. In the upper right corner of the screen that opens, click the arrow next to New Style and select Invoice to open the design window. Replace the template name with a descriptive one and click Airy Classic to select it.

You’ll need to select the Airy Classic template and give it a descriptive name.

There are other options on this page – lots of them. You can add a logo, change fonts and colors, and even modify the content on the invoice. Talk to us if you want to explore the possibilities.

Your progress invoice needs you to adjust a couple other things here. Click on Edit print settings. If there is a check in front of Fit printed form with pay stub in window envelope, uncheck it. Next, click the Content tab, then click the small pencil icon in the second section of the invoice sample over on the right. At the bottom of the left pane, click Show more activity options.Check the box in front of Show progress on line items if you want your progress invoice to display item details. When you’ve made all the changes you want to, click Done.

Estimate to Invoice

QuickBooks can create both invoices and estimates. They’re very similar, and you’ll complete them in the same way, with one obvious exception: In addition to an Estimate date, you can also specify an Expiration date. Click the + sign in the upper right, select Estimate, and fill out the form. Save and close when you’re done.

When your customer has accepted the estimate and you’ve agreed on a payment schedule, you’ll need to know how to create a progress invoice. Click Sales in the navigation bar on the left, then All Sales. Locate your estimate on the list and click Create invoice at the end of the row. This window opens:

You have three options when the time comes to start your progress invoicing.

You’ll choose Remaining total of all lines when you’re ready to send your final invoice. For your first, you can either enter a percentage of each line item or a custom amount for each. If you choose a percentage, QuickBooks will calculate what that number would be and enter it. You’ll be able to specify your custom amounts when the progress invoice actually opens. Click Create invoice.

The invoice that opens will contain the information you provided on the estimate. You’ll notice a new column here, though, labeled Due. Your calculated percentage will appear there if you chose that option. If you indicated that you wanted to enter a custom amount for each line, that field will say $0.00 of [total]. Go down that column and type in the amount you expect to be paid on each line item. When you’ve finished, Save the invoice and send it to your customer. Now it appears in the invoice list, where you can send reminders, receive payment, etc.

You can send as many progress invoices as you’d like until you can finally bill your customer for the Remaining total of all lines. QuickBooks provides a report so you can see the progress of all of your progress invoices at once. Click Reports and scroll down to Sales and customers to run Estimates & Progress Invoicing Summary by Customer.

Progress invoicing is a simple concept, but it requires many steps, as you’ve seen here. And there are other ways to go about it in QuickBooks. We strongly suggest that you let us help you with this task to make sure your invoices are set up correctly – and that you’re paid in full.

Could Your Sales Invoices Be Better? How QuickBooks Online Can Help.

Every interaction with your customers can enhance your image. Here’s how QuickBooks Online contributes to that.

Getting paid by your customers—on time, and in full—can take some effort on your part. You set smart due dates and enforce them. Price your products and services so they’re both reasonable and profitable. Accept online payments.

But are your invoices working for you here? QuickBooks Online provides sales form templates that you can usually use without modifying. But it also offers tools that support multiple kinds of customization. It helps you shape the content and appearance of your invoices and their accompanying messages to be consistent with your company’s brand.

These may be cosmetic changes, but they can affect the way customers react to communications from you. You have few chances to make an impression, so anything you can do to enhance and personalize every interaction will have impact on their impression of you. Neat, well-designed sales forms convey professionalism and attention to details.

Here’s a look at what you can do.

Editing Fields

Unless you use every single field in QuickBooks Online’s default sales form template, your invoices will look sloppier than they might otherwise. The site gives you control over much of the content that your customers will see. To make changes, click the gear icon in the upper right of the screen and select Account and Settings, then Sales. You’ll see Sales form content in the left column. Click on any of the fields to the right to open a more thorough list of options.

QuickBooks Online lets you turn fields on and off in your sales forms and specify other preferences.

Click on the status (On, Off) in the right column to change it. When you’re satisfied with your selections, click Save. Then close that window by clicking the X in the upper right corner.

You have more options than these. Click the gear icon again, and then Your Company | Custom Form Styles. You’ll see that there is already a “master” form. You can either edit it or create a new one. We recommend leaving the master form alone so you always have a clean copy to consult if you get tangled up while you’re working.

Click the down arrow in the New style box in the upper right and select Invoice. In the screen that opens, enter a descriptive name for your template in the field at the top and then click Content. A graphical representation of your invoice will appear in the right pane, grayed out. It’s divided into three sections: header, footer, and table (the middle of the invoice where you describe what you sold). Each displays a small pencil icon on the right side of the screen. Click the one in the middle to make that area more visible.

It’s easy to specify which fields should appear on your invoices, what the labels should say, and how wide the space should be.

As you check and uncheck boxes to indicate what content should be included, your invoice on the right will change to reflect your actions. You can Preview PDF by clicking that button in the lower right. When you’re satisfied with the changes you’ve made to all three sections, click on the Design tab.

Changing the Look

You don’t have to be a graphic artist to have QuickBooks Online forms that look attractive and consistent, which highlight your brand. The site provides tools that give you control over the appearance of your invoices, not just their content. Click each link below the Design tab to:

  • Choose a template.
  • Add your company’s logo.
  • Select a color scheme and fonts.
  • Change the printer settings to accommodate letterhead, for example.

 Choosing Your Words

You have control over the messages that go out with your invoices.

Finally, click the Emails tab. Options here let you customize the emails that are sent to customers along with their invoices. Again, changes you make in the left pane will be reflected in the graphical version on the right side.

When you’ve completed all of your modifications, click Done.

We gave you this whirlwind tour of QuickBooks Online’s invoice customization options so you’d know what was possible. We expect you might need some assistance when you sit down to apply the concepts you’ve learned about to your own company’s sales forms. We’re available to help you present a polished, carefully-crafted image representing your brand to your customers.

How Does QuickBooks® Online Handle Mobile Expenses?

If you purchase several items and services away from the office, QuickBooks Online can help you record them while you’re out and about.

QuickBooks Online’s mobile app, available at the Apple App Store and Google Play, can do many of the same tasks that it performs on your office desktop. You can, for example:

  • Check account balances.
  • Add and edit estimates, invoices, and sales receipts.
  • Add and edit customers, vendors, products, and services.
  • Record invoice payments.

One of the most common uses of the app, though, is the recording of expenses. Rather than coming home from a trip with your briefcase stuffed full of receipts and notes about purchases you made, you can document them on the road using your mobile device. When you get back to the office and log on to QuickBooks Online, they’ll all be there.

How It Work

Picture

You can snap a photo of a receipt with your smartphone and attach it to an expense you record in QuickBooks Online’s mobile app.
Open your QuickBooks Online mobile app and click the plus (+) sign at the bottom, then tap the Expense icon. The New Expense screen will open.  If you have a paper receipt, lay it flat on a table in a well-lighted area. Click the camera icon and then the Take Photo link. If you took the picture outside of QuickBooks Online for some reason, you’d select the Choose Existing link. Your device’s camera will open, and you’ll see four squared corners on the edges of the screen.

Hover your device over the receipt. You’ll need to position the camera so the receipt area that you want captured appears within the four corners. QuickBooks Online will provide advice along the way to help you do this. When you’re in the right place, you’ll see the phrase, Great! Snap the pic. Click the shutter icon below, and your device will snap the photo and display it. If you want to use it, click Use this photo (if you want to try again, click the X in the upper left of the screen).

QuickBooks Online will open the New Expense screen. You’ll see a miniature version of your receipt in the upper left corner. Looking at your original version—it will be too small to see here—fill in the blanks with the data from the purchase. Be sure to click the Billable button if you can bill someone else for it. Make any notes you’ll need in order to remind yourself of the transaction, and Add a Split if you need to divide the transaction between categories, customers or vendors, or billable status. Click Save when you’re done.

Automatic Synchronization

Picture

Once you’ve entered an expense in QuickBooks Online’s mobile app, it will be synchronized with your desktop, browser-based version.
Of course, no duplicate data entry is required once you’ve entered a receipt in the QuickBooks Online mobile app – the two versions always update each other.

Once you’re back at your desktop, on the browser-based version of QuickBooks Online, click Expenses in the toolbar to open the Expense Transactions screen. You should see the transaction you just created on your mobile device first in line on the list that displays. Click View/Edit at the end of that line to see it. Look toward the bottom under Item Details to see the link to an attachment that contains the photo you snapped of the receipt.

Picture

The record of the expense you entered on your mobile device will contain a link to an attachment that contains the photo of your receipt.
Of course, you don’t have to take a picture of your receipt with your mobile device. You can simply enter the details of your expense and Save the record.

​QuickBooks Online’s mobile app can help you save time and improve the accuracy of your work done away from the office. As we mentioned earlier, the app is capable of doing much more than simply recording receipts. We’d be happy to run you through its pieces to make sure your remote accounting work is done correctly.

How Do You Track Jobs in QuickBooks®?Part 1

If your business divides some of its work into specific jobs and you’re not tracking them individually, you’re missing out on valuable insight.
 
Job-costing is not just for contractors. That’s probably the most common understanding of this concept in QuickBooks, but you can also use the software’s jobs tools to track income and expenses for any related group of items and/or services.
 
Think of them as projects. If you’re an expert in business promotions, for example, you probably have multiple projects going on simultaneously that consist of materials you might need to order for your client (like special paper) and the actual work you do (design, content-creation, etc.). You could also have to track expenses like mileage, and you may price your services by the hour.
 
QuickBooks can handle all of this. If you’re conscientious about documenting all of the pieces that go into every job, you’ll be able to run reports that show you how much you spent and took in on each. This information can help you better price your services and manage your time to maximize profitability.
 
Many Elements                                            
 
In this first part of a two-column series, we’re going to explore the basic elements that go into job-tracking. Keep in mind that there are many different ways to work with jobs. How you choose to do it will depend on the structure of your business. We can help you devise a plan.
 
We’ll look at a simple example here. The first step involves setting up a job for an existing client. Even if you think you’re only going to be doing one project for them, you can still set it up as a job so you can assign all related income and expenses to it. This will make it much easier if you get additional work from the customer down the line – and if you have to bill the customer for something that’s not related to a specific project.
 
To create a job, open the Customers menu and select Customer Center. Make sure the Customers & Jobs tab is highlighted. Select the customer by clicking on it. Right-click the name and select Add Job from the drop-down list. When the New Job window opens, click the Job Info tab.
Picture

You can track your Jobs by keeping their status current in the New Job window.

Fill in the Job Name field. In this example, we’ve selected a name that’s broad enough that we’ll eventually be able to break down into specific tasks. If your customer has an outstanding balance as of the current date, that amount will appear in the Opening Balance field.
 
Enter a Job Description. The Job Type field is optional, but creating these classifications can help with advanced reports that gauge profitability. Consult with us if you want to explore these.
 
Open the Job Status list and select the correct one, then choose a Start Date and Projected End Date. You’ll document the End Date when you’re finished. Click OK.
 
Creating Item Records
 
You may already know that if you buy and/or sell products and/or services, you have to set up individual records for each one so you can include them on sales and purchase forms. You’ll need these to record income and expenses related to your Promotion job. If you’re new to QuickBooks, here’s how it works.
 
Open the Lists menu and select Item List. In the window that opens, click the arrow next to Item in the lower left corner and select New. A window like this will open:
Picture

The New Item window

​The Item Type list will drop down. Select Service. In the example above, you’re creating a record for a service you sell: Website Development. Enter that in the Item Name/Number field. Ignore the U/M Set field; this is not available in QuickBooks Pro or Premier.
 
Enter a Description and your hourly (or project) Rate. Choose the correct Tax Code status and select the Account. When you’re done, click OK.
 
Warning: You may not have an Account in your Chart of Accounts that fits the specialized income and expenses you want to track. Let us help you set one up.
 
You’ll repeat this process for other types of promotional work you do (making flyers and brochures, designing and ordering branded products, general content creation, etc.).
 
Think It Through First
 
Before you create your first job, spend time envisioning how you want it structured. Remember that every invoice or timed activity or other income or expense you enter will only be assigned to one Customer:Job, but you can include as many Items as you want. As we said, we’re happy to help you think this through and go through setup with you.
 
Next month, we’ll demonstrate how the records you’ve created can be used.

Resolve to Do These 3 Things in QuickBooks Online This Month

‘Tis the season for making resolutions and setting goals. Try exploring these three areas to dig deeper into QuickBooks Online.
By now, many New Year’s resolutions have already been made – and broken. Though they’re usually created with the best of intentions, they’re often just too ambitious to be realistic.
For example, you might decide to learn more about QuickBooks Online and keep up with your accounting chores more conscientiously in 2019. That’s hard to quantify. How will you know if you achieved that goal?
Instead, why not pick three (or more) specific areas and focus on them this month? We’ll get the ball rolling for you by making some suggestions.
Explore the QuickBooks Online mobile app:
Yes, QuickBooks Online itself is already mobile; you can access it from any computer that has an internet connection and browser. But you probably don’t always lug a laptop around when you’re away from the office, and you’re sometimes at locations where using it wouldn’t be practical. But you can always pull out your smartphone and fire up the QuickBooks online app, available for both iOS and Android.
QuickBooks Online APP

No matter how small your smartphone (this image was captured on an iPhone SE), you can still do your accounting tasks using QuickBooks Online’s app.

​QuickBooks Online’s app replicates a surprising percentage of the features found on the browser-based version. You can create, view, and edit invoices, estimates, and sales receipts for example, as well as see abbreviated customer and vendor records. Your product and service records are available there, including tools for recording expenses on the road.
Create a budget for one month:
Budgets are intimidating. That’s one reason why some small businesses don’t create them. So instead of trying to estimate what your income and expenses will be for an entire fiscal year, just build a budget for one month. In QuickBooks Online, you’d click the gear icon in the upper right, then select Budgeting. Click Add budget in the upper right to open the New Budget window.
Give it a name, like “February Budget,” and select FY2019. Leave the Interval at Monthly, and open the Pre-fill data? menu to click on Actual data – 2018 (if you have data from last year). Then click Create Budget in the lower right corner. Look at last year’s February numbers and estimate how they might change in 2019. Replace the old numbers with your new ones.
Picture QuickBooks Online

Creating a framework for a budget in QuickBooks Online is easy.

​We’re suggesting you try it for just one month, so you get a feel for how this tool works. And that experiment will probably leave you with some questions. We can help you go further and complete an annual budget.
Customize your sales forms:
Every piece of paper and email you send to your customers contributes to their impression of you. Are you presenting an attractive, consistent image of your business to them? QuickBooks Online can help with this. It offers simple (for the most part) tools that allow you to modify the boilerplate forms offered on the site – without being an experienced graphic designer.
Start by clicking on the gear icon in the upper right and selecting Your Company | Custom Form Styles. Unless you’ve done some work in this area before, the screen that opens will have just one listed entry: your Master form, the one that comes standard in QuickBooks Online. To see what you can do, click Edit at the end of that line. Your four options are:

  • Design. This section contains links to modifications you can make to your sales forms’ visuals. You can, for example, add a logo or color and change the default fonts.
QuickBooks Online element tools Picture

Want to change your logo or other elements of your sales forms? QuickBooks Online has the tools.

  • Content. Do you want to add or remove the standard columns (Date, Quantity, etc.) displayed on your invoices? You can do so by checking and unchecking boxes.
  • Emails. QuickBooks Online sends email messages with forms; you can edit them here.
  • Payments. This is a reminder that QuickBooks Online supports online payments, which can help you get paid faster.

There’s more you can do to make your sales forms look professional and polished. We can help you with these tools – and any others you want to explore to expand your use of QuickBooks Online. It’s a new year, and who knows what might come your way over the next 12 months? Contact us if you want to prepare for the new accounting challenges that 2019 might present.

How to Apply Finance Charges in QuickBooks®

You may hate to have to do it but assessing finance charges for late payments may improve your overall cash flow.
There is a myriad of ways to bring in customer payments faster and improve your cash flow. You can:

  • Get a merchant account and let customers pay you electronically
  • Offer a discount for early payments
  • Shorten the payment due cycle (21 days instead of 30 days, for example)
  • Be more aggressive about collections

QuickBooks can help you take all of these steps. It also offers a fifth option: assess finance charges for tardy remittances.
Maybe you don’t want to do this because it seems like a less-than-friendly way to treat customers – especially valued ones. But you’re not in the business of lending money, which is what you’re doing when you continue to let your accounts receivable slide. So, here’s how to do add finance charges to your payment policies.
Multiple Issues Involved
Before you can start adding finance charges to tardy payments, you’ll need to let QuickBooks know how you want them handled. Open the Edit menu and select Preferences. Click the Finance Charge tab in the left vertical pane, then the Company Preferences tab in the window that opens. You’ll see something like this:

Picture

You’ll need to decide on your QuickBooks Finance Charge settings before you can begin to apply these late fees.

hat Annual Interest Rate will you charge? Will there be a Minimum Finance Charge? Do you want to offer a Grace Period? If you’ve never worked with finance charges before, you might be at a loss as to how you should answer these questions. We can talk it through with you if you’d like, and make sure you’re selecting the correct Finance Charge Account. In our example, QuickBooks defaulted to 70100 – Other Income, which may be the best option for you.
The next question may require some research. Some jurisdictions don’t allow you to Assess finance charges on overdue finance charges; you’ll need to find out. If there’s any doubt, make sure that the box in front of that option isn’t checked.
QuickBooks also needs to know on what date it should start calculating finance charges: on the due date or invoice/billed date. Finally, check the box in front of Mark finance charge invoices “To be printed.” QuickBooks doesn’t include finance charges on invoices themselves; it bills them on separate invoices. Check this box if you want the software to print all of them as a batch.
When you’re done here, click OK.
Applying the Charges
Picture

By selecting an Assessment Date, you’re telling QuickBooks how many late days should be included in its finance charge calculations.

​When you’re ready, open the Customers menu and select Assess Finance Charges. A window like the one in the image above will open.
QuickBooks, of course, performs all of the required calculations in the background. But it must first know what specific date you plan to actually assess the charges so that it can determine the number of late days that should be included. This may not be the current date, so be sure the Assessment Date is correct before proceeding.
All you have to do here is make sure there’s a check mark in front of every finance charge that should be invoiced (they’ll probably already be there, but you should verify this). If you send statements, clear the box in front of Mark Invoices “To be printed.” The finance charges will appear on the next statement.
When you’re satisfied, click Assess Charges.
Dispatching the Charges
Your finance charges have now been recorded in QuickBooks as individual invoices. When it’s time to print, open the File menu and select Print Forms | Invoices. You’ll see your numbered finance charge invoices displayed like this:
Picture

You can see your finance charge invoices when you go to print them.

​(Of course, if you email invoices, you’d click on File | Send Forms.)
It’s a good idea to notify your customers before you start assessing finance charges. This will give them a chance to catch up, and no one will be surprised to see the extra invoices.
QuickBooks does the hefty lifting as far as calculations are concerned, but it’s very important that you set your finance charges up correctly. Customers will be annoyed by mistakes. And it’s much easier for us to help you get this tool set up right from the start than to have to go in and untangle errors. Let us know if you plan to start assessing finance charges, and we’ll help make it work for you.