5 QuickBooks Online Tasks You Should Do Before January 1

It’s probably your busiest month of the year. But there are things you can do to make your return from the holidays less stressful.

December always goes by so quickly. Seems like you’ve just finished Thanksgiving dinner and it’s time to ring in the New Year. You could probably spend the entire month on your personal obligations. But it’s also the end of the year, which means your busiest period if you’re a retailer. Even if you’re not, you probably have sales goals to try to meet. And you may have employee issues that need to be addressed before the calendar turns over.

On top of all of this, you should be closing out your books for the current year (as much as you can) in preparation for the new one. If you’ve been using QuickBooks Online conscientiously all year, your job will be a lot easier. But you’ll still need to carve out some time for year-end tasks.

We don’t expect that you’ll necessarily be able to wrap absolutely everything up by New Year’s Eve. You may be waiting for your customers and employees to do their part. But here are five things you can do amidst all of your other personal and professional plans that will help you get a jump on January.

Analyze your 2022 sales.

You won’t have your final numbers until the year is over, but you can get a good start in December. There are several QuickBooks Online reports that can give you a clear, understandable look at your 2022 sales. Click Reports in the toolbar and scroll down to Sales and customers. You can run reports that will tell you what your sales were by Class, Customer, Customer Type, and Product/Service, in summary or detail. The reports are customizable, so you can specify date ranges and group the results by, for example, Transaction Type, Customer, and Account.

You can customize and run QuickBooks Online’s Sales reports.

Warning: If you’re not clear about whether you should run reports in Cash or Accrual mode, let us help you with this. The distinction is important.

Know What You Owe

If money is tight at the end of the year, this will be a challenge. But you don’t want to come back from the holidays to a lot of past-due notices. To see what still needs to be paid, click Reports again and scroll down to What you owe. If you want the straight scoop right away, run Unpaid Bills. For a more detailed look, create the Accounts payable aging detail report. This groups your outstanding payables by days past due.

Know Who Still Owes You Money

This is a question that’s probably on your mind all year, but it’s especially important as the year winds down. It may be difficult to get delinquent customers to pay up in December, but you should at least know where you stand with them. Click the Reports tab again and scroll down Who owes you. Generate two reports there: Accounts receivable aging detail and Open Invoices

You might also want to spend an hour coming up with some strategies that would encourage customers to pay faster. If you’re at a loss about this, we could sit down together and come up with a plan.

Create statements for past-due customers

Customer statements are something like reports. They display sales transactions within a given period. Statements can serve two purposes. Sometimes, customers just want a list of their invoices and payments for their records. You can also use statements as a reminder to customers who are past due on their accounts.  Click New in the upper left corner, and then click Statement under Other.  There are three types, but you’d be most likely to create and send two of them:

  • Open Item. Displays all open, unpaid invoices for the last 365 days. 
  • Transaction Statement. Lists all transactions for the selected date range.

You can send statements to customers to remind them of overdue payments or just to provide a record of transactions for a given period.

Clean up your customers and vendor lists

If you only have a few of each, your list is probably current. But if you’ve been adding customers or vendors for years without ever editing the list, you’re probably spending too much time scrolling. You don’t have to delete them. You can just make them inactive. Click Sales in the toolbar, then Customers. If you know a customer has no open activity and you want to hide them, click in the box in front of the company or customer’s name. Repeat this for as many as you want, then click Batch actions in the upper left, then Make inactive.

A Busy Month

Don’t worry if you don’t get to all of these by the end of the year. But do add them to your January task list if you don’t. You might also consider having us run the standard financial reports that are available in QuickBooks Online Reports, under For my accountant. You can create reports like Trial Balance yourself, but they can be hard to analyze accurately. We’d be happy to set up a time after the first of the year to go over these after all of your 2022 transactions are in.

How to Give Your QuickBooks Online Forms a New Look

Your sales forms are a part of your company’s identity. Make them professional, personalized, and polished.

Your first impression of a business probably comes from a website or a mailing or an advertisement. The second might be from an invoice or sales receipt. What does it say about that company if its printed or digital sales forms are poorly designed or hard to read or just plain unattractive?

Customers form opinions about you not only from the quality of your products or services, but also by the professionalism and aesthetics of your written communications. Putting some effort into making them look good isn’t superficial. It’s an important part of your branding.

QuickBooks Online provides the tools you need to make your sales forms appealing, understandable, and consistent. They enhance your image and have impact on your customers’ overall impression of your business. Here’s how you can make them a part of your identity.

Where Do You Start?

QuickBooks Online comes with a default invoice form to get you started. You can either edit this one or create a new one. You can also make your own estimates and sales receipts. 

Click the gear icon in the upper right corner and select Custom form styles under Your Company. You’ll see the default invoice labeled Standard. We’ll leave that one as is and create a new one so there’s always a clean version. Click the down arrow next to New style in the upper right and select Invoice. You’ll see a copy of the default invoice, like this:

Table

Description automatically generated

This is QuickBooks Online’s default invoice template. You can make a copy of it and modify it for your own company.

You’ll see your modification options in the left pane of this screen. Your choices are divided into three different sections. Before you start working with them, enter a name for your new template in the field at the top. QuickBooks Online will have suggested a name, but you can change it to something descriptive that you’ll remember, like My Modified Invoice 1022

Changing the Form’s Look

The first tab, Design, should be highlighted. From here, you can:

  • Change up the template. Choose from one of the six options that QuickBooks Online offers.
  • Add a logo. Browse your system files to find your logo.
  • Splash on some color. Select a color palette from the ones offered.
  • Get choosy with your font. Select a new font type and size.
  • Edit print settings. Change the margins and other print options.

Editing the Content

When you’re done there, click the Content tab. You’ll notice that your invoice, which appears in the right pane, is grayed out. There are three pencil icons on the right side of the form. Click the one in the upper right corner, next to the invoice number. The top third of the form becomes active, and the content in the left pane changes to match the fields on the right. As you make changes in the left pane, like checking a box to add a phone number, the actual sample invoice changes to reflect that.

Graphical user interface, text, application

Description automatically generated

When you add, edit, or delete content in the left vertical pane…

Text

Description automatically generated

…the changes are reflected in the sample invoice in the right pane. Your company information will appear like this across all of your sales forms.

As you click on the other two pencil icons in the sample invoice, the left pane displays your options for those content areas. You have control over all of the content on your forms. It’s even possible to add your own custom fields. Let us know if you want to do so and we’ll show you how.

Readying Customer Emails 

The third tab on the customization screen, labeled Emails, shows you what your form will look like when you email it to your customer. Again, your working area is in the left pane, with the finished result appearing on the right. You have multiple options here, including text for the subject line, greeting, and message. You can also edit the text for reminder emails. 

When you’re done customizing, you can preview the PDF that will be attached to your customer emails. Then click Done. Your new invoice will appear on the Custom form styles page. Whenever you want to modify an existing sales form, click Edit at the end of its row. You can also make any form the default by opening the Edit menu and clicking Make default

Making your sales forms the best that they can be doesn’t really take that long. And it will demonstrate to your customers that you care not only about the quality of your products and/or services, but also about your communications with them. If we can be of any help as you work with forms modification in QuickBooks Online, please let us know. We’ll be happy to walk you through the process.

How QuickBooks Online Tracks Products and Services, Part 2

Last month, we created records for products and services. Now, we’ll talk about where they’re used in QuickBooks Online.

If you’ll recall, we went over two product-related concepts in QuickBooks Online in last month’s column. We first discussed getting the site ready for creating and using product and service records. You click the gear icon in the upper right and select Account and Settings, then click the Sales tab to indicate your preferences.

To create a product or service record, you hover your mouse over Sales in the left vertical pane on the main page and click Products and services. Click New in the upper right corner and open a blank record for an Inventory or Non-inventory part, a Service, or a Bundle (assembly). Once you complete a record and save it, it will appear in the list back on the Product and services page.

Working with Products and Services

That’s where we’ll start today, on the Products and services screen. This is a comprehensive table, a dashboard (or home page) for your products and services. It displays real-time information about your items’ pricing and inventory levels, as well as their type and tax status. At the top of the page, you’ll see big, colorful buttons that provide a total of the number of items that are low on stock or out of stock. When you click on one, a list of those products appears.

Application

Description automatically generated with low confidence

QuickBooks Online’s Products and services page displays inventory levels and warns you when your stock is low and at zero.

Each row on this screen contains details about the item listed there, like Description, Sales Price and Cost, and Qty On Hand. If you look down at the end of the row, you’ll see options for several types of Actions: Edit, Make inactive, Run report, and Duplicate. Click the gear icon above the table to modify the columns in the table. 

The More menu at the top of the screen contains more options: Manage categories, Run reports, and Price rules. If you want to know what actions you can take on multiple items simultaneously, check the box in front of each and click the Batch actions menu, over to the right (Adjust quantity, Reorder, etc.).

Warning: Be very careful using the Adjust quantity option. There are legitimate reasons for employing it, but you need to make very sure that you understand how this will affect other areas of your accounting. Please ask us if you’re unsure.

Using Products and Services in Transactions

Once you start using product and service records in transactions, you’ll see why we suggested that you create those early on and make them as comprehensives as possible. While you can add products and services in the process of creating an invoice, for example, it’s much easier if you have them ready to go.

Let’s look at a sales receipt to see how this works. Click +New in the upper right corner and select Sales receipt. Select a Customer in the first field and verify that the related fields on the form were filled out correctly. Check and make any changes necessary in the Sales receipt date, Payment method, and Deposit to fields. 

Graphical user interface, application

Description automatically generated

Once you’ve built up a list of products and services, they’ll be available when you create transactions.

Enter the Service Date, and then click the down arrow in the field under Product/Service. The top of the list has an entry labeled +Add new. Click it if you need to add a product or service on the fly, or just select the existing one that you want. QuickBooks Online will fill in the Rate, Amount, and Tax (status). You only have to enter the Qty (quantity) that you’re selling. 

If you have more items or services to add, you can do so on the next line(s). When you’re done, check the numbers in the lower right and save the transaction. QuickBooks Online will adjust your inventory to account for any items you just sold. You can see this change by going back to the Products and Services screen. Or you can run reports, including:

  • Sales by Product/Service
  • Product/Service List
  • Inventory Valuation Detail
  • Physical Inventory Worksheet

Supply Chain Woes?

It seems that the serious supply chain problems we were experiencing in previous months have eased up some, but you may still be having trouble stocking some items. We hope this isn’t affecting you too much. 

QuickBooks Online, though, can help ensure that you know ahead of time when you must reorder. Its inventory-tracking capabilities can also alert you to items that aren’t selling well, so you don’t get overstocked on anything. And the ability to pull up product and service records when you’re creating transactions saves time and keeps your inventory levels accurate. Please let us know if you need assistance with this element of your accounting – or any of QuickBooks Online’s other tools.

How QuickBooks© Online Helps You Track Mileage

With gas prices so high, you need to track your travel costs as closely as possible. Consider getting a tax deduction for your business mileage.

If you drive even a little for business, it’s easy to let mileage costs slide. After all, it’s a pain to keep track of your tax-deductible mileage in a little notebook and do all the calculations required. If you do rack up a lot of business miles, you probably forget to track some trips and end up losing money.

QuickBooks Online offers a much better way. Its Mileage tools include simple fill-in-the-blank records that allow you to document individual trips. You can either enter the starting point and destination and let the site calculate your mileage and deduction or enter the number of miles yourself.

If you use QuickBooks Online’s mobile app, it can track your miles automatically as you drive (as long as you have the correct settings turned on). Here’s a look at how all of this works.

Setting Up 

To get started, click the Mileage link in QuickBooks Online’s toolbar. The screen that opens will eventually display a table that contains information about your trips, but you need to do a little setup first. Click the down arrow next to Add Trip in the upper right corner and select Manage vehicles. A panel will slide out from the right. Click Add vehicle.

A picture containing text

Description automatically generated

You’ll need to supply information about your vehicles before you can start entering trips.

You’ll need to supply the vehicle’s year, make, and model. Do you own or lease it, and on what date was the vehicle purchased or leased and put into service? Do you want to have your annual mileage calculated by entering odometer readings or have QuickBooks Online track your business miles driven automatically? When you’re done making your selections and entering data, click Save.

Entering Trip Data

You can download trips as CSV files or import them from Mile IQ, but you’re probably more likely to enter them manually. Click Add Trip in the upper right corner. In the pane that opens, you’ll enter the date of the trip and either the total miles or start and end point. You’ll select the business purpose and vehicle and indicate whether it was a round trip. When you’re done, click Save. The trip will appear in the table on the opening screen, and your current possible total deduction will be in the upper left corner, along with your total business miles and total miles.

If you want to designate a trip as personal, click the box in front of the trip in that table. In the black horizontal box that appears, click the icon that looks like a little person, then click Apply. Now, the trip will appear in the Personal column and will not count toward your business tax-deductible mileage. 

Graphical user interface, text, application

Description automatically generated

When you select a trip in the Mileage table, you can mark it as personal so it’s not included in your business tax-deductible miles.

Personal Trips Can Count, Too

If you use your vehicle(s) for personal as well as business purposes, tracking some of those miles can also mean a tax deduction. For tax year 2022, you can deduct 18 cents per mile for your travel to and from medical appointments. Note: Medical mileage is only deductible if medical exceeds a certain percent of AGI. Be sure to check with the IRS yearly tax code, as they update the mileage amounts annually.

And if you do volunteer work for a qualified charitable organization, the miles you drive in service of it can be deducted at the rate of 14 cents per mile. You can also claim the cost of parking and tolls, as long as you weren’t reimbursed for any of these expenses. Obviously, the IRS wants you to keep careful records of your charitable mileage, and QuickBooks Online can provide them.

QuickBooks Online doesn’t track these deductions, but you’ll at least have a record of the miles driven.

Auto-Track Your Miles

The easiest way to track your mileage in QuickBooks Online is by using its mobile app. You can launch this and have it record your mileage automatically as you’re driving. Versions are available for both Android and iOS, and they’re different from each other. They also have more features than the browser-based version of QuickBooks Online, like maps, rules, and easier designation of trips as business or personal.

Graphical user interface, application

Description automatically generated

The iOS version of Mileage in the QuickBooks Online app

In both versions, you’ll need to click the menu in the lower right corner after you’ve opened the QuickBooks Online app and select Mileage. Make sure Auto-Tracking is turned on. Your phone’s location services tool must be turned on, too. There are other settings that vary between the two operating systems. You can search the help system of either app to make sure you get your settings correct if the onscreen instructions aren’t clear enough.

Of course, you won’t see the fruits of your mileage deductions until you file your 2022 taxes. But you can factor these savings in as you’re doing your tax planning during the year. Please let us help if you’re having any trouble with QuickBooks Online’s Mileage tools, or if you have questions with other elements of the site.

With gas prices so high, you need to track your travel costs as closely as possible. Consider getting a tax deduction for your business mileage.

How to Maintain Customer Records in QuickBooks Online

Your customers are your company’s lifeblood. Make sure their records are thorough and up-to-date.

When companies buy other companies, what’s often considered the most critical asset? The customer list. When a business is damaged and data possibly lost, which set of records do they most hope to recover? The customer list.

You probably spend most of your time in QuickBooks Online working with transactions and reports, but your customer records deserve equal time. If they’re incomplete or otherwise not maintained well, you lose time filling in the blanks when you’re trying to complete a task that requires complete customer profiles. Your searches and reports may not tell the whole picture. Your relationships can suffer, and you may miss out on sales opportunities.

QuickBooks Online provides excellent tools for creating and maintaining comprehensive customer and sub-customer records. Here’s a look at how it all works.

Moving Your Customer Data In

There are two ways to create customer records in QuickBooks Online. If you have an existing database in Outlook, Excel, Gmail, or Google Sheets, you can import it. This will save you an enormous amount of time, but it’s a challenging process. You select the file you want to import, and then you have to “map” it by matching the fields in your database to fields in QuickBooks Online. You’ll likely need our help with this.

Graphical user interface, application

Description automatically generated

To import a customer file into QuickBooks Online, you’ll have to “map” its fields. We can help you with this.

Your other option is to enter records manually. This is time-consuming, but the more information you can include about your customers from the start, the better. You can always edit your records to add, delete, or modify what you originally entered.

To get started, hover over Sales in the toolbar and click on Customers. Then click on New Customer in the upper right corner to open the Customer information window. The only field you’re required to complete is Display name as. You may want to do this if you have a new customer on the phone and you want to concentrate on the conversation. You can take notes about their contact information and fill in the record later, when you’re off the phone.

But wherever possible, as we’ve already said, complete as many fields as you can.  You’ll enter name and billing and shipping address and phone number(s) on the opening screen. You can also supply contact details like fax number and website. 

Creating Sub-customers

You’ll notice a checkbox that says Is sub-customer. QuickBooks Online lets you “nest” related records under the “parent” record. This can be an actual customer, but many people use it to document jobs they’re doing for the customer. So if you’re a contractor, for example, you might have sub-customers like Sun deck and Spa

If you want to set up such a record, enter the job name and click in the box next to Is sub-customer. Two fields will open below that allow you to select the parent customer and to indicate the sub-customer’s billing status. The remainder of the fields will automatically fill in with the parent customer’s contact information.

Graphical user interface, text, application

Description automatically generated

You can set up jobs as sub-customers in QuickBooks Online. 

Supplying Details

When you’re setting up individual customers, you should add as much detail as you possibly can to each record, beyond basic contact information. QuickBooks Online’s record templates display a number of tabs running horizontally across the window. The most important of these are:

  • Tax info. Are the customers taxable or exempt? If taxable, what is his or her Default tax code? (If you haven’t set up sales taxes yet and need to, please let us help. It’s complicated.)
  • Payment and billing. Do they have preferred payment and/or delivery methods? Will you be assigning default payment terms, like Net 30 or Due on receipt? What is their Opening balance? If they’re brand-new customers who have never ordered from you, this will be $0.00. If they’re existing, active customers, enter any outstanding balance they have with you as of the date that you enter. This must be correct, to avoid any problems with the customers’ ongoing balances. Questions? Ask us.

Other tabs here are self-explanatory. When you’ve entered everything you can, click Save. The new record will now appear in the Customers list and will be available to select from the drop-down list in transactions.

There will be times when you have to refer back to these forms to answer questions. By maintaining detailed, accurate customer records, you’ll be ready to respond. If you have questions about any of the information requested, or about other elements of QuickBooks Online that are puzzling you, please contact us so we can set up a consultation.

Should You Charge Late Fees? QuickBooks Can Help

Do you have a lot of aging receivables? Assessing finance charges can speed up customer payments.

Have your customers been submitting payments later than usual these last several months? It wouldn’t be surprising. Many businesses are struggling to pay bills these days. Still, you need to get paid – and on time. Tardy receivables have a negative impact on your own cash flow.

We’ve discussed ways to encourage prompt payment in past columns. For example, you can start accepting credit/debit cards and direct bank transfers, make sure invoices go out immediately after a sale, or offer a premium like a small one-time discount for paying on time 12 months in a row to name a few.

You can also assess finance charges on remittances that come in after the due date. QuickBooks provides the tools to allow this.

Setting It Up

Before you start charging extra for late payments, you’ll need to do some setup work in QuickBooks. Open the Edit menu and select Preferences, then Finance Charge. Click the Company Preferences tab. You’ll see a window like this:

Graphical user interface, text, application

Description automatically generated

You can set your own preferences for assessing finance charges in QuickBooks.

You’ll have to answer these questions and enter your responses in the window:

What will your Annual Interest Rate (%) be?

What will you set as a Minimum Finance Charge?

Will you allow a Grace Period? This is the number of days given to your customers to make their payments after the due date before finance charges kick in. This is typically from 15-21 days.

Where should captured finance charges go? In this example, the Finance Charge Account has been assigned to Other Income

Do you want to Assess finance charges on overdue finance charges? Some jurisdictions don’t allow you to charge interest on overdue interest charges. If you want to do this, check on your local lending laws – specifically state usury laws which may limit the amounts that can be charged.

When will you start to Calculate charges? In this example, the due date is selected. So, QuickBooks will start to add finance charges 21 days after the stated due date. If you choose invoice/billed date, you’ll want to make your grace period longer. This can be rather a confusing concept. Contact us if you want a deeper explanation.

Assessing Finance Charges

There’s one more issue on the Preferences screen that you’ll need to resolve. QuickBooks offers two ways to notify customers about finance charges. You can’t include them on invoices, like you may be used to seeing on credit card bills. Rather, you have to print separate invoices that only contain the finance charges. 

If you put a check in the box in front of Mark finance charge invoices “To be printed,” you can print them out separately. If you leave the box blank, the finance charges will appear on the customer’s next statement. Click OK when you’re done with this window.

Graphical user interface, table

Description automatically generated

QuickBooks can find the overdue invoices that need to have finance charges applied and display them in a window like this one.

Open the Customers menu and select Assess Finance Charges. A window like the one in the image above will open. Make sure that the Assessment Date is the actual date you want to assess charges, which may not be the current date. Click in the Assess column to create a checkmark for every customer you want to charge. When you’re done, click Assess Charges.

When you’re ready to print finance charge invoices, open the File menu and select Print Forms | Invoices to open a window like this:

Graphical user interface, table

Description automatically generated

Invoices with an FC preceding the number are finance charge invoices ready for printing.

Lots to Learn

Besides knowing whether you can charge finance charges on existing finance charges, there are other considerations. For example, do your state’s lending laws allow you to use the phrase “finance charge” or must you use something like “late fee?” When should you assess finance charges? Have you notified your customers of your intent to begin assessing finance charges? This is definitely something they should know in advance. You might need to add this to your customer message on invoices.

We can’t tell you whether finances charges are the path you should take to improve your cash flow as there are many issues to consider. But we can help you with the mechanics of doing so and are here to answer any questions. Let us know if you want to get started using this tool, we can help.

QuickBooks Online’s Mobile App: The Basics

QuickBooks Online is more portable than you may realize.

In this work-from-home world, millions of people are finding it impossible to get away from the “office”. But there may be times when you’re not at home or work when it would be really convenient to have access to your accounting data in QuickBooks Online. 

The site’s free companion apps make that possible. Available for both Android and iOS, the QuickBooks Online mobile app can do many of the things that you’re used to doing on your desktop or laptop. And of course, everything you do on the app is synchronized with your browser-based version, and vice versa. Both versions look and work similarly and offer a user experience that makes your mobile tasks easy to accomplish. 

Here’s a look at what you can do.

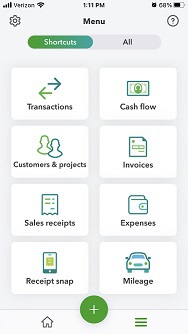
The QuickBooks Online mobile app doesn’t look much like the browser-based version, but it can do many of the same tasks.

Navigation Tools

Once you’ve downloaded the QuickBooks Online mobile app and entered your login credentials from the browser-based version, you’ll see a screen full of shortcuts to the app’s main functions. This is an abbreviated list of what you can actually do, but it takes you to the screens you’ll want to see most often. Click the All tab, and a full set of links for the app opens that includes functions missing from the shortcuts page, like Reports and Products & services. 

Click on the home button in the lower left, and the app opens two more screens. One is a Dashboard that’s similar to the one you see in your browser. It displays charts for profit and loss, invoices, and expenses, as well as a list of your account balances. Click the Activity tab to see a list of the most recent activity. Like most everything on the app, the list is interactive. When you click on an activity, the transaction underlying it opens.

There are two more navigation links at the bottom of the screen. When you want to add a transaction, you can click on the + (plus) sign to open your options there. Click the three horizontal lines to open the Shortcuts page. The gear icon in the upper left takes you to the Settings screen, where you’ll find links to Company Information, Tax Rates, Overdue Invoice Alerts, etc.

Records and Transactions

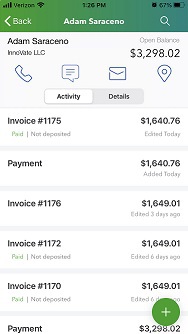
Customer and vendor records are not as detailed as they are on the browser-based site, but they should serve you well for mobile activities. You can toggle between basic contact details and recent activity. There are also icons that allow you to quickly call, text, or email a contact. Product records are not as complete, however you can see each item’s name, description, sale price, tax status, and account and category assignments. You have the ability to edit records and create new ones on the apps.

You can view the data from your browser-based version of QuickBooks Online on the mobile app.

You can also add and edit transactions on the mobile apps, including invoices, estimates, sales receipts, expenses, and invoice payments. These are very thorough. They include the fields you need to bill customers and record purchases. You can even request signatures on estimates, add notes or attachments to invoices, and view a status bar for invoice progress.

Other Features

There are other tasks you can complete on the QuickBooks Online mobile apps. You can snap photos of receipts with your phone. The apps will then upload them to the main site and move some of their data on to the correct fields on forms. You can work with bank deposits, projects, and categories. And you can record mileage for business trips. If you turn on Auto-tracking, the apps will record your mileage as you drive.

There’s one more feature on the app that’s fairly new to QuickBooks Online – so new that it may not have been rolled out to you yet: Cash Flow. This is divided into two sections on the main site, Overview and Planner. The second deals with cash flow projections, which can be a complex concept to understand. We recommend you let us walk you through this tool so you know when it may be wise to take actions that will prevent an impending cash crunch.

Are you experiencing cash flow problems now because of the economic downturn? We can analyze your data and reports in QuickBooks Online and help you come up with a recovery plan, contact us to help you.

10 Tips for Better Budgeting…

…and how QuickBooks Online can help you with the mechanics.

If you already have a budget, it’s probably been difficult for you to stick with it for the last several months. Unless you provide products and/or services that have been in great demand since the  COVID-19 pandemic took hold, you’ve had to adjust your budget significantly.

Better days are ahead, though, and now is a good time to start doing some planning for 2021. While there are still likely to be uncertainties next year, creating a budget will give you a starting point. A budget increases your awareness of all of your projected income and expenses, which may make it less likely that you’ll find yourself constantly running short on funds.

Here are some ways you can make your budgeting process more effective and realistic.

Use what you already know. Unless you’re starting a brand-new business, you already have the best resource possible: a record of your past income and expenses. Use this as the basis for your projections.

Be aware of your sales cycle. Even if you’re not a seasonal business, you’ve probably learned that some months or quarters are better than others. Budget conservatively for the slower months.

Distinguish between essential and non-essential expenses. Enter your budget items for the bills and other expenses that must be covered before you add optional categories. 

You can use data from a previous year to create a new budget in QuickBooks Online.

Keep it simple. Don’t budget down to the last paper clip. You risk budget burnout, and your reports will be unwieldy. 

Build in some backup funding. Just as you’re supposed to have an emergency fund in your personal life, try to create one for your business.

Make your employees part of the process. You shouldn’t be secretive about the expense element of your budget. Try to get input from staff in areas where they have knowledge.

Overestimate your expenses, a little. This can help prevent “borrowing” from one budget category to make up for a shortfall in another.

Consider using excess funds to pay down debt. Debt costs you money. The sooner you pay it off, the sooner you can use those payments for some non-essential items.

Look for areas where you can change vendors.  As you’re creating your budget think carefully about each supplier of products and services. Can you find less costly alternatives?

Revisit your budget frequently. You should evaluate your progress at least once a month. In fact, you could even start by budgeting for only a couple of months at a time. You’ll learn a lot about your spending and sales patterns that you can use for future periods.

How QuickBooks Online Can Help

QuickBooks Online offers built-in tools to help you create a budget. Click the gear icon in the upper right corner and select Budgeting under Tools. Click Add budget. At the top of the screen, give your budget a Name and select the Fiscal Year it should cover from the drop-down list by that field. Choose an Interval (monthly, quarterly, or yearly) and indicate whether you want to Pre-fill data from an existing year. 

QuickBooks Online supplies a budget template that already contains commonly used small business items.

The final field is labeled Subdivide by, which is optional. You can set up budgets that only include selected Customers or Classes, for example. Select the desired divider in that field, then choose who or what you want included in the next. Click Next or Create Budget in the lower right corner (depending on whether you used pre-filled data) to open your budget template. If you subdivided the budget, you’ll see a field marked View budget for. Click the down arrow and select from the options listed there.

To create your budget, you simply enter numbers in the small boxes supplied. Columns are divided by months or quarters, depending on what you specified, and rows are labeled with budget items (Advertising, Gross Receipts, Legal & Professional Fees, etc.). You simply enter numbers in the boxes that apply. When you click in a box, a small arrow appears pointing right. Click on this, and your number will automatically appear in the rest of that row’s boxes. When you’re done, click Save in the lower right. You can edit your budget at any time.

QuickBooks Online provides two related reports. Budget Overview displays all of the data in your budget(s). Budget vs. Actuals shows you how you’re adhering to your budget. 
We know creating a budget can be challenging, but it’s so important – especially right now.  We’d be happy to look at your company’s financial situation and see how QuickBooks’ budgeting tools—and its other accounting features—can help you get a better understanding of your finances.

Still Dealing with 2019 in QBO? Clearing the Way for 2020

If you have a nagging feeling this month that you’re not caught up with your accounting tasks, it’s time to clean up your unfinished 2019 work.

It would be great if you could have closed out 2019 knowing that you were all caught up with your accounting work. You sent all your invoices, paid all your bills, and wrapped everything up with a series of reports and a proverbial bow.

Unfortunately, December rarely goes that way. You’re making last-minute adjustments for your taxes. Dealing with the holiday rush if you’re a retailer. Handling end-of-year employee issues, trying to make your monthly sales quotas, and doing something special to make your customers feel appreciated at this time of year.

On top of your daily accounting work, you’re feeling pressure in December to get a clear picture of your finances for the entire year. Then the holidays hit, and suddenly you’re ringing in the New Year without having had time for that.

Here are five things you can do clean up 2019 and make way for 2020.

1. Create two critical A/R reports: Accounts Receivable Aging Summary and Open Invoices.

This may make you feel both better and worse. On the bright side, you’ll know where you stand in terms of who owes you what and how big the problem is. On the other hand, you may find it disheartening to see how many payments are past due. These reports are easy to find. Click Reports in the left vertical pane and scroll down to Who owes you.

A screenshot of a cell phone

Description automatically generated

The Open Invoices report can show you quickly who’s past due.

Now would be an excellent time, too, to develop some strategies to be proactive and keep your accounts receivable more up to date in 2020. We’d be happy to sit down with you and help you with this difficult task.

2. Create two critical A/P reports: Accounts Payable Aging Summary and Unpaid Bills.

Add “Stay Current with Bills” to your list of 2020 goals. But first, you have to see where you stand right now. Click Reports again and scroll down to What you owe.

Who is responsible for paying bills? If it’s you, maybe it’s time to hand over that task to someone without your managerial responsibilities who can make it a priority.

3. Create statements for all customers who are past due.

Things slip for your customers toward the end of the year, too. Give them a chance to catch up. Their invoices might have gotten lost in the year-end confusion, but you need to get current with your accounts receivable. So, send statements to those in arrears.

Click +New at the top of the left vertical pane, then go to Other | Statement

4. Clean up your customer and vendor lists.

Customers and vendors come and go, but their QuickBooks records are forever unless you do something about them. You can easily make them inactive – after confirming they have no open activity. Click Sales | Customers in the left vertical pane. Click the box in front of customers you want to make inactive and then click Batch actions | Make inactive.

A screenshot of a cell phone

Description automatically generated

Cleaning up your customer and vendor lists will save you time in the future.

5. Always look carefully at your dashboard when you log in.

The block in the upper left corner is the most important here. You can see at a glance how much money you have tied up in unpaid invoices and how much money needs to be deposited. This will help you keep QuickBooks Online cleaned up.

More to Do

There are certainly other things you can do to clean up QuickBooks. For example, if you carry inventory, January is a good time to run the Physical Inventory Worksheet report and make some decisions about where your purchasing emphasis should be in 2020. Need help interpreting your product movement and sales priorities? We can help with that.

Finally, sometime this month—certainly in the first quarter of 2020—let us create the critical standard financial reports (under For my accountant in Reports) that you could actually generate in QuickBooks Online, but which would be difficult for you to analyze. These are the reports you would need if you were going to apply for a loan, for example, or request a business valuation. But the insight they provide can give you a sophisticated overview of your finances.

Have You Explored QuickBooks Online’s New 2019 Features?

Intuit keeps innovating. Here are some of the changes the company introduced for QuickBooks Online in 2019.

Whether you can see them now or not, Intuit added and enhanced a ton of new features in 2019. Some of you may not see all of them until 2020, since the company typically rolls them out slowly.

So, if you’re not in one of the first waves of users, we want you to know what’s coming. It may also be that your version of QuickBooks Online has incorporated the changes, but you just haven’t noticed them. Here’s a rundown of what’s in store for everyone on the horizon.

A new location for the Create button

Previously, you clicked on the +(plus) sign in the upper right corner to open the Create window (invoice, sales receipt, bill, single time activity, etc.). Now, you’ll see a button marked +New in the upper left corner.

Instant Deposits

If you use QuickBooks Online Payments, you’ll be able to have available credit card and bank transfer payments from customers deposited in your bank account within 30 minutes for a 1 percent fee. The funds will be directed to your U.S.-issued Visa or MasterCard debit card.

Mileage Tracker

This is a tool previously found only in QuickBooks Self-Employed, but QuickBooks Online users will now have access to it. It does just what it sounds like: allows you to track business-related mileage so you’ll have a numerical total to enter when you come to that deduction on your income tax return. You can record trips manually by entering starting and ending addresses (or the total miles). Or, if you’re using the QuickBooks Mobile app, you’ll be able to turn on GPS and let your smartphone record the mileage automatically.

A picture containing text, map

Description automatically generated

QuickBooks Online’s Mileage Tracker allows you to record business miles driven manually or automatically and calculates your tax deduction.

New navigation tools in QuickBooks Mobile app

You’ve probably gotten used to navigating from a list of features in the QuickBooks Mobile app. You should soon see an entirely different look for navigation that uses icons representing common tasks (Transactions, Expenses, Mileage, etc.). These will appear when you click on the Shortcuts tab. You’ll find the remaining tools under the All tab.

Health benefit management

QuickBooks Online now allows you to compare, buy, and manage employee health, dental, and vision coverage.

Receipt Capture

Receipts can be the bane of a business owner’s existence. Many still use the “shoebox” method, tossing receipts in a box and entering them when tax time rolls around. Not a particularly elegant solution. Now, you can snap photos of receipts and move them into QuickBooks Online in one of three ways, by:

  • Scanning through the mobile app.
  • Uploading, then dragging and dropping.
  • Forwarding through email.

Receipts are automatically categorized and matched to transactions; if there’s no match, you can create a new transaction. Your receipts appear in the Receipts dashboard under the Banking tab.

Multilingual invoicing

Do you have international customers? If so, you may be able to send them invoices in their native languages. Besides English, QuickBooks Online now supports French, Spanish, Italian, Portuguese (Brazil), and Chinese (traditional).

A close up of a map

Description automatically generated

You can now send invoices to customers in any of six languages.

One-step contractor payments

You can now select trackable details like class, project, and location by making selections from drop-down lists in the contractor payments window.

Next-day deposits

If you’re a QuickBooks Online Payments subscriber, you’ll be able to get next-day access to payments customers have made to you via credit card or ACH. You’ll have to sign up for this service, and fees apply to ACH payments (1 percent of the total deposit, up to $10).

Auto-calculated sales tax

QuickBooks Online has streamlined the process of adding sales tax to sales forms – even if you’re a cash-basis business. After you’ve done some initial setup work, QuickBooks Sales Tax will do the necessary calculations and add sales tax automatically.

Hello, 2020

We hope that 2019 has been a good year for your business, and we wish you the best in 2020. If you’re still struggling to use QuickBooks Online to maximize productivity and make better business decisions, remember that we’re here to help. We can also advise you on any of the new features Intuit has introduced. Contact us anytime to set up a consultation.